


Introducing SQL Anywhere Studio
Tutorial: Designing Databases with PowerDesigner
In PowerDesigner, models that depict the physical components of your database design, including tables and columns, are called Physical Data Models (PDM). PowerDesigner stores these in files with the extension .PDM.
To save the physical data model (PDM)
Choose File
Type a file name with the extension .PDM and select a location.
Click OK.
You can use PowerDesigner to generate a SQL script that implements all the components of your model. You can then use the SQL script to generate a database.
To generate a SQL script to create your new database
Choose Database
The Database Generation dialog appears:
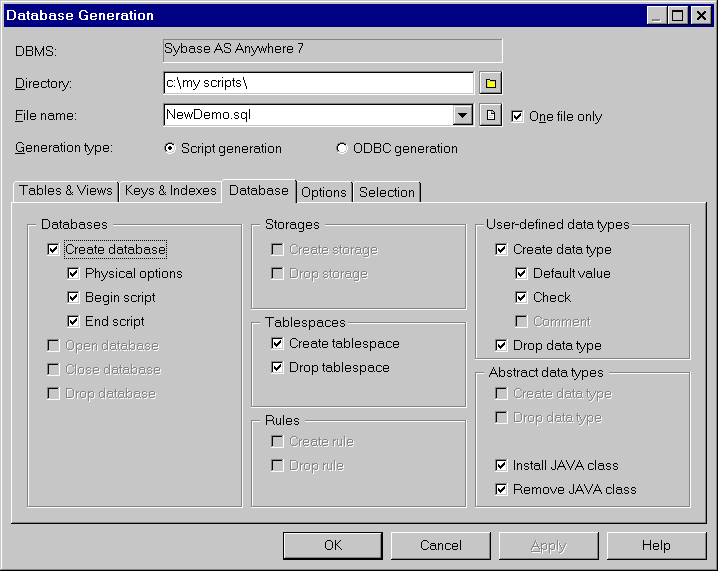
Type NewDemo.SQL in the File Name box and choose a convenient directory.
Ensure that Script Generation is selected.
Click the Database tab, and ensure that Create Database is selected.
Explore the other tabs to observe options that give you control over many other properties of the generated script.
Click OK.
When the script is created, the Result dialog appears.
Click Edit to view the script.
Check that your changes are reflected in the script. For example, the definition of the new office table appears below.
/* ========================================= */
/*   Table: office                           */
/* ========================================= */
create table office
(
   id            integer         not null
      default autoincrement
      check (
         id >= 100),
   name          char(15)        not null,
   street        char(30)        not null,
   city          char(20)        not null,
   state         char(2)         not null,
   zip           char(5)         not null,
   phone         char(10)                ,
   fax           char(10)                ,
   primary key (id)
);
When you are finished, close the dialog: in the Result dialog, click Close.
You can now create your new database from Interactive SQL.
To create the new database
Start Interactive SQL.
Connect to the sample database. You can use the same ODBC connection.
Create an empty database:
Execute the following SQL statement, substituting any convenient directory.
CREATE DATABASE 'c:\\My Scripts\\newdemo.db'
TipTo execute a SQL statement in Interactive SQL, type or copy the statement in the SQL Statements pane, and then press F5, or choose SQL |
Close the connection to the sample database by clicking SQL
Connect to the new database by clicking SQL
Enter DBA as the User ID
Enter SQL as the Password
Click the Database tab, and in the Database File box, enter the full path and file name of the new database file.
Click OK.
Use the read statement. Remember that this statement demands that you enclose the file name in double quotes.
Execute the SQL statement:
READ "c:\\My Scripts\\newdemo.SQL"
You can use these basic steps to modify other databases.