

UltraLite.NET User's Guide
Tutorial: Visual Studio Application
The first step is to set up a new Visual Studio application. You also need to create a schema from which to generate your database.
Create a new project in Visual Studio
Create a Visual Studio project to hold your work:
From the Visual Studio .NET 2003 File menu, choose New
Select either a Visual Basic Smart Device Application or a Visual C# Smart Device Application and name your project VBapp or CSapp, depending on whether you've selected a Visual Basic or C# project.
Enter a Location of c:\tutorial\uldotnet and click OK. The Smart Device Application Wizard appears.
Choose Pocket PC as the target platform, and select Windows Application as the project type. Click OK. A Design workspace appears, displaying a form.
Add references to your project:
From the Project menu, choose Add References. The Add Reference window appears.
Select iAnywhere.UltraLite from the components listed. Click Select to add it to the list of selected components and click OK.
If UltraLite.NET does not appear in the list, click Browse and locate it in the ultralite\UltraLite.NET\ce subdirectory of your SQL Anywhere installation. Select iAnywhere.UltraLite.dll and click Open.
Alternatively, open a command prompt and browse to the ultralite\UltraLite.NET\ce subdirectory of your SQL Anywhere installation. Run install.btm. For usage, type the following command:
install ?
Click Project
Click Project
Open the folder corresponding to the processor of the CE device you are using (for the Pocket PC emulator, open the x86 folder) and select ulnet9.dll. Click on the arrow on the Open button and select Link File to link it to your project.
Create a form for your application.
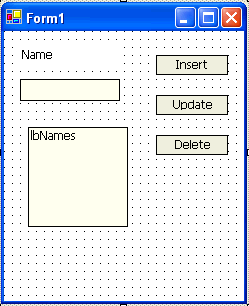
Open Form1, and add the following components to it:
| Type | Name | Text |
|---|---|---|
| Button | btnInsert | Insert |
| Button | btnUpdate | Update |
| Button | btnDelete | Delete |
| TextBox | txtName | |
| ListBox | lbNames | |
| Label | laName | Name: |
Your form should look like this:

You are now ready to move to the next lesson.


