|
|
|
|
|
|
|
|
|
|
|
|
| |
The conversion from the SwingUI.java
program for Lesson 4 to the FileIO.java
program for this lesson primarily involves
the Constructor and Instance Variable ChangesAJTextfield instance variable is added to
the class so the constructor can instantiate the object
and the actionPerformed method can access the text
the end user types into it.
The
The
//Instance variable for text field
JTextField textField;
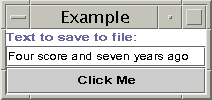
FileIO(){
text = new JLabel("Text to save to file:");
clicked = new
JLabel("Text retrieved from file:");
button = new JButton("Click Me");
button.addActionListener(this);
clickButton = new JButton("Click Again");
clickButton.addActionListener(this);
//Text field instantiation
textField = new JTextField(20);
panel = new JPanel();
panel.setLayout(new BorderLayout());
panel.setBackground(Color.white);
getContentPane().add(panel);
//Adjustments to layout to add text field
panel.add("North", text);
panel.add("Center", textField);
panel.add("South", button);
}
Method ChangesTheactionPerformed method uses the
FileInputStream and FileOutputStream
classes to read data from and write data to a file.
These classes handle data in byte streams, as opposed to
character streams, which are shown in the applet
example. A more detailed explanation of the changes to the
method implementation follows the code.
public void actionPerformed(
ActionEvent event){
Object source = event.getSource();
if(source == button){
//Variable to display text read from file
String s = null;
if(_clickMeMode){
try{
//Code to write to file
String text = textField.getText();
byte b[] = text.getBytes();
String outputFileName =
System.getProperty("user.home",
File.separatorChar + "home" +
File.separatorChar + "monicap") +
File.separatorChar + "text.txt";
File outputFile = new File(outputFileName);
FileOutputStream out = new
FileOutputStream(outputFile);
out.write(b);
out.close();
//Code to read from file
String inputFileName =
System.getProperty("user.home",
File.separatorChar + "home" +
File.separatorChar + "monicap") +
File.separatorChar + "text.txt";
File inputFile = new File(inputFileName);
FileInputStream in = new
FileInputStream(inputFile);
byte bt[] = new
byte[(int)inputFile.length()];
in.read(bt);
s = new String(bt);
in.close();
}catch(java.io.IOException e){
System.out.println("Cannot access text.txt");
}
//Clear text field
textField.setText("");
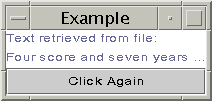
//Display text read from file
text.setText("Text retrieved from file:");
textField.setText(s);
button.setText("Click Again");
_clickMeMode = false;
} else {
//Save text to file
text.setText("Text to save to file:");
textField.setText("");
button.setText("Click Me");
_clickMeMode = true;
}
}
}
To write the end user text to a file, the text is retrieved from the
   String text = textField.getText();
   byte b[] = text.getBytes();
Next, a
      String outputFileName =
                System.getProperty("user.home",
        File.separatorChar + "home" +
        File.separatorChar + "monicap") +
        File.separatorChar + "text.txt";
        File outputFile = new File(outputFileName);
        FileOutputStream out = new
                FileOutputStream(outputFile);
Finally, the FileOutputStream object writes the byte
array to the File object and closes the output stream
when the operation completes.
   out.write(b);
   out.close();
The code to open a file for reading is similar. To read text from a file, a File object is created
and used to create a FileInputStream object.
      String inputFileName =
                System.getProperty("user.home",
        File.separatorChar + "home" +
        File.separatorChar + "monicap") +
        File.separatorChar + "text.txt";
        File inputFile = new File(inputFileName);
        FileInputStream out = new
                FileInputStream(inputFile);
Next, a byte array is created the same size as
the file into which the file contents are read.
   byte bt[] = new byte[(int)inputFile.length()];
   in.read(bt);
Finally, the byte array is used to construct a String
object, which is used to create the text for the label
component. The FileInputStream is closed when the
operation completes.
   String s = new String(bt);
   label.setText(s);
   in.close();
System PropertiesThe above code used a call toSystem.getProperty
to create the pathname to the file in the user's home
directory. The System class maintains a set of
properties that define attributes of the current working
environment. When the Java platform starts, system properties
are initialized with information about the runtime
environment including the current user, Java platform
version, and the character used to separate components of a
file name (File.separatorChar).
The call to File.separatorCharThe above code used thejava.io.File.separatorChar
variable to construct the directory pathname. This variable
is initialized to contain the file separator value stored
in the file.separator system property and gives
you a way to construct platform-independent pathnames.
For example, the pathname Exception HandlingAn exception is a class that descends from eitherjava.lang.Exception or
java.lang.RuntimeException that defines mild
error conditions your program might encounter. Rather
than letting the program terminate, you can write code to
handle exceptions and continue program execution.
Checked exceptions descend from
In the example, the
However, the
  public int aComputationMethod(int number1,
	int number2)
	throws IllegalValueException{
     //Body of method
   }
When you catch exceptions in your code, you should handle them
in a way that is friendly to your end users. The exception
and error classes have a You can provide your own application-specific error text to print to the command line, or display a dialog box with application-specific error text. Using application-specific error text that you provide will also make it much easier to internationalize the application later on because you will have access to the text. For the example programs in this lesson, the error message for the file input and output is handled with application-specific error text that prints at the command line as follows:
//Do this during development
  }catch(java.io.IOException e){
   System.out.println(e.toString());
   System.out.println(e.printStackTrace());
  }

//But deploy it like this
  }catch(java.io.IOException e){
   System.out.println("Cannot access text.txt");
  }
If you want to make your code even more user friendly, you
could separate the write and read operations and
provide two try and catch
blocks. The error text for the read operation could
be Cannot read text.txt, and the error text for
the write operation could be Cannot write text.txt.
As an exercise, change the code to handle the read and write operations separately. Give it a try before peeking at the solution. File Access by AppletsThe file access code for the FileIOAppl.java code is equivalent to the FileIO.java application, but shows how to use the APIs for handling data in character streams instead of byte streams. You can use either approach in applets or applications. In this lesson, the choice to handle data in bytes streams in the application and in character streams in the applet is purely random. In real-life programs, you would base the decision on your specific application requirements.
The changes to instance variables and the
public void actionPerformed(ActionEvent event){
  Object source = event.getSource();
  if(source == button){
//Variable to display text read from file
    String s = null;
    if(_clickMeMode){
      try{
//Code to write to file
        String text = textField.getText();
        String outputFileName =
                System.getProperty("user.home",
          File.separatorChar + "home" +
          File.separatorChar + "monicap") +
          File.separatorChar + "text.txt";
          File outputFile = new File(outputFileName);
          FileWriter out = new
                FileWriter(outputFile);
        out.write(text);
        out.close();
//Code to read from file
        String inputFileName =
                System.getProperty("user.home",
          File.separatorChar + "home" +
          File.separatorChar + "monicap") +
          File.separatorChar + "text.txt";
        File inputFile = new File(inputFileName);
        FileReader in = new FileReader(inputFile);
        char c[] = new
	char[(char)inputFile.length()];
        in.read(c);
        s = new String(c);
        in.close();
      }catch(java.io.IOException e){
       System.out.println("Cannot access text.txt");
      }
//Clear text field
      textField.setText("");
//Display text read from file
      text.setText("Text retrieved from file:");
      textField.setText(s);
      button.setText("Click Again");
      _clickMeMode = false;
    } else {
//Save text to file
      text.setText("Text to save to file:");
      textField.setText("");
      button.setText("Click Me");
      _clickMeMode = true;
    }
  }
}
Granting Applets PermissionIf you tried to run the applet example, you undoubtedly saw errors when you clicked theClick Me button. This is
because the Java 2 Platform security does not permit an applet
to write to and read from files without explicit permission.
An applet has no access to local system resources unless it
is specifically granted the access. So for the Access permission is granted with a policy file, and appletviewer is launched with the policy file to be used for the applet being viewed. Creating a Policy FilePolicy tool is a Java 2 Platform security tool for creating policy files. The Java Tutorial trail on Controlling Applets explains how to use Policy Tool in good detail. Here is the policy file you need to run the applet. You can use Policy tool to create it or copy the text below into an ASCII file.
grant {
  permission java.util.PropertyPermission
	"user.home", "read";
  permission java.io.FilePermission
	"${user.home}/text.txt", "read,write";
};
Running an Applet with a Policy FileAssuming the policy file is namedpolfile and
is in the same directory with an HTML file named
fileIO.html that contains the HTML
to run the FileIOAppl applet, you would run the
application in appletviewer like this:
appletviewer -J-Djava.security.policy=polfile fileIO.html Here is the fileIO.html file for running the FileIOAppl
applet:
<HTML>
<BODY>

<APPLET CODE=FileIOAppl.class WIDTH=200 HEIGHT=100>
</APPLET>

</BODY>
</HTML>
Restricting ApplicationsYou can use the default security manager and a policy file to restrict the application's access as follows.
java -Djava.security.manager
     -Djava.security.policy=apppolfile  FileIO
Because the application runs within the security manager, which disallows
all access, the policy file needs two additional permissions. One so
the security manager can access the event queue and load the user interface
components, and another so the application does not display
the banner warning that its window was created by another
program (the security manager).
grant {
  permission java.awt.AWTPermission
	"accessEventQueue";
  permission java.awt.AWTPermission
	"showWindowWithoutWarningBanner";

  permission java.util.PropertyPermission
	"user.home", "read";
  permission java.io.FilePermission
	"${user.home}/text.txt", "read,write";
};
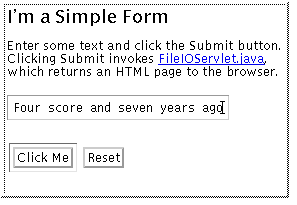
File Access by ServletsAlthough servlets are invoked from a browser, they are under the security policy in force for the web server under which they run. When file input and output code is added toExampServlet.java
from Lesson 5, FileIOServlet
for this lesson executes without restriction under Java WebServerTM 1.1.1.
import java.io.*;
import javax.servlet.*;
import javax.servlet.http.*;
public class FileIOServlet extends HttpServlet {
public void doPost(HttpServletRequest request,
HttpServletResponse response)
throws ServletException, IOException
{
response.setContentType("text/html");
PrintWriter out = response.getWriter();
out.println("<title>Example<title>" +
"<body bgcolor=FFFFFF>");
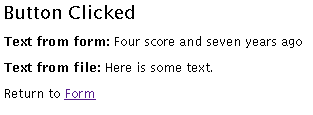
out.println("<h2>Button Clicked</h2>");
String DATA = request.getParameter("DATA");
if(DATA != null){
out.println("<STRONG>Text from
form:</STRONG>");
out.println(DATA);
} else {
out.println("No text entered.");
}
try{
//Code to write to file
String outputFileName=
System.getProperty("user.home",
File.separatorChar + "home" +
File.separatorChar + "monicap") +
File.separatorChar + "text.txt";
File outputFile = new File(outputFileName);
FileWriter fout = new FileWriter(outputFile);
fout.write(DATA);
fout.close();
//Code to read from file
String inputFileName =
System.getProperty("user.home",
File.separatorChar + "home" +
File.separatorChar + "monicap") +
File.separatorChar + "text.txt";
File inputFile = new File(inputFileName);
FileReader fin = new
FileReader(inputFile);
char c[] = new
char[(char)inputFile.length()];
int i;
i = fin.read(c);
String s = new String(c);
out.println("<P>
<STRONG>Text from file:</STRONG>");
out.println(s);
fin.close();
}catch(java.io.IOException e){
System.out.println("Cannot access text.txt");
}
out.println("<P>Return to
<A HREF="../simpleHTML.html">Form</A>");
out.close();
}
}
AppendingSo far the examples have shown you how to read in and write out streams of data in their entirety. But often, you want to append data to an existing file or read in only certain amounts. Using the RandomAccessFile class, alter the FileIO.java class to append to the file.Give it a try before taking a peek at the Solution. More InformationFor more infomation on file input and output, see the Reading and Writing trail in The Java Tutorial.You can learn more about component sizing in The Java Tutorial sections on Solving Common Layout Problems and Layout Management. [TOP] |
 The file input and output code in the