JavaTM Programming Language Basics, Part 2
Lesson 2: User Interfaces Revisited
[<<BACK] [CONTENTS] [NEXT>>]
In JavaTM Programming Language Basics, Part 1,
you learned how to use Java Foundation Classes (JFC) Project Swing (Project Swing)
components to build a simple user interface with very basic backend
functionality. You also learned how to use the Remote Method Invocation
(RMI) application programming interface (API) to send data from a client program
to a server program on the net where the data can be accessed by other
client programs.
This lesson takes the RMI application from
Part 1, Lesson 8: Remote Method Invocation, creates a more involved user
interface, and uses a different layout manager. These changes give you
the beginnings of a very simple electronic-commerce application that
consists of two types of client programs: one lets end users place
purchase orders and the other lets order processors view the orders.
About the Example
This is a very simple electronic commerce example for instructional
purposes only. It consists of three programs: two client programs, one
for ordering fruit and another for viewing the order, and one
server program that makes order information available to clients that
view the orders.
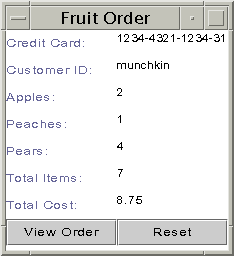
Fruit Order Client
The FruitClient program
presents a user interface and prompts the end user to order
apples, peaches, and pears at $1.25 each.
 After the end user
enters the number of each item to order, he or she presses the Return key
to commit the order and update the running total.
After the end user
enters the number of each item to order, he or she presses the Return key
to commit the order and update the running total.
The Tab key or mouse moves the cursor to the next field. At the bottom,
the end user provides a credit card number and customer ID.
When the end user clicks Purchase, all values entered
into the form are sent to the server program.
The end user must press the Return key for the total to update. If the
Return key is not pressed, an incorrect total is sent across the net
with the order.
The end of this lesson asks you to change the code so
there is no danger incorrect totals are sent across the net because
the end user did not press the Return key.
Server Program
The RemoteServer program
provides remotely accessible send and get
methods. Fruit order clients call send methods to
send data to the server, and view order clients call the
get methods to retrieve the data. In this example, the
server program has no user interface.
View Order Client
The OrderClient program presents
a user interface, and when the end user clicks View Order,
the program gets the order data from the server program and
puts it on the screen.
Compile and Run the Example
See
Part 1, Lesson 8: Remote Method Invocation,
for information on how to run the example. Use the Part 1, Lesson
8 instructions, but use the source code provided in this lesson.
Here is a summarized version of those steps:
Compile:
These instructions assume development is in
the zelda home directory.
Unix:
cd /home/zelda/classes
javac Send.java
javac RemoteServer.java
javac RMIClient2.java
javac RMIClient1.java
rmic -d . RemoteServer
cp RemoteServer*.class /home/zelda/public_html/classes
cp Send.class /home/zelda/public_html/classes
Win32:
cd \home\zelda\classes
javac Send.java
javac RemoteServer.java
javac RMIClient2.java
javac RMIClient1.java
rmic -d . RemoteServer
copy RemoteServer*.class \home\zelda\public_html\classes
copy Send.class \home\zelda\public_html\classes
Start rmi Registry:
Unix:
cd /home/zelda/public_html/classes
unsetenv CLASSPATH
rmiregistry &
Win32:
cd \home\zelda\public_html\classes
set CLASSPATH=
start rmiregistry
Start Remote Server:
Unix:
cd /home/zelda/public_html/classes
java
-Djava.rmi.server.codebase=http://kq6py/~zelda/classes
-Djava.rmi.server.hostname=kq6py.eng.sun.com
-Djava.security.policy=java.policy RemoteServer
Win32:
cd \home\zelda\public_html\classes
java -Djava.rmi.server.codebase=
  file:c:\home\zelda\public_html\classes
-Djava.rmi.server.hostname=kq6py.eng.sun.com
-Djava.security.policy=java.policy RemoteServer
Start RMIClient1:
Unix:
cd /home/zelda/classes

java -Djava.rmi.server.codebase=
  http://kq6py/~zelda/classes/
-Djava.security.policy=java.policy RMIClient1
  kq6py.eng.sun.com/~zelda
Win32:
cd \home\zeldzeldaa\classes

java -Djava.rmi.server.codebase=
  file:c:\home\zelda\classes\
-Djava.security.policy=java.policy RMIClient1
kq6py.eng.sun.com\home\zelda\public\html
Start RMIClient2:
Unix:
cd /home/zelda/classes
java -Djava.rmi.server.codebase=
  http://kq6py/~zelda/classes
-Djava.rmi.server.hostname=kq6py.eng.sun.com
-Djava.security.policy=java.policy RMIClient2
  kq6py.eng.sun.com
Win32:
cd \home\zelda\classes
java -Djava.rmi.server.codebase=
  file:c:\home\zelda\public_html\classes
-Djava.rmi.server.hostname=kq6py.eng.sun.com
-Djava.security.policy=java.policy RMIClient2
  kq6py.eng.sun.com
Fruit Order Client Code
The RMIClient1.java code
uses label, text field, text area, and button components to create the
user interface for ordering fruit.
On the display, user interface components are arranged in a 2-column
grid with labels in the left column, and the input and output data
fields (text fields and text
areas) aligned in the right column.
The end user enters his or her apples, peaches, and pears
order into the text fields and presses the Return key
after each fruit entry. When the Return key is pressed, the text
field behavior updates the item and cost totals displayed in
the text areas.
The Reset button behavior clears the display, and
the underlying total cost and items variables. The
Purchase button
behavior sends the order data to the server program.
If the Reset button is clicked before
the Purchase button, null
values are sent over the network.
Instance Variables
These next lines declare the Project Swing component classes
the SwingUI class uses. These are instance variables
that can be accessed by any method in the instantiated class.
In this example, they are built in the SwingUI
constructor and accessed in the actionPerformed method
implementation.
  JLabel col1, col2;
  JLabel totalItems, totalCost;
  JLabel cardNum, custID;
  JLabel applechk, pearchk, peachchk;

  JButton purchase, reset;
  JPanel panel;

  JTextField appleqnt, pearqnt, peachqnt;
  JTextField creditCard, customer;
  JTextArea items, cost;

  static Send send;
  int itotal=0;
  double icost=0;
Constructor
The constructor is fairly long because it creates all
the components, sets the layout to a 2-column grid, and places
the components in the grid on a panel. A panel is a container
component that holds other components.
The Reset and Purchase
buttons and the appleQnt, pearQnt,
and peachQnt text fields are added as
action listeners. This means when the end user
clicks one of the buttons or presses Return in one of
the text fields, an action event occurs that causes the platform
to call the FruitClient.actionPerformed method
where the behaviors for these components are defined.
As explained in Part1, Lesson 4: Building a User
Interface,
a class declares the ActionListener
interface and implements the actionPerformed method
if it needs to handle action events such as button clicks and text
field Returns. Other user interface components generate some
different action events, and as a result, require you to implement
different interfaces and methods.
//Create left and right column labels
col1 = new JLabel("Select Items");
col2 = new JLabel("Specify Quantity");

//Create labels and text field components
applechk = new JLabel("   Apples");
appleqnt = new JTextField();
appleqnt.addActionListener(this);

pearchk = new JLabel("   Pears");
pearqnt = new JTextField();
pearqnt.addActionListener(this);

peachchk = new JLabel("   Peaches");
peachqnt = new JTextField();
peachqnt.addActionListener(this);

cardNum = new JLabel("   Credit Card:");
creditCard = new JTextField();

customer = new JTextField();
custID = new JLabel("   Customer ID:");

//Create labels and text area components
totalItems = new JLabel("Total Items:");
totalCost = new JLabel("Total Cost:");
items = new JTextArea();
cost = new JTextArea();

//Create buttons and make action listeners
purchase = new JButton("Purchase");
purchase.addActionListener(this);

reset = new JButton("Reset");
reset.addActionListener(this);
In the next lines, a JPanel component is created and
added to the top-level frame, and the layout manager and background
color for the panel are specified. The layout manager determines
how user interface components are arranged on the panel.
The example in
Part 1, Lesson 4: Building a User Interface,
used the BorderLayout layout manager. This example uses the
GridLayout layout manager, which arranges components
in a grid or the number of rows and columns you specify. The
example uses a 2-column grid with an unlimited number of rows
as indicated by the zero (unlimited rows) and
two (two columns) in the statement
panel.setLayout(new GridLayout(0,2));.
The layout manager and color are set on the panel, and
the panel is added to the content pane with a call to the
getContentPane method of the JFrame
class. A content pane lets different types of
components work together in Project Swing.
//Create a panel for the components
  panel = new JPanel();

//Set panel layout to 2-column grid
//on a white background
  panel.setLayout(new GridLayout(0,2));
  panel.setBackground(Color.white);

//Add components to panel columns
//going left to right and top to bottom
  getContentPane().add(panel);
  panel.add(col1);
  panel.add(col2);

  panel.add(applechk);
  panel.add(appleqnt);

  panel.add(peachchk);
  panel.add(peachqnt);

  panel.add(pearchk);
  panel.add(pearqnt);

  panel.add(totalItems);
  panel.add(items);

  panel.add(totalCost);
  panel.add(cost);

  panel.add(cardNum);
  panel.add(creditCard);

  panel.add(custID);
  panel.add(customer);

  panel.add(reset);
  panel.add(purchase);
Event Handling
The actionPerformed method provides behavior
for each of the following possible application events:
- The mouse is clicked on the
Purchase or
Reset button.
- The Return key is pressed inside the
appleQnt,
peachQnt, or pearQnt field.
Rather than show the entire actionPerformed
method here, this section describes the purchase
button and pearQnt text field behaviors only.
The Reset button is similar to the purchase
button, and the other text fields are similar to pearQnt.
Purchase Button: The Purchase
button behavior involves retrieving data from the text fields
and text areas, and sending that data to the server program.
The server program is available to the FruitClient
program through its
Send interface, which declares the remote
server methods for sending and getting data.
The send variable is an instance of the
Send interface. This instance is created in the
FruitClient program's main method.
The send variable is
declared static and global in the
FruitClient program so the static main
method can instantiate it, and to make it accessible to the
actionPerformed method.
if(source == purchase){
  cardnum = creditCard.getText();
  custID = customer.getText();
  apples = appleqnt.getText();
  peaches = peachqnt.getText();
  pears = pearqnt.getText();
  try{
     send.sendCreditCard(cardnum);
     send.sendCustID(custID);
     send.sendAppleQnt(apples);
     send.sendPeachQnt(peaches);
     send.sendPearQnt(pears);
     send.sendTotalCost(icost);
     send.sendTotalItems(itotal);
  } catch (Exception e) {
     System.out.println("Cannot send data to server");
  }
}
pearQnt Text Field: The pearQnt
text field behavior involves retrieving the number of pears
the end user wants to order, adding the number to the items
total, using the number to calculate the cost, and adding
the cost for pears to the total cost. Two interesting things
in this code involve managing the cursor focus and
converting strings to numbers for the calculations.
Both topics are covered below.
if(source == pearqnt){
  number = pearqnt.getText();
  if(number.length() > 0){
    pearsNo = Integer.valueOf(number);
    itotal += pearsNo.intValue();
    pearqnt.setNextFocusableComponent(creditCard);
  } else {
    itotal += 0;
    pearqnt.setNextFocusableComponent(creditCard);
  }
}
Cursor Focus
End users can use the Tab key to move the cursor from
one component to another within the user interface. The
default Tab key movement steps through all user interface
components including the text areas.
Because the end user does not interact with the text areas, there is
no reason for the cursor to go there. The example program includes a
call in its constructor to pearqnt.setNextFocusableComponent
to make the cursor move from the pearqnt text field
to the creditcard text field bypassing the total
cost and total items text areas when the Tab key is pressed.
  applechk = new JLabel("   Apples");
  appleqnt = new JTextField();
  appleqnt.addActionListener(this);

  pearchk = new JLabel("   Pears");
  pearqnt = new JTextField();
  pearqnt.addActionListener(this);

  peachchk = new JLabel("   Peaches");
  peachqnt = new JTextField();
  peachqnt.addActionListener(this);

  cardNum = new JLabel("   Credit Card:");
  creditCard = new JTextField();
//Make cursor go to creditCard component
  pearqnt.setNextFocusableComponent(creditCard);

  customer = new JTextField();
  custID = new JLabel("   Customer ID:");
Converting Strings to Numbers and Back
To calculate the items ordered and their cost, the
string values retrieved from the appleQnt,
peachQnt, and pearQnt text
fields have to be converted to their number equivalents.
The string value is returned in the number variable.
To be sure the user actually entered a value, the string length
is checked. If the length is not greater than zero, the end
user pressed Return without entering a value. In this
case, the else statement adds zero to
the running total and the cursor focus is set for the
creditCard text field. Adding zero is not
really necessary, but does make the code more understandable
for someone reading it.
If the length is greater than zero, an instance of the
java.lang.Integer class is created from the string.
Next, the Integer.intValue() method is called to
produce the integer (int) equivalent of the string
value so it can be added to the items total kept in the
itotal integer variable.
if(number.length() > 0){
  pearsNo = Integer.valueOf(number);
  itotal += pearsNo.intValue();
} else {
  itotal += 0;
}
To display the running item and cost totals in their
respective text areas, the totals have to be converted
back to strings. The code at the end of the
actionPerformed method shown below does this.
To display the total items, a
java.lang.Integer object is created
from the itotal integer variable.
The Integer.toString method is called
to produce the String equivalent of the
integer (int). This string is passed to
the call to this.cost.setText(text2)
to update the Total Cost field in the display.
Note:
The cost text area variable is referenced as
this.cost because the actionPerformed
method also has a cost variable of type
Double. To reference the global text area and not
the local Double by the same name, you have
to reference it as this.cost.
  num = new Integer(itotal);
  text = num.toString();
  this.items.setText(text);

  icost = (itotal * 1.25);
  cost = new Double(icost);
  text2 = cost.toString();
  this.cost.setText(text2);
Until now, all data types used in the examples have been classes.
But, the int and double data types
are not classes. They are primitive data types.
The int data type contains a
single whole 32-bit integer value that can be positive or negative. You
can use the standard arithmetic operators (+, -, *, and /) to
perform arithmetic operations on the integer.
The Integer class,
not only contains a whole 32-bit integer value that can be positive or
negative, but provides methods for working on the value. For
example, the Integer.intValue method lets you
convert an Integer to an int to
perform arithmetic operations.
The double data type contains a 64-bit double-precision
floating point value. The Double class not only contains
a 64-bit double-precision floating point value, but provides
methods for working on the value. for example, the
Double.doubleValue method lets you convert a Double
to a double to perform arithmetic operations.
Server Program Code
The server program consists of the
RemoteServer.java class
that implements the methods declared in the
Send.java interface. These classes
are described in
Part 1, Lesson 8: Remote Method Invocation with the only
difference being in this lesson there are many more
sendXXX and getXXX methods
to declare and implement. Here is the list:
- public void sendCreditCard(String creditcard){cardnum = creditcard;}
- public String getCreditCard(){return cardnum;}
- public void sendCustID(String cust){custID = cust;}
- public String getCustID(){return custID;}
- public void sendAppleQnt(String apps){apples = apps;}
- public String getAppleQnt(){return apples;}
- public void sendPeachQnt(String pchs){ peaches = pchs;}
- public String getPeachQnt(){return peaches;}
- public void sendPearQnt(String prs){pears = prs;}
- public String getPearQnt(){return pears;}
- public void sendTotalCost(double cst){cost = cst;}
- public double getTotalCost(){return cost; }
- public void sendTotalItems(int itm){items = itm;}
- public int getTotalItems(){return items;}
The important thing to note is data of any type and
size can be easily passed from one client through the server
to another client using the RMI API. No special handling is
needed for large amounts of data or special considerations for
different data types, which can sometimes be issues when using
socket communications.
View Order Client Code
The OrderClient.java
class uses text areas and buttons to display the order information.
The code is very similar to the FruitOrder.java
class so rather than repeat much of what you have read above,
this section highlights two parts of the actionPerformed
method behavior for viewing an order.
The first part retrieves the credit card number, and the number
of apples, peaches, and pears ordered from the server and sets those
values in the corresponding text areas.
The second part retrieves the cost and item totals, which
are double and integer, respectively.
It then converts the total cost to a
java.lang.Double object, and the total items to a
java.lang.Integer object, and
calls the toString method on each to get the
string equivalents. Finally, the strings can be used to
set the values for the corresponding text areas.
if(source == view){
 try{
//Retrieve and display text
  text = send.getCreditCard();
  creditNo.setText(text);

  text = send.getCustID();
  customerNo.setText(text);

  text = send.getAppleQnt();
  applesNo.setText(text);

  text = send.getPeachQnt();
  peachesNo.setText(text);

  text = send.getPearQnt();
  pearsNo.setText(text);

//Convert Numbers to Strings
  cost = send.getTotalCost();
  price = new Double(cost);
  unit = price.toString();
  icost.setText(unit);

  items = send.getTotalItems();
  itms = new Integer(items);
  i = itms.toString();
  itotal.setText(i);

 } catch (Exception e) {
  System.out.println("Cannot send data to server");
 }
}
Program Improvements
The example program as it is currently written has two
major design flaws in the fruit order client. The first
one involves the need to press the Return key for
calculations to happen, and the second involves handling
the error condition if the end user enters a character
that is not a number when ordering apples, peaches, and
pears.
Calculations and Pressing Return:
If the end user enters a value for apples, peaches, or pears
and moves to the next field without pressing the Return
key, no calculation is made. This means when the
end user clicks the Purchase key, the order is sent, but
the item and cost totals will be incorrect.
So, in this particular application relying on the
Return key action event is not good design.
Modify the actionPerformed method so this
does not happen. Here is one possible
solution.
Give it a try before taking a look.
Non-Number Errors:
If the end user enters a non-number value for
apples, peaches, or pears the program will
present a stack trace indicating an illegal number
format. A good program will catch and handle
the error, rather than produce a stack trace.
Hint:
You need to figure out
which part of the code throws the error and
enclose it in a try and catch
block. try and catch
blocks were first introduced in
Part 1, Lesson 6: File Access and Permissions.
The error you need to catch is
java.lang.NumberFormatException.
Give it a try before taking a look at the
solution.
More Information
You can find more information on
event listening in the
Writing Event Listeners lesson in
The Java
Tutorial.
The
Variables
and Data Types trail in
The Java Tutorial
provides more information on primitive data types.
See
The JFC Swing
Tutorial: A Guide to Constructing GUIs for more information
on Project Swing.
*As used on this web site, the terms "Java virtual machine"
or "JVM" mean a virtual machine for the Java platform.
[TOP]
