|
The JavaTM 2 platform java.awt.print package lets you
print anything that can be rendered to a Graphics or
Graphics2D context — including AWT
components, Java Foundation Classes (JFC) Project Swing
(Project Swing) components, and 2D graphics.
The Printing API is easy to use. Your application
tells the printing system what to print, and the printing system
determines when each page is rendered. This callback
printing model enables printing support on a wide range
of printers and systems. The callback model also lets users print to a
bitmap printer from a computer that does not have enough memory
or disk space to hold the bitmap for an entire page.
A graphics context lets a program paint to a rendering device such
as a screen, printer, or offscreen image. Because Swing components are rendered
through a Graphics object using AWT graphics support, it is easy to
print Swing components with the new printing API. However, AWT components are not
rendered to a graphics device, so you must extend the AWT component class and
implement the AWT component paint method.
What is in the Package?
The java.awt.print consists of the following interfaces,
classes, and exceptions. Here is where you can view the
API
specification.
- Interfaces
- Pageable
- Printable
- PrinterGraphics
- Classes
- Book
- PageFormat
- Paper
- PrinterJob
- Exceptions
- PrinterAbortException
- PrinterException
- PrinterIOException
Printing an AWT Component
 The printbutton.java
application displays a panel with MyButton on it. When
you click the button, the application prints the MyButton
component.
In the code, the Button class is extended to implement Printable
and includes the paint and print method
implementations. The print method is required because
the class implements Printable, and the paint
method is needed to describe how the button shape and
label text looks when printed.
To see the button, the printer graphics context is translated
into the imageable area of the printer, and to see the label
text, a font is set on the printer graphics context.
In this example, the button is printed at a 164/72 inches
inset from the left imageable margin (there are 72 pixels per inch)
and 5/72 inches from the top
imageable margin. This is where the button is positioned in the frame
by the layout manager
and those same numbers are returned by the following calls:
int X = (int)this.getLocation().getX();
int Y = (int)this.getLocation().getY();
And here is the MyButton class code:
class MyButton extends Button
		implements Printable {

  public MyButton() {
    super("MyButton");
  }

  public void paint(Graphics g) {
  //To see the label text, you must specify a font for
  //the printer graphics context
    Font  f = new Font("Monospaced", Font.PLAIN,12);
    g2.setFont (f);

  //Using "g" render anything you want.
  //Get the button's location, width, and height
    int X = (int)this.getLocation().getX();
    int Y = (int)this.getLocation().getY();
    int W = (int)this.getSize().getWidth();
    int H = (int)this.getSize().getHeight();

  //Draw the button shape
    g.drawRect(X, Y, W, H);

  //Draw the button label
  //For simplicity code to center the label inside the
  //button shape is replaced by integer offset values
    g.drawString(this.getLabel(), X+10, Y+15);

  }

  public int print(Graphics g,
                     PageFormat pf, int pi)
		       throws PrinterException {
    if (pi >= 1) {
      return Printable.NO_SUCH_PAGE;
    }

    Graphics2D g2 = (Graphics2D) g;

  //To see the button on the printed page, you
  //must translate the printer graphics context
  //into the imageable area
    g2.translate(pf.getImageableX(), pf.getImageableY());
    g2.setColor(Color.black);
    paint(g2);
    return Printable.PAGE_EXISTS;
   }
Note:
The printing Graphics2D is based on the BufferedImage class and
on some platforms does not default to a foreground color of black. If
this is the case on your platform, you have to add
g2.setColor(Color.black) to the print method
before the paint invocation.
Printing a Project Swing Component
 Printing a Project Swing component is almost the same as printing an AWT
component, except the
 MyButton subclass does not
need a paint method implementation. It does, however, have
a print method that calls the paint
method for the component. The paint method implementation
is not needed because Project Swing components know how to paint themselves.
Here
is the complete printbutton.java
source code for Project Swing.
class MyButton extends JButton implements Printable {

  public MyButton() {
    super("MyButton");
  }

  public int print(Graphics g,
                     PageFormat pf, int pi)
                       throws PrinterException {
    if (pi >= 1) {
      return Printable.NO_SUCH_PAGE;
    }

    Graphics2D g2 = (Graphics2D) g;
    g2.translate(pf.getImageableX(),
                 pf.getImageableY());
    Font  f = new Font("Monospaced", Font.PLAIN,12);
    g2.setFont (f);
    paint(g2);
    return Printable.PAGE_EXISTS;
   }
If you extend a JPanel and implement Printable,
you can print a panel component and all of its contents.
public class printpanel extends JPanel
			implements ActionListener,
			Printable {
Here is
the printpanel.java code
that prints a JPanel object and the JButton
it contains, and the
ComponentPrinterFrame.java
code that prints a JFrame object and the
JButton, JList, JCheckBox,
and JComboBox components it contains.
Printing Graphics in Project Swing
In the same way the AWT example subclassed a Button
component and implemented the paint method to
draw the button, you can subclass an AWT or Project Swing component and implement
the paint method to render 2D graphics to the screen or printer.
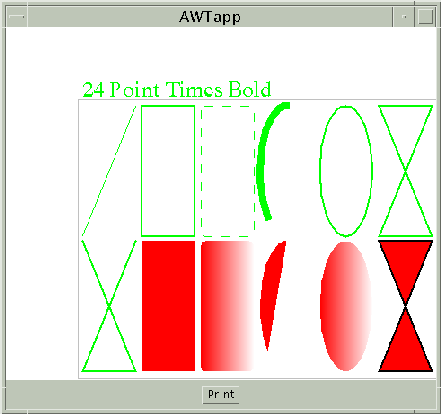
The ShapesPrint.java"
Project Swing application borrowed from
The Java Tutorial
shows how this is done. It is modified for this article to include
a TextLayout object.

The paintComponent method calls the drawShapes
method to render the 2D graphics to the screen when the application starts.
When you click the Print button, a printer graphics context
is created and passed to the drawShapes method for printing.
Print Dialog
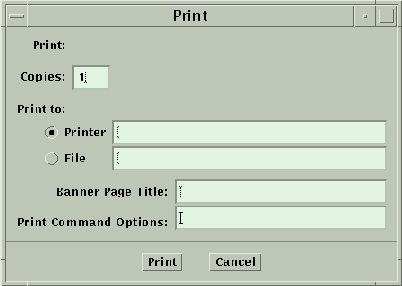
It is easy to display a Print dialog
so the end user can interactively change the print job
properties. The actionPerformed method of
the previous Project Swing example is modified here
to do just that.

public void actionPerformed(ActionEvent e) {
  PrinterJob printJob = PrinterJob.getPrinterJob();
  printJob.setPrintable((MyButton) e.getSource());
  if(printJob.printDialog()){
    try { printJob.print(); }
    catch (Exception PrinterExeption) { }
  }
}
Note:In Project Swing, the
printJob.setPageable((MyButton) e.getSource());
statement can be written as
printJob.setPrintable((MyButton) e.getSource());. The
difference is setPrintable is for applications that
do not know the number of pages they are printing.
If you use setPrintable, you need to add
if(pi >= 1){ return Printable.NO_SUCH_PAGE: }
to the beginnig of the print method.
Page Setup Dialog
You can add a line of code that tells the PrinterJob object
to display a Page dialog so the end user can interactively modify the
page format for printing in portrait, landscape, or reverse landscape mode.
The actionPerformed method of the previous Project Swing example is
modified here to display Page and Print dialogs.
Note: Some platforms
do not support a page dialog. On those platforms, the pageDialog
call simply returns the passed-in PageFormat object
and no dialog appears.
public void actionPerformed(ActionEvent e) {
  PrinterJob printJob = PrinterJob.getPrinterJob();
  printJob.setPrintable((MyButton) e.getSource());
  PageFormat pf = printJob.pageDialog(
                             printJob.defaultPage());
  if(printJob.printDialog()){
    try { printJob.print(); } catch (Exception ex) { }
  }
}
Printing a Collection of Pages
You can use the Book class to print a collection
of pages that you append to the book. The pages can be in any order
and have different page formats.
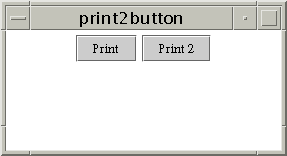
 The print2button.java
example puts the
 Print and Print 2 buttons of
type MyButton on a panel.
It creates a book that contains the pages to print.
When you click either button, the book prints one copy of the
Print button in
landscape mode and two copies of the Print 2 button
in portrait more, as specified in the actionPerformed
method implementation shown here.
Note:
Currently a bug restricts the Solaris platform to
only print in portrait mode.
public void actionPerformed(ActionEvent e) {
  PrinterJob printJob = PrinterJob.getPrinterJob();

/* Set up Book */
  PageFormat landscape = printJob.defaultPage();
  PageFormat portrait = printJob.defaultPage();
  landscape.setOrientation(PageFormat.LANDSCAPE);
  portrait.setOrientation(PageFormat.PORTRAIT);
  Book bk = new Book();
  bk.append((Printable)b, landscape);
  bk.append((Printable)b2, portrait, 2);
  printJob.setPageable(bk);

  try { printJob.print(); } catch (Exception ex) { }
}
[TOP]
|


