Note: The
getComponent() method is interesting, as it allows classes that are not Components themselves to implement the MenuElement interface and act as menu elements when necessary. Such a class must provide a Component used for display in a menu, and this Component would be returned by getComponent(). This design has curious implications, allowing us to design robust JavaBeans that encapsulate an optional GUI representation. We can imagine a complex spell-checker or dictionary class imp! lementing the MenuElement interface and providing a custom component for display in a menu (a powerful and highly object-oriented bean indeed).JMenuItem
, JMenuBar, JPopupMenu, and JMenu all implement this interface. Note that each of their getComponent() methods simply return a this reference. Also note that by extending any of these implementing classes, we inherit MenuElement functionality and are therefore not required to implement it. (We won’t explicitly use this interface in any examples, as the custom component we will build at the end of this chapter is an extension of JMenu.)12.1.11 MenuSelectionManager
class javax.swing.MenuSelectionManager
MenuSelectionManager
is a service class responsible for managing menu selection throughout a single Java session. (Note that unlike most other service classes in Swing, MenuSelectionManager does not register its shared instance with AppContext--see chapter 2.) When MenuElement implementations receive MouseEvents or KeyEvents, these events should not be processed directly. Rather, they should be handed off to the MenuSelectionManager so that it may forward th! em to sub-components automatically. For instance, whenever a JMenuItem is activated by keyboard or mouse, or whenever a JMenuItem selection occurs, the menu item UI delegate is responsible for forwarding the corresponding event to the MenuSelectionManager if necessary. The following code shows how BasicMenuItemUI deals with mouse releases:
public void mouseReleased(MouseEvent e) {
      MenuSelectionManager manager = MenuSelectionManager.defaultManager();
      Point p = e.getPoint();
      if(p.x >= 0 && p.x < menuItem.getWidth() &&
       p.y >= 0 && p.y < menuItem.getHeight()) {
        manager.clearSelectedPath();
        menuItem.doClick(0);
      }
      else {
        manager.processMouseEvent(e);
      }
}
The static
defaultManager() method returns the MenuSelectionManager shared instance, and the clearSelectedPath() method tells the currently active menu hierarchy to close and unselect all menu components. In the code shown above, clearSelectedPath() will only be called if the mouse release occurs within the corresponding JMenuItem (in which case there is no need for the event to propogate any further). If this is not the case, the event is sent to MenuSelectionManager’s processMouseEvent() method which forwards it to other sub-components. JMenuItem doesn’t have any sub-components by default so not much interesting happens in this case. However, in the case of JMenu, which considers its popup menu a sub-component, sending a mouse released event to the MenuSelectionManager is expected no matter what (from BasicMenuUI):
public void mouseReleased(MouseEvent e) {
     MenuSelectionManager manager = MenuSelectionManager.defaultManager();
      manager.processMouseEvent(e);
      if (!e.isConsumed())
        manager.clearSelectedPath();
}
MenuSelectionManager
will fire ChangeEvents whenever its setSelectedPath() method is called (i.e. each time a menu selection changes). As expected, we can attach ChangeListeners to listen for these events.12.1.12 The MenuDragMouseListener interface
abstract interface javax.swing.event.MenuDragMouseListener
This listener receives notification when the mouse cursor enters, exits, is released, or is moved over a menu item.
12.1.13 MenuDragMouseEvent
class javax.swing.event.MenuDragMouseEvent
This event class is used to deliver information to
MenuDragMouseListeners. It encapsulates the component source, event id, time of the event, bitwise or-masked int specifying which mouse button and/or keys (CTRL, SHIFT, ALT, or META) were pressed at the time of the event, x and y mouse coordinates, number of clicks immediately preceding the event, whether or not the event represents the platform-dependent popup trigger, an array of MenuElements leading to the source of the event, and the current MenuSelectionManager. This event inherits all MouseEvent functionali! ty (see API docs) and adds two methods for retrieving the array of MenuElements and the MenuSelectionManager.12.1.14 The MenuKeyListener interface
abstract interface javax.swing.event.MenuKeyListener
This listener is notified when a menu item receives a key event corresponding to a key press, release, or type. These events don’t necessarily correspond to mnemonics or accelerators, and are received whenever a menu item is simply visible on the screen.
12.1.15 MenuKeyEvent
class javax.swing.event.MenuKeyEvent
This event class is used to deliver information to
MenuKeyListeners. It encapsulates the component source, event id, time of the event, bitwise or-masked int specifying which mouse button and/or keys (CTRL, SHIFT, or ALT) were pressed at the time of the event, an int and char identifying the source key that caused the event, an array of MenuElements leading to the source of the event, and the current MenuSelectionManager. This event inherits all KeyEvent functionality (see API docs) and adds two methods for retrieving the array of MenuElements and the MenuSelectionManager.12.1.16 The MenuListener interface
abstract interface javax.swing.event.MenuListener
This listener receives notification when a menu is selected, deselected, or cancelled. Three methods must be implemented by
MenuListeners, and each takes a MouseEvent parameter: menuCanceled(), menuDeselected(), and menuSelected().12.1.17 MenuEvent
class javax.swing.event.MenuEvent
This event class is used to deliver information to
MenuListeners. It simply encapsulates a reference to its source Object.12.1.18 The PopupMenuListener interface
abstract interface javax.swing.event.PopupMenuListener
This listener receives notification when a
JPopupMenu is about to become visible, hidden, or when it is cancelled. Canceling a JPopupMenu also causes it to be hidden, so two PopupMenuEvents are fired in this case. A cancel occurs when the invoker component is resized or the window containing the invoker changes size or location. Three methods must be implemented by PopupMenuListeners, and each takes a PopupMenuEvent parameter: popupMenuCanceled(), pop! upMenuWillBecomeVisible(), and popupMenuWillBecomeInvisible().12.1.19 PopupMenuEvent
class javax.swing.event.PopupMenuEvent
This event class is used to deliver information to
PopupMenuListeners. It simply encapsulates a reference to its source Object.12.1.20 JToolBar
class javax.swing.JToolBar
This class represents the Swing implementation of a toolbar. Toolbars are often placed directly below menu bars at the top of a frame or applet, and act as a container for any component (buttons and combo boxes are most common). The most convenient way to add buttons to a
JToolBar is to use Actions (discussed below).
Note: Components often need their alignment setting tweaked to provide uniform positioning within
JToolBar. This can be accomplished through use of the setAlignmentY() and setAlignmentX() methods. We will see that this is necessary in the final example of this chapter.JToolBar
also allows convenient addition of an inner JSeparator sub-class, JToolBar.Separator, to provide an empty space for visually grouping components. These separators can be added with either of the overloaded addSeparator() methods, one of which takes a Dimension parameter specifying the size of the separator.Two orientations are supported,
VERTICAL and HORIZONTAL, and managed by JToolBar’s orientation property. It uses a BoxLayout layout manager which is dynamically changed between Y_AXIS and X_AXIS when the orientation property changes.JToolBar
can be dragged in and out of its parent container if its floatable property is set to true. When dragged out of its parent, a JToolBar appears as a floating window and its border changes color depending on whether it can re-dock in its parent at a given location. If a JToolBar is dragged outside of its parent and released, it will be placed in its own JFrame which is fully maximizable, minimizable, and closable. When this frame is closed JToolBar will j! ump back into its most recent dock position in its original parent, and the floating JFrame will disappear. It is recommended that JToolBar is placed in one of the four sides of a container using a BorderLayout, leaving the other sides unused. This allows the JToolBar to be docked in any of that container’s side regions.The protected
createActionChangeListener() method is used when an Action (see below) is added to a JToolBar to create a PropertyChangeListener for internal use in responding to bound property changes that occur in that Action.
UI Guideline : 3 Uses for a Toolbar
Toolbars have become ubiquitious in modern software. However, they are often overused or misused and fail to achieve their objective of increased usability. There are three key uses which have subtle differences and implications.
Tool Selection or Mode Selection
Perhaps the most effective use of a toolbar is, as the name suggests, for the selection of a tool or operational mode. This is most common in drawing or image manipulation packages. The user selects the toolbar button to change the mode from "paintbrush" to "filler" to "draw box" to "cut" etc.. This is a highly effective use of toolbar, as the small icons are usually sufficient to render a suitable tool image. Many images for this purpose have been adopted as a defacto standard. If you are developing such a tool selection toolbar, it would be advisable to stick closely to icons which have been used by similar existing products.
Functional Selection
The earliest use of toolbar was to replace the selection of a specific function from the menu. This led to them being called "speedbars" or "menubars". The idea was that the small icon button was faster and easier to acquire than the menu selection and that usability was enhanced as a result. This worked well for many common functions in file oriented applications, such as "open file", "new file", "save", "cut", "copy" and "paste". In fact, most of us would recognise the small icons for all of these functions. However, with other more application specific functions, it has been much harder for icon designers to come up with appropriate designs. This often leads to applications which have a confusing and intimidating array of icons across the top of the screen. This can detract from usability. As a general rule of thumb, stick to common cross application functions when overloading menu selections with toolbar buttons. If you do need to break the rule th! en consider selecting annotated buttons for the toolbar.
Navigational Selection
The 3rd use for toolbars has been for navigational selection. This often means replacing or overloading menu options from a "Window", "Go" or "Form" menu. These menu options are used to select a specific screen to come to the front. The toolbar buttons replace or overload the menu option and allow the navigational selection to be made supposedly by faster means. However, again this suffers from the problem of appropriate icon design. It is usually too difficult to devise a suitable set of icons which have clear and unambiguous meaning. Therefore, as a rule of thumb, consider the use of annotated buttons on the toolbar.
12.1.21 Custom JToolBar separators
Unfortunately Swing does not include a toolbar-specific separator component that will display a vertical or horizontal line depending on current toolbar orientation. The following psuedo-code shows how we can build such a component under the assumption that it will always have a
JToolBar as direct parent:
public class MyToolBarSeparator extends JComponent
{
    public void paintComponent(Graphics g) {
      super.paintComponent(g);
      if (getParent() instanceof JToolBar) {
        if (((JToolBar) getParent()).getOrientation() == JToolBar.HORIZONTAL) {
          // paint a vertical line
        }
        else {
          // paint a horizontal line
        }
      }
    }

    public Dimension getPreferredSize() {
      if (getParent() instanceof JToolBar) {
        if (((JToolBar) getParent()).getOrientation() == JToolBar.HORIZONTAL) {
          // return size of vertical bar
        }
        else {
          // return size of horizontal bar
        }
      }
    }
}
UI Guideline : Use of a separator
The failure to include a separator for toolbars really was an oversight by the Swing designers. Again, use the separator to group related functions or tools. For example, if the function all belong on the same menu then group them together, or if the tools (or modes) are related such as "cut", "copy", "paste" then group them together and separate them from others with a separator.
Visual grouping like this improves visual separation by introducing a visual layer. The viewer can first acquire a group of buttons and then a specific button. They will also learn with directional memory the approximate position of each group. By separating them you will improve the usability by helping them to acquire the target better when using the mouse.
12.1.22 Changing JToolBar’s floating frame behavior
The behavior of
JToolBar’s floating JFrame is certainly useful, but it is arguable whether the maximization and resizability should be allowed. Though we cannot control whether or not a JFrame can be maximized, we can control whether or not it can be resized. To enforce non-resizability in JToolBar’s floating JFrame (and set its dispayed title while we’re at it) we need to override its UI delegate and customize the createFloatingFrame() method as follows:
public class MyToolBarUI extends javax.swing.plaf.metal.MetalToolBarUI {

    protected JFrame createFloatingFrame(JToolBar toolbar) {
      JFrame frame = new JFrame(toolbar.getName());
      frame.setTitle("My toolbar");
      frame.setResizable(false);
      WindowListener wl = createFrameListener();
      frame.addWindowListener(wl);
      return frame;
    }
}
To assign
MyToolBarUI as a JToolBar’s UI delegate we can do the following:mytoolbar.setUI(new MyToolBarUI());
To force use of this delegate on a global basis we can do the following before any
JToolBars are instantiated:UIManager.getDefaults().put(
"ToolBarUI","com.mycompany.MyToolBarUI");
Note that we may also have to add an associated
Class instance to the UIDefaults table for this to work (see chapter 21).
UI Guideline : Use of a Floating Frame
It is probably best to restrict the use of a floating toolbar frame to toolbars being used for tool or mode selection (see guideline in 12.1.20).
12.1.23 The Action interface
abstract interface javax.swing.Action
This interface describes a helper object which extends
ActionListener and which supports a set of bound properties. We use appropriate add() methods in the JMenu, JPopupMenu, and JToolBar classes to add an Action which will use information from the given instance to create and return a component that is appropriate for that container (a JMenuItem in the case of the first two, a JButton in the case of the latter). The same! Action instance can be used to create an arbitrary number of menu items or toolbar buttons.Because
Action extends ActionListener, the actionPerformed() method is inherited and can be used to encapsulte appropriate ActionEvent handling code. When a menu item or toolbar button is created using an Action, the resulting component is registered as a PropertyChangeListener with the Action, and the Action is registered as an ActionListener with the component. Thus, whenever a change occurs to one of that Action’s bound properties, all components with registered PropertyChangeListeners will receive notification. This provides a convenient means for allowing identical functionality in menus, toolbars, and popup menus with minimum code repetition and object creation.The
putValue() and getValue() methods are intended to work with a Hashtable-like structure to maintain an Action’s bound properties. Whenever the value of a property changes, we are expected to fire PropertyChangeEvents to all registered listeners. As expected, methods to add and remove PropertyChangeListeners are provided.The
Action interface defines five static property keys intended for use by JMenuItems and JButtons created with an Action instance:String DEFAULT
: [not used]String LONG_DESCRIPTION
: Used for a lengthy description of an Action.String NAME
: Used as the text in associated and displayed in JMenuItems and JButtons.String SHORT_DESCRIPTION
: Used for the tooltip text of associated JMenuItems and JButtons.String SMALL_ICON
: Used as the icon in associated JMenuItems and JButtons.12.1.24 AbstractAction
class javax.swing.AbstractAction
This class is an abstract implementation of the
Action interface. Along with the properties inherited from Action, AbstractAction defines the enabled property which provides a means of enabling/disabling all associated components registered as PropertyChangeListeners. A SwingPropertyChangeSupport instance is used to manage the firing of PropertyChangeEvents to all registered PropertyChan! geListeners (see chapter 2 for more about SwingPropertyChangeSupport).
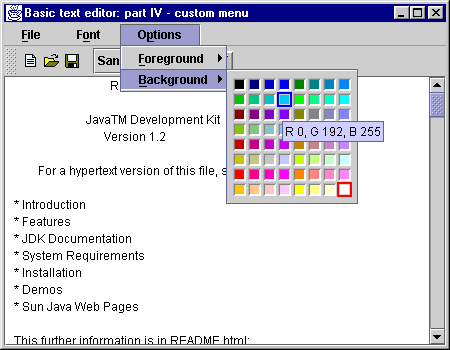
12.2 Basic text editor: part I - menus
In this example we begin the construction of a basic text editor application using a menu bar and several menu items. The menu bar contains two
JMenus labeled "File" and "Font." The "File" menu contains JMenuItems for creating a new (empty) document, opening a text file, saving the current document as a text file, and exiting the application. The "Font" menu contains JCheckBoxMenuItems for making the document bold and/or italic, as well as JRadioButtonMenuItems organized into a ButtonGroup allowing selection of a single fon! t.
Figure 12.1 JMenu containing JMenuItems with mnemonics and icons.
<<file figure12-1.gif>>
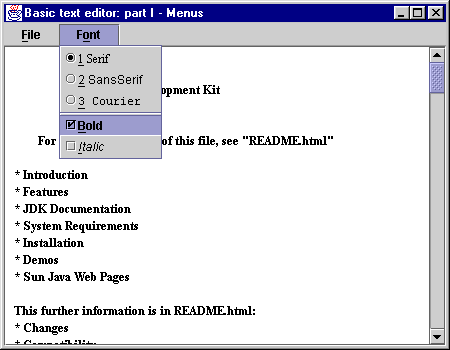
Figure 12.2 JMenu containing JRadioButtonMenuItems and JCheckBoxMenuItems.
<<file figure12-2.gif>>
The Code: BasicTextEditor.java
see \Chapter12\1
import java.awt.*;
import java.awt.event.*;
import java.io.*;
import java.util.*;

import javax.swing.*;
import javax.swing.event.*;

public class BasicTextEditor extends JFrame
{
	public static final String FONTS[] = { "Serif", "SansSerif",
		"Courier" };
	protected Font m_fonts[];

	protected JTextArea m_monitor;
	protected JMenuItem[] m_fontMenus;
	protected JCheckBoxMenuItem m_bold;
	protected JCheckBoxMenuItem m_italic;

	protected JFileChooser m_chooser;

	public BasicTextEditor()
	{
		super("Basic text editor: part I - Menus");
		setSize(450, 350);

		m_fonts = new Font[FONTS.length];
		for (int k = 0; k < FONTS.length; k++)
		   m_fonts[k] = new Font(FONTS[k], Font.PLAIN, 12);

		m_monitor = new JTextArea();
		JScrollPane ps = new JScrollPane(m_monitor);
		getContentPane().add(ps, BorderLayout.CENTER);

		m_monitor.append("Basic text editor");

		JMenuBar menuBar = createMenuBar();
		setJMenuBar(menuBar);

		m_chooser = new JFileChooser();
		m_chooser.setCurrentDirectory(new File("."));

		WindowListener wndCloser = new WindowAdapter()
		{
			public void windowClosing(WindowEvent e)
			{
				System.exit(0);
			}
		};
		addWindowListener(wndCloser);

		updateMonitor();
		setVisible(true);
	}

	protected JMenuBar createMenuBar()
	{
		final JMenuBar menuBar = new JMenuBar();

		JMenu mFile = new JMenu("File");
		mFile.setMnemonic('f');

		JMenuItem item = new JMenuItem("New");
		item.setIcon(new ImageIcon("file_new.gif"));
		item.setMnemonic('n');
		ActionListener lst = new ActionListener()
		{
			public void actionPerformed(ActionEvent e)
			{
				m_monitor.setText("");
			}
		};
		item.addActionListener(lst);
		mFile.add(item);

		item = new JMenuItem("Open...");
		item.setIcon(new ImageIcon("file_open.gif"));
		item.setMnemonic('o');
		lst = new ActionListener()
		{
			public void actionPerformed(ActionEvent e)
			{
                                BasicTextEditor.this.repaint();
				if (m_chooser.showOpenDialog(BasicTextEditor.this) !=
					JFileChooser.APPROVE_OPTION)
					return;
                                Thread runner = new Thread() {
                                  public void run() {
				    File fChoosen = m_chooser.getSelectedFile();
				    try
				    {
					FileReader in = new FileReader(fChoosen);
					m_monitor.read(in, null);
					in.close();
				    }
				    catch (IOException ex)
				    {
					ex.printStackTrace();
				    }
                                  }
                                };
                                runner.start();
			}
		};
		item.addActionListener(lst);
		mFile.add(item);

		item = new JMenuItem("Save...");
		item.setIcon(new ImageIcon("file_save.gif"));
		item.setMnemonic('s');
		lst = new ActionListener()
		{
			public void actionPerformed(ActionEvent e)
			{
                                BasicTextEditor.this.repaint();
				if (m_chooser.showSaveDialog(BasicTextEditor.this) !=
					JFileChooser.APPROVE_OPTION)
					return;
                                Thread runner = new Thread() {
                                  public void run() {
			 	    File fChoosen = m_chooser.getSelectedFile();
				    try
				    {
					FileWriter out = new FileWriter(fChoosen);
					m_monitor.write(out);
					out.close();
				    }
				    catch (IOException ex)
				    {
					ex.printStackTrace();
				    }
                                  }
                                };
                                runner.start();
			}
		};
		item.addActionListener(lst);
		mFile.add(item);

		mFile.addSeparator();

		item = new JMenuItem("Exit");
		item.setMnemonic('x');
		lst = new ActionListener()
		{
			public void actionPerformed(ActionEvent e)
			{
				System.exit(0);
			}
		};
		item.addActionListener(lst);
		mFile.add(item);
		menuBar.add(mFile);

		ActionListener fontListener = new ActionListener()
		{
			public void actionPerformed(ActionEvent e)
			{
				updateMonitor();
			}
		};

		JMenu mFont = new JMenu("Font");
		mFont.setMnemonic('o');

		ButtonGroup group = new ButtonGroup();
		m_fontMenus = new JMenuItem[FONTS.length];
		for (int k = 0; k < FONTS.length; k++)
		{
			int m = k+1;
			m_fontMenus[k] = new JRadioButtonMenuItem(
				m+" "+FONTS[k]);
			boolean selected = (k == 0);
			m_fontMenus[k].setSelected(selected);
			m_fontMenus[k].setMnemonic('1'+k);
			m_fontMenus[k].setFont(m_fonts[k]);
			m_fontMenus[k].addActionListener(fontListener);
			group.add(m_fontMenus[k]);
			mFont.add(m_fontMenus[k]);
		}

		mFont.addSeparator();

		m_bold = new JCheckBoxMenuItem("Bold");
		m_bold.setMnemonic('b');
		Font fn = m_fonts[1].deriveFont(Font.BOLD);
		m_bold.setFont(fn);
		m_bold.setSelected(false);
		m_bold.addActionListener(fontListener);
		mFont.add(m_bold);

		m_italic = new JCheckBoxMenuItem("Italic");
		m_italic.setMnemonic('i');
		fn = m_fonts[1].deriveFont(Font.ITALIC);
		m_italic.setFont(fn);
		m_italic.setSelected(false);
		m_italic.addActionListener(fontListener);
		mFont.add(m_italic);

		menuBar.add(mFont);

		return menuBar;
	}

	protected void updateMonitor()
	{
		int index = -1;
		for (int k = 0; k < m_fontMenus.length; k++)
		{
			if (m_fontMenus[k].isSelected())
			{
				index = k;
				break;
			}
		}
		if (index == -1)
			return;

		if (index==2)  // Courier
		{
			m_bold.setSelected(false);
			m_bold.setEnabled(false);
			m_italic.setSelected(false);
			m_italic.setEnabled(false);
		}
		else
		{
			m_bold.setEnabled(true);
			m_italic.setEnabled(true);
		}

		int style = Font.PLAIN;
		if (m_bold.isSelected())
			style |= Font.BOLD;
		if (m_italic.isSelected())
			style |= Font.ITALIC;
		Font fn = m_fonts[index].deriveFont(style);
		m_monitor.setFont(fn);
		m_monitor.repaint();
	}

	public static void main(String argv[])
	{
		new BasicTextEditor();
	}
}
Understanding the Code
Class BasicTextEditor
This class extends
JFrame and provides the parent frame for our example. One class variable is declared:String FONTS[]
: an array of font family names.Instance variables:
Font[] m_fonts
: an array of Font instances which can be used to render our JTextArea editor.JTextArea m_monitor
: used as our text editor.JMenuItem[] m_fontMenus
: an array of menu items representing available fonts.JCheckBoxMenuItem m_bold
: menu item which sets/unsets the bold property of the current font.JCheckBoxMenuItem m_italic
: menu item which sets/unsets the italic property of the current font.JFileChooser m_chooser
: used to load and save simple text files.The
Menu1 constructor populates our m_fonts array with Font instances corresponding to the names provided in FONTS[]. The m_monitor JTextArea is then created and placed in a JScrollPane. This scroll pane is added to the center of our frame’s content pane and we append some simple text to m_monitor for display at startup. Our createMenuBar() method is called to create the menu bar to manage t! his application, and this menu bar is then added to our frame using the setJMenuBar() method.The
createMenuBar() method creates and returns a JMenuBar. Each menu item receives an ActionListener to handle it's selection. Two menus are added titled "File" and "Font." The "New" menu item in the "File" menu is responsible for creating a new (empty) document. It doesn’t really replace JTextArea’s Document. Instead it simply clears the contents of our editor component. Note that an icon is used in this menu item. Also note that this menu item can be selected with the keyboard by pressing ‘n’ when the "File" menu’s popup is visible, because we assigne! d it ‘n’ as a mnemonic. The File menu was also assigned a mnemonic character, ‘f,’ and pressing ALT-F while the application frame is active, the "File" popup will be displayed allowing navigation with either the mouse or keyboard (all other menus and menu items in this example also receive appropriate mnemonics).
Bug Alert! Even though ALT-F will get processed by the corresponding menu in the menu bar, the key event that is generated is still received by
JTextArea. Thus, you will often see an ‘f’ added to the text area even though ALT was held down when ‘f’ was pressed. It is possible to work around this problem by extending JTextArea (or any other JTextComponent) as follows:
public class MyTextArea extends JTextArea
{
  protected synchronized void processComponentKeyEvent(
   KeyEvent anEvent) {
    super.processComponentKeyEvent(anEvent);
    ivLastKeyEventWasAlt = anEvent.isAltDown();
  }

  protected synchronized void processInputMethodEvent(
   InputMethodEvent e) {
    if (ivLastKeyEventWasAlt) {
      e.consume();
    }
    super.processInputMethodEvent(e);
  }
  private transient boolean ivLastKeyEventWasAlt = false;
}
Note that this workaround was orginally posted to the JDC Bug Parade and it should only be considered a temporary solution until the problem is actually fixed.
The "Open" menu item brings up our
m_chooser JFileChooser component (discussed in chapter 14) to allow selection of a text file to open. Once a text file is selected, we open a FileReader on it and invoke read() on our JTextArea component to read the file's content (which creates a new PlainDocument containing the selected file’s content to replace the current JTextArea document--see chapter 11). The "Save" menu item brings up m_chooser to select a destination and file name to save the current text to. Once a text file is selected, we open a FileWriter on it and invoke write() on our JTextArea component to write its content to the destination file. Both of these I/O operations are wrapped in separate threads to avoid clogging up the event dispatching thread.
Bug Alert! We have added code to repaint the whole application before the I/O operations occur. This is because when a Swing menu is hidden by a dialog (in this case a
JFileChooser dialog) that pops up immediately in response to a menu selection, the menu will often not perform all necessary repainting of itself and components that lie below its popup. To make sure that no remnants of menu rendering are left around we force a repaint of the whole frame before moving on.The "Exit" menu item terminates program execution. It is separated from the first three menu items with a menu separator to create a more logical display.
The "Font" menu consists of several menu items used to select the font and font style used in our editor. All of these items receive the same
ActionListener which invokes our updateMonitor() method (see below). To give the user an idea of how each font looks, each font is used to render the corresponding menu item text. Since only one font can be selected at any given time, we use JRadioButtonMenuItems for these menu items, and add them all to a ButtonGroup instance which manages a single selection.To create each menu item we iterate through our
FONTS array and create a JRadioButtonMenuItem corresponding to each entry. Each item is set to unselected (except for the first one), assigned a numerical mnemonic corresponding to the current FONTS array index, assigned the appropriate Font instance for rendering its text, assigned our multi-purpose ActionListener, and added to our ButtonGroup along with the others.The two other menu items in the "Font" menu manage the bold and italic font properties. They are implemented as
JCheckBoxMenuItems since these properties can be selected or unselected independently. These items also are assigned the same ActionListener as the radio button items to process changes in their selected state.The
updateMonitor() method updates the current font used to render the editing component by checking the state of each check box item and determining which radio button item is currently selected. The m_bold and m_italic components are disabled and unselected if the Courier font is selected, and enabled otherwise. The appropriate m_fonts array element is selected and a Font instance is derived from it corresponding to the current state of the check box items using Font’s deriveFont() method (see chapter 2).
Note: Surprisingly the
ButtonGroup class does not provide a direct way to determine which component is currently selected. So we have to examine m_fontMenus array elements in turn to determine the selected font index. Alternatively we could save the font index in an enhanced version of our ActionListener.Running the Code
Open a text file, make some changes, and save it as a new file. Change the font options and note how the text area is updated. Select the Courier font and note how it disables the bold and italic check box items (it also unchecks them if they were previously checked). Select another font and note how this re-enables check box items. Figure 12.1 shows BasicTextEditor’s "File" menu, and figure 12.2 shows the "Font" menu. Note how the mnemonics are underlined and the images appear to the right of the text by default (just like buttons).
UI Guideline : File oriented applications
This is an example of a menu being used on a file oriented application. Menus were first developed to be used in this fashion. The inclusion of a menu on such an application is essential, as users have come to expect one. There are clearly defined platform standards for the layout of such a menu and it is best that you ahere to these. Almost always the "File" menu comes first (to the LHS).
Note also the use of the elipsis "..." on the "Open..." and "Save..." options. This is a standard technique which gives a visual affordance to the behaviour that a dialog will open when the menu item is selected.
UI Guideline : Correct use of separator and widget overloading
This example shows clearly how a menu in a simple application can have selection controls added to speed operation and ease usability. The separator is used to group and separate the selection of the font type from the font style.
12.3 Basic text editor: part II - toolbars and actions
Swing provides the
Action interface to simplify the creation of menu items. As we know, implementations of this interface encapsulate both knowledge of what to do when a menu item or toolbar button is selected (by extending the ActionListener interface) and knowledge of how to render the component itself (by holding a collection of bound properties such as NAME, SMALL_ICON, etc.). We can create both a menu item and a toolbar button from a single Action instance, conserving code and providing a reliable means of ensuring consistency between menus and toolbars.The following example uses the
AbstractAction class to add a toolbar to our BasicTextEditor application. By converting the ActionListeners used in the example above to AbstractActions, we can use these actions to create both toolbar buttons and menu items with very little additional work.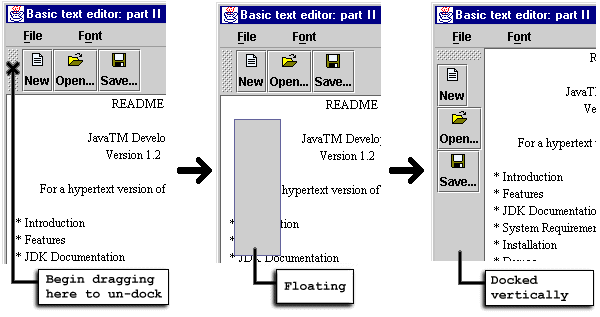
Figure 12.3 Process of un-docking, dragging, and docking a floating JToolBar.
<<file figure12-3.gif>>
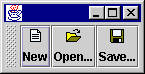
Figure 12.4 A floating JToolBar placed in a non-dockable region.
<<file figure12-4.gif>>
The Code: BasicTextEditor.java
see \Chapter12\2
import java.awt.*;
import java.awt.event.*;
import java.io.*;
import java.util.*;

import javax.swing.*;
import javax.swing.event.*;

public class BasicTextEditor extends JFrame
{
  // Unchanged code from section 12.2

  protected JToolBar m_toolBar;

  protected JMenuBar createMenuBar() {
    final JMenuBar menuBar = new JMenuBar();
    JMenu mFile = new JMenu("File");
    mFile.setMnemonic('f');

    ImageIcon iconNew = new ImageIcon("file_new.gif");
    Action actionNew = new AbstractAction("New", iconNew) {
      public void actionPerformed(ActionEvent e) {
        m_monitor.setText("");
      }
    };

    JMenuItem item =  mFile.add(actionNew);
    item.setMnemonic('n');

    ImageIcon iconOpen = new ImageIcon("file_open.gif");
    Action actionOpen = new AbstractAction("Open...", iconOpen) {
      public void actionPerformed(ActionEvent e) {
        // Unchanged code from section 12.2
      }
    };

    item =  mFile.add(actionOpen);
    item.setMnemonic('o');

    ImageIcon iconSave = new ImageIcon("file_save.gif");
    Action actionSave = new AbstractAction("Save...", iconSave) {
      public void actionPerformed(ActionEvent e) {
        // Unchanged code from section 12.2
      }
    };

    item =  mFile.add(actionSave);
    item.setMnemonic('s');

    mFile.addSeparator();

    Action actionExit = new AbstractAction("Exit") {
      public void actionPerformed(ActionEvent e) {
        System.exit(0);
      }
    };

    item =  mFile.add(actionExit);
    item.setMnemonic('x');
    menuBar.add(mFile);

    m_toolBar = new JToolBar();
    JButton btn1 = m_toolBar.add(actionNew);
    btn1.setToolTipText("New text");
    JButton btn2 = m_toolBar.add(actionOpen);
    btn2.setToolTipText("Open text file");
    JButton btn3 = m_toolBar.add(actionSave);
    btn3.setToolTipText("Save text file");

    // Unchanged code from section 12.2

    getContentPane().add(m_toolBar, BorderLayout.NORTH);

    return menuBar;
  }

  // Unchanged code from section 12.2
}
Understanding the Code
Class BasicTextEditor
This class now declares one more instance variable,
JToolBar m_toolBar. The constructor remains unchanged and is not listed here. The createMenuBar() method now creates AbstractAction instances instead of ActionListeners. These objects encapsulate the same action handling code we defined in the last example, as well as the text and icon to display in associated menu items and toolbar buttons. This allows us to create JMenuItems using the JMenu.add(Action a) method, and JButtons using the JToolBar.add(Action a) method. These methods return instances that we can treat as any other button component and do things such as set the background color assign a different text alignment.Our
JToolBar component is placed in the NORTH region of our content pane, and we make sure to leave the EAST, WEST, and SOUTH regions empty allowing it to dock on all sides.Running the Code
Verify that the toolbar buttons work as expected by opening and saving a text file. Try dragging the toolbar from its ‘handle’ and note how it is represented by an empty gray window as it is dragged. The border will change to a dark color when the window is in a location where it will dock if the mouse is released. If the border does not appear dark, releasing the mouse will result in the toolbar being placed in its own
JFrame. Figure 12.3 illustrates the simple process of undocking, dragging, and docking our toolbar in a new location. Figure 12.4 shows our toolbar in its own JFrame when undocked and released outside of a dockable region (also referred to as a hotspot).
Note: The current
JToolBar implementation does not easily allow the use of multiple floating toolbars as is common in many modern applications. We hope to see more of this functionality built into future versions of Swing.
UI Guideline : Vertical or Horizontal?
In some applications, you may prefer to leave the selection of a vertical or horizontal toolbar to the user. More often than not, you as designer can make that choice for them. Consider whether vertical or horizontal space is more valuable for what you need to display. If, for example, you are displaying Letter text then you probably need vertical space more than horizontal space. Usually in PC applications, vertical space is at a premium.
When vertical space is at a premium, place the toolbar vertically thus freeing up valuable vertical space.
When horizontal space is at a premium, place the toolbar horizontally thus freeing up valuable horizontal space.
Almost never allow a floating toolbar, as it has a tendency to get lost under other windows. Floating toolbars are for advanced users who understand the full operation of the computer system. Consider the technical level of your user group before making the design choice for a floating toolbar.
12.4 Basic text editor: part III - custom toolbar components
Using
Actions to create toolbar buttons is easy, but not always desirable if we wish to have complete control over our toolbar components. In this section we build off of BasicTextEditor and place a JComboBox in the toolbar allowing Font selection. We also use instances of our own custom buttons, SmallButton and SmallToggleButton, in the toolbar. Both of these button classes use different borders to signify different states. SmallButton uses a raised border when the mouse passes over it, no border when the mouse is not within its bounds, and a lowered border when a mouse press occurs. SmallToggleButton uses a raised border when unselected and a lowered border when selected.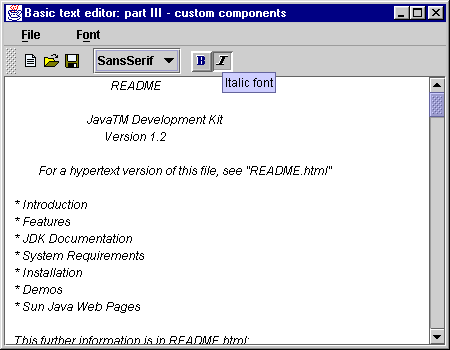
Figure 12.5 JToolBar with custom buttons and a JComboBox.
<<file figure12-5.gif>>
The Code: BasicTextEditor.java
see \Chapter12\3
import java.awt.*;
import java.awt.event.*;
import java.io.*;
import java.util.*;

import javax.swing.*;
import javax.swing.event.*;

public class BasicTextEditor extends JFrame
{
  // Unchanged code from section 12.3

  protected JComboBox m_cbFonts;
  protected SmallToggleButton m_bBold;
  protected SmallToggleButton m_bItalic;

  // Unchanged code from section 12.3

  protected JMenuBar createMenuBar()
  {
    // Unchanged code from section 12.3

    m_toolBar = new JToolBar();
    JButton bNew = new SmallButton(actionNew, "New text");
    m_toolBar.add(bNew);

    JButton bOpen = new SmallButton(actionOpen, "Open text file");
    m_toolBar.add(bOpen);

    JButton bSave = new SmallButton(actionSave, "Save text file");
    m_toolBar.add(bSave);

    JMenu mFont = new JMenu("Font");
    mFont.setMnemonic('o');

    // Unchanged code from section 12.3

    mFont.addSeparator();

    m_toolBar.addSeparator();
    m_cbFonts = new JComboBox(FONTS);
    m_cbFonts.setMaximumSize(m_cbFonts.getPreferredSize());
    m_cbFonts.setToolTipText("Available fonts");
    ActionListener lst = new ActionListener() {
      public void actionPerformed(ActionEvent e) {
        int index = m_cbFonts.getSelectedIndex();
        if (index < 0)
          return;
        m_fontMenus[index].setSelected(true);
        updateMonitor();
      }
    };
    m_cbFonts.addActionListener(lst);
    m_toolBar.add(m_cbFonts);

    m_bold = new JCheckBoxMenuItem("Bold");
    m_bold.setMnemonic('b');
    Font fn = m_fonts[1].deriveFont(Font.BOLD);
    m_bold.setFont(fn);
    m_bold.setSelected(false);
    m_bold.addActionListener(fontListener);
    mFont.add(m_bold);

    m_italic = new JCheckBoxMenuItem("Italic");
    m_italic.setMnemonic('i');
    fn = m_fonts[1].deriveFont(Font.ITALIC);
    m_italic.setFont(fn);
    m_italic.setSelected(false);
    m_italic.addActionListener(fontListener);
    mFont.add(m_italic);

    menuBar.add(mFont);

    m_toolBar.addSeparator();

    ImageIcon img1 = new ImageIcon("font_bold1.gif");
    ImageIcon img2 = new ImageIcon("font_bold2.gif");
    m_bBold = new SmallToggleButton(false, img1, img2, "Bold font");
    lst = new ActionListener() {
      public void actionPerformed(ActionEvent e) {
        m_bold.setSelected(m_bBold.isSelected());
        updateMonitor();
      }
    };
    m_bBold.addActionListener(lst);
    m_toolBar.add(m_bBold);

    img1 = new ImageIcon("font_italic1.gif");
    img2 = new ImageIcon("font_italic2.gif");
    m_bItalic = new SmallToggleButton(false, img1, img2, "Italic font");
    lst = new ActionListener() {
      public void actionPerformed(ActionEvent e) {
        m_italic.setSelected(m_bItalic.isSelected());
        updateMonitor();
      }
    };
    m_bItalic.addActionListener(lst);
    m_toolBar.add(m_bItalic);

    getContentPane().add(m_toolBar, BorderLayout.NORTH);
    return menuBar;
  }

  protected void updateMonitor() {
    int index = -1;
    for (int k=0; k<m_fontMenus.length; k++) {
      if (m_fontMenus[k].isSelected()) {
        index = k;
        break;
      }
    }
    if (index == -1)
      return;
    boolean isBold = m_bold.isSelected();
    boolean isItalic = m_italic.isSelected();

    m_cbFonts.setSelectedIndex(index);

    if (index==2) {   //Courier
      m_bold.setSelected(false);
      m_bold.setEnabled(false);
      m_italic.setSelected(false);
      m_italic.setEnabled(false);
      m_bBold.setSelected(false);
      m_bBold.setEnabled(false);
      m_bItalic.setSelected(false);
      m_bItalic.setEnabled(false);
    }
    else {
      m_bold.setEnabled(true);
      m_italic.setEnabled(true);
      m_bBold.setEnabled(true);
      m_bItalic.setEnabled(true);
    }

    if (m_bBold.isSelected() != isBold)
      m_bBold.setSelected(isBold);
    if (m_bItalic.isSelected() != isItalic)
      m_bItalic.setSelected(isItalic);

    int style = Font.PLAIN;
    if (isBold)
      style |= Font.BOLD;
    if (isItalic)
      style |= Font.ITALIC;
    Font fn = m_fonts[index].deriveFont(style);
    m_monitor.setFont(fn);
    m_monitor.repaint();
  }

  public static void main(String argv[]) {
    new BasicTextEditor();
  }
}

class SmallButton extends JButton implements MouseListener
{
  protected Border m_raised;
  protected Border m_lowered;
  protected Border m_inactive;

  public SmallButton(Action act, String tip) {
    super((Icon)act.getValue(Action.SMALL_ICON));
    m_raised = new BevelBorder(BevelBorder.RAISED);
    m_lowered = new BevelBorder(BevelBorder.LOWERED);
    m_inactive = new EmptyBorder(2, 2, 2, 2);
    setBorder(m_inactive);
    setMargin(new Insets(1,1,1,1));
    setToolTipText(tip);
    addActionListener(act);
    addMouseListener(this);
    setRequestFocusEnabled(false);
  }

  public float getAlignmentY() { return 0.5f; }

  public void mousePressed(MouseEvent e) {
    setBorder(m_lowered);
  }
  public void mouseReleased(MouseEvent e) {
    setBorder(m_inactive);
  }
  public void mouseClicked(MouseEvent e) {}
  public void mouseEntered(MouseEvent e) {
    setBorder(m_raised);
  }
  public void mouseExited(MouseEvent e) {
    setBorder(m_inactive);
  }
}

class SmallToggleButton extends JToggleButton implements ItemListener
{
  protected Border m_raised;
  protected Border m_lowered;

  public SmallToggleButton(boolean selected,
   ImageIcon imgUnselected, ImageIcon imgSelected, String tip) {
    super(imgUnselected, selected);
    setHorizontalAlignment(CENTER);
    setBorderPainted(true);
    m_raised = new BevelBorder(BevelBorder.RAISED);
    m_lowered = new BevelBorder(BevelBorder.LOWERED);
    setBorder(selected ? m_lowered : m_raised);
    setMargin(new Insets(1,1,1,1));
    setToolTipText(tip);
    setRequestFocusEnabled(false);
    setSelectedIcon(imgSelected);
    addItemListener(this);
  }

  public float getAlignmentY() { return 0.5f; }

  public void itemStateChanged(ItemEvent e) {
    setBorder(isSelected() ? m_lowered : m_raised);
  }
}
Understanding the Code
Class BasicTextEditor
BasicTextEditor
now declares three new instance variables:JComboBox m_cbFonts
: combo box containing available font names.SmallToggleButton m_bBold
: custom toggle button representing the bold font style.SmallToggleButton m_bItalic
: custom toggle button representing the italic font style.The
createMenuBar() method now creates three instances of the SmallButton class (see below) corresponding to our pre-existing "New," "Open," and "Save" toolbar buttons. These are constructed by passing the appropriate Action (which we built in part II) as well as a tooltip String to the SmallButton constructor. Then we create a combo box with all available font names and add it to the toolbar. The setMaximumSize() method is called on the combo box to reduce its size to a necessary maximum (otherwise it ! will fill all unoccupied space in our toolbar). An ActionListener is then added to monitor combo box selection. This listener selects the corresponding font menu item because the combo box and font radio button menu items must always be in synch. It then calls our updateMonitor() method.Two
SmallToggleButtons are created and added to our toolbar to manage the bold and italic font properties. Each button receives an ActionListener which selects/deselects the corresponding menu item (because both the menu items and toolbar buttons must remain in synch) and calls our updateMonitor() method.Our
updateMonitor() method receives some additional code to provide consistency between our menu items and toolbar controls. This method relies on the state of the menu items, which is why the toolbar components first set the corresponding menu items when selected. The code added here is self-explanatory and just involves enabling/disabling and selecting/deselecting components to preserve consistency.Class SmallButton
SmallButton
represents a small push button to be used in a toolbar. It implements the MouseListener interface to process mouse input. Three instance variables are declared:Border m_raised
: border to be used when the mouse cursor is located over the button.Border m_lowered
: border to be used when the button is pressed.Border m_inactive
: border to be used when the mouse cursor is located outside the button.The
SmallButton constructor takes an Action parameter, which is added as an ActionListener and performs an appropriate action when the button is pressed, and a String representing the tooltip text. Several familiar properties are assigned and the icon encapsulated within the Action is used for this buttons icon. SmallButton also adds itself as a MouseListener and sets its tooltip text to the given String passed to the constructor. Note that the requestFocusEnabled property is set to false so that when this button is clicked focus will not be transferred out of our JTextArea editor component.The
getAlignmentY() method is overriden to return a constant value of 0.5f, indicating that this button should always be placed in the middle of the toolbar in the vertical direction. The remainder of SmallButton represents an implementation of the MouseListener interface which sets the border based on mouse events. The border is set to m_inactive when the is mouse located outside its bounds, m_active when the mouse is located inside its bounds, and m_lowered