Chapter 14. Dialogs
In this chapter:
14.1 Dialogs overview
Swingís
JDialog class allows implementation of both modal and non-modal dialogs. In simple cases, when we need to post a short message or ask for a single value input, we can use standardized pre-built dialog boxes provided by the JOptionPane convenience class. Additionally, two special dialog classes provide powerful selection and navigation capabilities for choosing colors and files: JColorChooser and JFileChooser.
UI Guideline : Usage Advice When to Use a Dialog
Dialogs are intended for the acquisition of sets of related data. This may be the set of attributes for a particular object or group of objects. A Dialog is particularly useful when validation across those attributes must be performed before the data can be accepted. The validation code can be executed when an "accept" button is pressed and the dialog will only dismiss when the data is validated as good.
Dialogs are also useful for complex manipulations or selections. For example a dialog with two lists, "Available Players" and "Team for Saturday's Game," might allow the selection, addition, and deletion of items to and/or form each list. When the team for the Saturday game is selected, the User can accept the selection by pressing "OK".
Data entry and complex data manipulation which requires a clear boundary or definition of acceptance, are good uses for a dialog.
When to Use an Option Pane
Option Panes are designed for use when the system needs to hold a conversation with the User, either for simple directed data entry such as "Enter your name and password" or for navigation choices such as "View", "Edit", "Print".
When to Use a Chooser
Choosers have been introduced to facilitate consistency for common selections across a whole operating environment. If you have a need to select files or colors then you ought to be using the appropriate chooser. The User gets the benefit of only learning one component which appears again and again across applications. Using a Chooser when appropriate should improve customer acceptance for your application.
14.1.1 JDialog
class javax.swing.JDialog
This class extends
java.awt.Dialog and is used to create a new dialog box in a separate native platform window. We typically extend this class to create our own custom dialog, as it is a container almost identical to JFrame.
Note:
JDialog is a JRootPane container just as JFrame, and familiarity with chapter 3 is assumed here. All WindowEvents, default close operations, sizing and positioning, etc., can be controlled identically to JFrame and we will not repeat this material.We can create a
JDialog by specifying a dialog owner (Frame or Dialog instances), a dialog title, and a modal/non-modal state. The following code shows a typical custom dialog class constructor:
  class MyDialog extends JDialog
  {
    public MyDialog(Frame owner) {
      super(owner, "Sample Dialog", true);
      // Perform GUI initialization here
    }
  }
We are not required to pass a valid parent and are free to use
null as the parent reference. As we discussed in chapter 2, the SwingUtilities class maintains a non-visible Frame instance registered with the AppContext service mapping, which is used as the parent of all null-parent dialogs. If a valid parent is used the dialogís icon will be that of the parent frame set with the setIconImage() method.A modal dialog will not allow other windows to become active (i.e. respond to user input) at the same time it is active. Modal dialogs also block the invoking thread of execution and do not allow it to continue until they are dismissed. Non-modal dialogs do allow other windows to be active and do not affect the invoking thread.
To populate a dialog we use the same layout techniques discussed for
JFrame, and we are prohibited from changing the layout or adding components directly. Instead we are expected to deal with the dialog's content pane:JButton btn = new JButton("OK");
myDialog.getContentPane().add(btn);
From the design prospective, it is very common to add push buttons to a dialog. Typical buttons are "OK" or "Save" to continue with an action or save data, and "Cancel" or "Close" to close the dialog and cancel an action or avoid saving data.
Bug Alert!
JDialog is not garbage collected even when it is disposed, made non-visible, and retains no direct references in scope. This Ďfeatureí is not documented and is most likely an AWT or Swing bug.
Bug Alert! Because of certain AWT limitations,
JDialog will only allow lightweight popup menus. JPopupMenu, and the components that use it, such as JComboBox and JMenu, can only be lightweight in modal dialogs. For this reason we need to be especially careful when implementing a modal dialog containing heavyweight components.As with
JFrame, JDialog will appear in the upper left-hand corner of the screen unless another location is specified. It is usually more natural to center a dialog with respect to its owner, as follows:Window owner = myDialog.getParent();
myDialog.setResizable(false);
Dimension d1 = myDialog.getSize();
Dimension d2 = owner.getSize();
int x = Math.max((d2.width-d1.width)/2, 0);
int y = Math.max((d2.height-d1.height)/2, 0);
myDialog.setBounds(x, y, d1.width, d1.height);
Note: It is common practice to show dialogs in response to menu selections. In such cases a menuís popup may remain visible and the parent frame needs to be manually repainted. For this reason we suggest calling
repaint() on the parent before displaying dialogs invoked by menus.To display a
JDialog window we can use either the show() method inherited from java.awt.Dialog, or we can use the setVisible() method inherited from java.awt.Component. The following snippet code illustrates a typical scheme of creation and usage of the custom dialog box:
Reference: In chapter 20 we will show how to construct quite complex dialogs and assume knowledge of the
JDialog information presented here. We suggest supplementing this chapterís material with a brief look at the chapter 20 examples to get a feel for what lies ahead.
Note: When building complex dialogs it is normally preferable that one instance of that dialog be used throughout a given Java session. We suggest instiating such dialogs when the application/applet is started, and storing them as variables for repetitive use. This avoids the often significantly long delay time required to instantiate a dialog each time it is needed. We also suggest wrapping dialog instantiation in a separate thread to avoid clogging up the AWT event dispatching thread.
14.1.2 JOptionPane
class javax.swing.JOptionPane
This class provides an easy and convenient way to display standard dialogs used for posting a message, asking a question, or prompting for simple user input. Note that each
JOptionPane dialog is modal and will block the invoking thread of execution, as described above (this does not apply to internal dialogs; we will discuss these soon enough).It is important to understand that
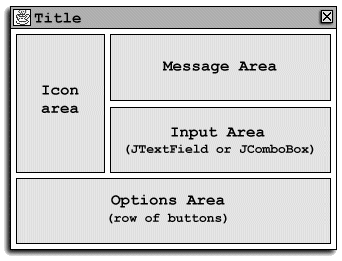
JOptionPane is not itself a dialog (note that it directly extends JComponent). Rather, it acts as a container that is normally placed in a JDialog or a JInternalFrame, and provides several convenient methods for doing so. There is nothing stopping us from creating a JOptionPane and placing it in any container we choose, but this will rarely be useful. Figure 14.1 illustrates the general JOptionPane component arrangement:
Figure 14.1 The components of a JOptionPane dialog.
<<file figure14-1.gif>>
JOptionPane
class supports four pre-defined types: Message, Confirm, Input, and Option. We will discuss how to create and work with each type, but first we need to understand the constituents. To create a JOptionPane that is automatically placed in either a JDialog or JInternalFrame, we need to supply some or all of the following parameters to one if its static showXXDialog() methods (discussed below):A parent
A message
Object: a message to be displayed in the center of the pane (in the Message area). Typically this is a String, which may be broken into separate lines using '\n' characters. However this parameter has a generic Object type and JOptionPane deals with non-String objects in the following way:Icon
: will be displayed in a JLabel.Component
: will simply be placed in the message area.Object[]
: dealt with as described here, these will be placed vertically in a column (this is done recursively).Object
: the toString() method will be called to convert this to a String for display in a JLabelAn
int message type: can be one of the following static constants defined in JOptionPane: ERROR_MESSAGE, INFORMATION_MESSAGE, WARNING_MESSAGE, QUESTION_MESSAGE, PLAIN_MESSAGE. This is used by the current L&F to customize the look of an option pane by displaying an appropriate icon (in the Icon area) corresponding to the message typeís meaning (see below).An
int option type: can be one of the following static constants defined in JOptionPane: DEFAULT_OPTION, YES_NO_OPTION, YES_NO_CANCEL_OPTION, OK_CANCEL_OPTION. This parameter specifies a set of corresponding buttons to be displayed at the bottom of the pane (in the Options area). Another set of similar parameters returned from JOptionPane showXXDialog() methods (see below) specify whi! ch button was pressed: CANCEL_OPTION, CLOSED_OPTION, NO_OPTION, OK_OPTION, YES_OPTION. Note that CLOSED_OPTION is only returned when the pane is contained in a JDialog or JInternalFrame, and that containerís close button (located in the title bar) is pressed.An
Icon: displayed in the left side of the pane (in the Icon area). If not explicitly specified, the icon is determined by the current L&F based on the message type (this does not apply to panes using the PLAIN_MESSAGE message type).An array of option
Objects: we can directly specify an array of option Objects to be displayed at the bottom of the pane (in the Options area). This array can also be specified with the setOptions() method. It typically contains an array of Strings to be displayed on a JButtons, but JOptionPane also honors Icons (also displayed in JButtons) and Compo! nents (placed directly in a row). Similar to message Objects, the toString() method will be called to convert all objects that are not Iconís or Components to a String for display in a JButton. If null is used, the option buttons are determined by the specified option type.An initial value
Object: specifies which button or component in the Options area has the focus when the pane is initially displayed.An array of selection value
Objects: specifies an array of allowed choices the user can make. If this array contains more than twenty items a JList is used to display them using the default rendering behavior (see chapter 10). If the array contains less than twenty items a JComboBox is used to display them (also using the default JList rendering behavior). If null is used, an empty JTextField is displayed. In any case, the component used for selection is placed in the Input area.A
String title: used for display as the titlebar title in the containing JDialog or JInternalFrame.The following static methods are provided for convenient creation of
JOptionPanes placed in JDialogs:showConfirmDialog()
: this method displays a dialog with several buttons and returns an int option type corresponding to the button pressed (see above). Four overloaded methods are provided allowing specification of, at most, a parent component, message, title, option type, message type, and icon.showInputDialog()
: this method displays a dialog which is intended to receive user input, and returns a String (if the input component is a text field) or an Object if the input component is a list or a combo box (see above). Four overloaded methods are provided allowing specification of, at most, a parent component, message, title, option type, message type, icon, array of possible selections, and an initially selected item. Two buttons are always displayed in the Options area: "OK" and "Cancel."showMessageDialog()
: this method displays a dialog with an "OK" button, and doesnít return anything. Three overloaded methods are provided allowing specification of, at most, a parent component, message, title, message type, and icon.showOptionDialog()
: this method displays a dialog which can be customized a bit more than the above dialogs, and returns either the index into the array of option Objects specified, or an option type if no option Objects are specified. Only one method is provided allowing specification of a parent component, message, title, option type, message type, icon, array of option Objects, and an option Object with the initial focus. The option Objects are layed out as a row in the Options area.To create
JOptionPanes contained in JInternalFrames rather than JDialogs, we can use the showInternalConfirmDialog(), showInternalInputDialog(), showInternalMessageDialog(), and showInternalOptionDialog() overloaded methods. These work the same as the methods described above, only they expect that a given parent is a JDesktopPane (or has a JDesktopPane ancestor).
Note: Internal dialogs are not modal and, as such, do not block execution of the invoking thread.
Alternatively, we can directly create a
JOptionPane as illustrated by the following psuedo-code:JOptionPane pane = new JOptionPane(...); // Specify parameters
pane.setXX(...); // Set additional parameters
JDialog dialog = pane.createDialog(parent, title);
dialog.show();
Object result = pane.getValue();
// Process result (may be null)
This code creates an instance of
JOptionPane and specifies several parameters (see API docs). Additional settings are then provided with setXX accessor methods. The createDialog() method creates a JDialog instance containing our JOptionPane which is then displayed (we could also have used the createInternalFrame() method to wrap our pane in a JInternalFrame). Finally, the getValue()
Note: The advantage of
JOpionPane is its simplicity and convenience. In general, there should be no need to customize it to any large extent. If you find yourself desiring a different layout we suggest writing your own container instead.Figure 14.2 illustrates the use of
JOptionPane where a custom dialog may be more suitable. Note the extremely long button, text field, and combo box. Such extreme sizes have detrimental affects on the overall usability and appearance of an app.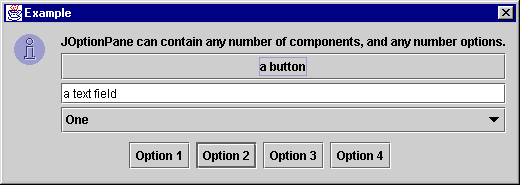
Figure 14.2 Awkward use of components in a JOptionPane.
<<file figure14-2.gif>>
UI Guideline : Usage of JOptionPane
JOptionPane is not designed as a general purpose input dialog. The primary restriction is the defined layout. JOptionPane is designed for use in conversations between the System and the User where the desired result is a navigation choice or a data selection, or where the User must be notified of an event.
Therefore, JOptionPane is best used with a single entry field or combobox selection, possibly with a set of buttons for selection or navigational choice.
For example an Answer Phone application might require an option dialog displaying "You have 1 message," with options "Play," "Save," "Record outgoing message," and "Delete messages." Such a requirement can be met with a JOptionPane which provides a single label for the message and 4 buttons for each of the choices available.
14.1.3 JColorChooser
class javax.swing.JColorChooser
This class represents a powerful, pre-built component used for color selection.
JColorChooser is normally used in a modal dialog. It consists of tabbed pane containing three panels each offering a different method of choosing a color: Swatches, HSB, and RGB. A color preview pane is displayed below this tabbed pane and always displays the currently selected color. Figure 14.3 illustrates.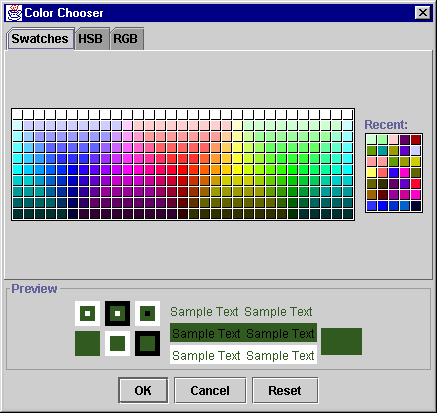
Figure 14.3 JColorChooser in a JDialog.
<<file figure14-3.gif>>
The static
showDialog() method instatiates and displays a JColorChooser in a modal dialog, and returns the selected Color (or null if no selection is made):Color color = JColorChooser.showDialog(myComponent,
"Color Chooser", Color.red);
if (color != null)
myComponent.setBackground(c);
A more complex variant is the static
createDialog() method which allows specification of two ActionListeners to be invoked when a selection is made or cancelled respectively. We can also do the following:Retrieve color selection panels with the
Add custom color selection panels using the
addChooserPanel() method.Assign a new custom color preview pane uwing the
setPreviewPanel() method.Several classes and interfaces supporting
JColorChooser are grouped into the javax.swing.colorchooser package.14.1.4 The ColorSelectionModel interface
abstract interface javax.swing.colorchooser.ColorSelectionModel
This is a simple interface describing the color selection model for
JColorChooser. It declares methods for adding and removing ChangeListeners which are intended to be notified when the selected Color changes, and getSelectedColor()/setSelectedColor() accessors to retrieve and assign the currently selected Color respectively.14.1.5 DefaultColorSelectionModel
class javax.swing.colorchooser.DefaultColorSelectionModel
This is the default concrete implementation of the
ColorSelectionModel interface. It simply implements the necessary methods as expected, stores registered ChangeListeners in an EventListenerList, and implements an additional method to perform the actual firing of ChangeEvents to all registered listeners.14.1.6 AbstractColorChooserPanel
abstract class javax.swing.colorchooser.AbstractColorChooserPanel
This abstract class describes a color chooser panel which can be added to
JColorChooser as a new tab. We can sub-class AbstractColorChooserPanel to implement a custom color chooser panel of our own. The two most important methods that must be implemented are buildChooser() and updateChooser(). The former is normally called only once at instantiation time and is intended to perform all GUI initialization tasks. The latter is intended to update the panel to reflect a change in the associated JColorChooserís ColorSelectionModel. Other required methods include those allowing access to a display name and icon used to identify the panel when it is displayed in JColorChooserís tabbed pane.14.1.7 ColorChooserComponentFactory
class javax.swing.colorchooser.ColorChooserComponentFactory
This is a very simple class that is responsible for creating and returning instances of the default color chooser panels and preview panel used by
JColorChooser. The three color chooser panels are instances of private classes: DefaultSwatchChooserPanel, DefaultRGBChooserPanel, DefaultHSBChooserPanel. The preview pane is an instance of DefaultPreviewPane. Other private classes used in this package include two custom layout managers, CenterLayout and SmartGrid! Layout, a class for convenient generation of synthetic images, SyntheticImage, and a custom text field that only allows integer input, JIntegerTextField. These undocumented classes are very interesting and we urge curious readers to spend some time with the source code. Because they are only used within the colorchooser package and are defined as package private, we will not discuss them further here.14.1.8 JFileChooser
class javax.swing.JFileChooser
This class represents the standard Swing directory navigation and file selection component which is normally used in a modal dialog. It consists of a
JList and several button and input components all linked together offering functionality similar to the file dialogs we are used to on our native platforms. The JList is used to display a list of files and sub-driectories residing in the current directory being navigated. Figure 14.4 illustrates.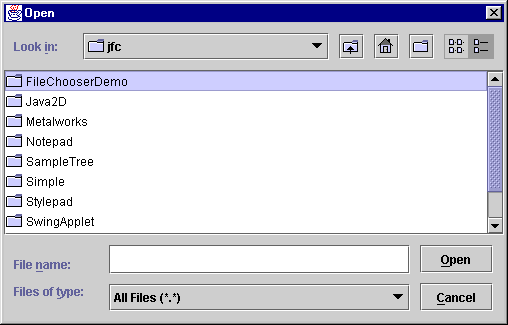
Figure 14.4 JFileChooser in a JDialog.
<<file figure14-4.gif>>
UI Guideline : Cross Application Consistency
The key reason for promoting the use of a standard file chooser dialog is to promote the consistency of such an operation across the whole operating system or machine environment. The User experience is improved because file selection is always the same no matter which application they are running. This is an important goal and worthy of recognition. Thus, if you have a requirement to manipulate files, you ought to be using the JFileChooser component.
The fact that such a re-usable component exists and much of the complex coding is provided as part of the implementation, is merely a bonus for the developer.
We can set the current directory by passing a
String to its setCurrentDirectory() method. JFileChooser also has the ability to use special FileFilters (discussed below) to only allow navigation of certain types of files. Several properties control whether directories and/or files can be navigated and selected, and how the typical "Open" (approve) and "Cancel" (cancel) buttons are represented (see the API docs for more on these straight forward methods.)To use this component we normally create an instance of it, set the desired options, and call
showDialog() to place it in an active modal dialog. This method takes the parent component and the text to display for its approve button, as parameters. Calling showOpenDialog()or showSaveDialog()will show a modal dialog with "Open" or "Save" for the approve button text respectively.
Note:
JFileChooser can take a significant amount of time to instantiate. Please consider storing an instance as a variable and performing instantiation in a separate thread at startup time, as discussed in a note above.The following code instantiates a
JFileChooser in an "Open" file dialog, verifies that a valid file is selected, and retrieves that file as a File instance:JFileChooser chooser = new JFileChooser();
chooser.setCurrentDirectory(".");
if (chooser.showOpenDialog(myComponent) !=
JFileChooser.APPROVE_OPTION)
return;
File file = chooser.getSelectedFile();
JFileChooser
generates PropertyChangeEvents when any of its properties change state. The approve and cancel buttons generate ActionEvents when pressed. We can register PropertyChangeListeners and ActionListeners to receive these events respectively. As any well-defined JavaBean should, JFileChooser defines several static String constants corresponding to each property name, e.g. JFileChooser.FILE_FILTER_CHANGED_PROPERTY (see ! API docs for a full listing). We can use these constants in determining which property a JFileChooser-generated PropertyChangeEvent corresponds to.JFileChooser
also supports the option of inserting an accessory component. This component can be any component we like and will be placed to the right of the JList. In constructing such a component, we are normally expected to implement the PropertyChangeListener interface. This way the component can be registered with the associated JFileChooser to receive notification of property state changes. The component should use these events to update its state accordingly. We use the setAccessory() method to assign an accessory component to a JFileChooser, and addPropertyChangeListener() to register it for receiving property state change notification.
Reference: For a good example of an accessory component used to preview selected images, see the
FileChooserDemo example that ships with Java 2. In the final example of this chapter we will show how to customize JFileChooser in a more direct mannar.Several classes and interfaces related to
JFileChooser are grouped into javax.swing.filechooser package.
Note:
JFileChooser is still fairly immature. For example, multi-selection mode is specified but has not been implemented yet. Later in this chapter we will show how to work around this, as well as how to build our own accessory-like component in a different location than that of a normal accessory as described above.
14.1.9 FileFilter
abstract class javax.swing.filechooser.FileFilter
This abstract class is used to implement a filter for displaying only certain file types in
JFileChooser. Two methods must be implemented in concrete sub-classes:boolean accept(File f)
: returns true if the given file should be displayed, false otherwise.String getDescription()
: returns a description of the filter used in the JComboBox at the bottom of JFileChooser.To manage
FileFilters we can use several methods in JFileChooser, including:addChoosableFileFilter(FileFilter f)
to add a new filter.removeChoosableFileFilter(FileFilter f)
to remove an existing filter.setFileFilter(FileFilter f)
to set a filter as currently active (and append it, if necessary).By default
JFileChooser receives a filter accepting all files. Special effort must be made to remove this filter if we do not desire our application to accept all files:FileFilter ft = myChooser.getAcceptAllFileFilter();
myChooser.removeChoosableFileFilter(ft);
So how do we create a simple file filter instance to only allow navigation and selection of certain file types? The following class can be used as template for defining most of our own filters, and we will see it used in future chapters:
class SimpleFilter extends FileFilter
{
    private String m_description = null;
    private String m_extension = null;

    public SimpleFilter(String extension, String description) {
      m_description = description;
      m_extension = "." + extension.toLowerCase();
    }

    public String getDescription() {
      return m_description;
    }

    public boolean accept(File f) {
      if (f == null)
        return false;
      if (f.isDirectory())
        return true;
      return f.getName().toLowerCase().endsWith(m_extension);
    }
}
Note that we always return true for directories because we normally always want to be able to navigate any directory. This filter only shows files matching the given extension
String passed into our constructor and stored as variable m_extension. In more robust, multi-purpose filters we might store an array of legal extensions, and check for each in the accept() method. Also note that the description String passed into the constructor, and stored as variable m_description, is the String shown in ! the combo box at the bottom of JFileChooser representing the corresponding file type. JFileChooser can maintain multiple filters, all added using the addChoosableFileFilter() method, and removable with its removeChoosableFileFilter() method.14.1.10 FileSystemView
abstract class javax.swing.filechooser.FileSystemView
This class encapsulates functionality which extracts information about files, directories, and partitions, and supplies this information to the
JFileChooser component. This class is used to make JFileChooser independent from both platform-specific file system information, as well as the JDK/Java 2 release version (since the JDK1.1 File API doesn't allow access to some more specific file information available in Java 2). We can provide our own FileSystemView sub-class and assign it to a JFileChooser instance using the setFileSyst! emView(FileSystemView fsv) method. Four abstract methods must be implemented:createNewFolder(File containingDir)
: creates a new folder (directory) within the given folder.getRoots()
: returns all root partitions. The notion of a root differs significantly from platform to platform.isHiddenFile(File f)
: returns whether or not the given File is hidden.isRoot(File f)
: returns whether or not the given File is a partition or drive.These methods are called by
JFileChooser and FileFilter implementations and we will, in general, have no need to extend this class unless we need to tweak the way JFileChooser interacts with our OS. The static getFileSystemView() method currently returns a Unix or Windows specific instance for use by JFileChooser in the most likely event that one of these platform types is detected. Otherwise, a generic instance is used. Support for Macintosh, OS2, and several other operating systems is expected to be provided here in future releases.14.1.11 FileView
abstract class javax.swing.filechooser.FileView
This abstract class can be used to provide customized information about files and their types (typically determined by the file extension), including icons and a string description. Each L&F provides its own sub-class of
FileView, and we can construct our own fairly easily. Each of the five methods in this class is abstract and must be implemented by sub-classes. The following generalized template can be used when creating our own FileViews:
class MyExtView extends FileView
{
// Store icons to use for list cell renderer.
protected static ImageIcon MY_EXT_ICON =
new ImageIcon("myexticon.gif");
protected static ImageIcon MY_DEFAULT_ICON =
new ImageIcon("mydefaulticon.gif");
// Return the name of a given file. "" corresponds to
// a partition, so in this case we must return the path.
public String getName(File f) {
String name = f.getName();
return name.equals("") ? f.getPath() : name;
}
// Return the description of a given file.
public String getDescription(File f) {
return getTypeDescription(f);
}
// Return the String to use for representing each specific
// file type. (Not used by JFileChooser in Java 2 FCS)
public String getTypeDescription(File f) {
String name = f.getName().toLowerCase();
if (name.endsWith(".ext"))
return "My custom file type";
else
return "Unrecognized file type";
}
// Return the icon to use for representing each specific
// file type in JFileChooserís JList cell renderer.
public Icon getIcon(File f) {
String name = f.getName().toLowerCase();
if (name.endsWith(".ext"))
return MY_EXT_ICON;
else
return MY_DEFAULT_ICON;
}
// Normally we should return true for directories only.
public Boolean isTraversable(File f) {
return (f.isDirectory() ? Boolean.TRUE : Boolean.FALSE);
}
}
We will see how to build a custom
FileView for JAR and ZIP archive files in the final example of this chapter.
14.2 Adding an "About" dialog
Most GUI applications have at least one "About" dialog, usually modal, which often displays copyright, company, and other important information such as product name, version number, authors, etc. The following example illustrates how to add such a dialog to our text editor example developed in chapter 12. We build a sub-class of
JDialog, populate it with some simple components, and store it as a variable which can be shown and hidden indefinitely without having to instantiate a new dialog each time it is requested. We also implement centering so that whenever it is shown it will appear in the center of our applicationís frame.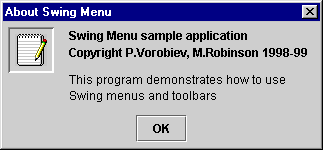
Figure 14.5 A typical "About" custom JDialog with dynamic centering.
<<file figure14-5.gif>>
The Code: BasicTextEditor.java
see \Chapter14\1
import java.awt.*;
import java.awt.event.*;
import java.io.*;
import java.util.*;

import javax.swing.*;
import javax.swing.event.*;
import javax.swing.border.*;

public class BasicTextEditor extends JFrame
{
  // Unchanged code from section 12.5
  protected AboutBox m_dlg;

  public BasicTextEditor() {
    super("\"About\" BasicTextEditor");
    setSize(450, 350);
    ImageIcon icon = new ImageIcon("smallIcon.gif");
    setIconImage(icon.getImage());

    // Unchanged code from section 12.5

    updateMonitor();
    m_dlg = new AboutBox(this);
    setVisible(true);
}

  protected JMenuBar createMenuBar() {
    // Unchanged code from section12.5

    JMenu mHelp = new JMenu("Help");
    mHelp.setMnemonic('h');
    Action actionAbout = new AbstractAction("About") {
      public void actionPerformed(ActionEvent e) {
        Dimension d1 = m_dlg.getSize();
        Dimension d2 = BasicTextEditor.this.getSize();
        int x = Math.max((d2.width-d1.width)/2, 0);
        int y = Math.max((d2.height-d1.height)/2, 0);
        m_dlg.setBounds(x+BasicTextEditor.this.getX(),
          y+ BasicTextEditor.this.getY(),
          d1.width, d1.height);
        m_dlg.show();
      }
    };
    item =  mHelp.add(actionAbout);
    item.setMnemonic('a');
    menuBar.add(mHelp);

    getContentPane().add(m_toolBar, BorderLayout.NORTH);
    return menuBar;
  }
  // Unchanged code
 }

class AboutBox extends JDialog
{
  public AboutBox(Frame owner) {
    super(owner, "About Swing Menu", true);

    JLabel lbl = new JLabel(new ImageIcon("icon.gif"));
    JPanel p = new JPanel();
    Border b1 = new BevelBorder(BevelBorder.LOWERED);
    Border b2 = new EmptyBorder(5, 5, 5, 5);
    lbl.setBorder(new CompoundBorder(b1, b2));
    p.add(lbl);
    getContentPane().add(p, BorderLayout.WEST);

    String message = "Swing Menu sample application\n"+
      "Copyright P.Vorobiev, M.Robinson 1998-99";
    JTextArea txt = new JTextArea(message);
    txt.setBorder(new EmptyBorder(5, 10, 5, 10));
    txt.setFont(new Font("Helvetica", Font.BOLD, 12));
    txt.setEditable(false);
    txt.setBackground(getBackground());
    p = new JPanel();
    p.setLayout(new BoxLayout(p, BoxLayout.Y_AXIS));
    p.add(txt);

    message = "This program demonstrates how to use\n"+
      "Swing menus and toolbars";
    txt = new JTextArea(message);
    txt.setBorder(new EmptyBorder(5, 10, 5, 10));
    txt.setFont(new Font("Arial", Font.PLAIN, 12));
    txt.setEditable(false);
    txt.setBackground(getBackground());
    p.add(txt);

    getContentPane().add(p, BorderLayout.CENTER);

    JButton btOK = new JButton("OK");
    ActionListener lst = new ActionListener() {
      public void actionPerformed(ActionEvent e) {
        setVisible(false);
      }
    };
    btOK.addActionListener(lst);
    p = new JPanel();
    p.add(btOK);
    getContentPane().add(p, BorderLayout.SOUTH);

    pack();
    setResizable(false);
  }
}
Understanding the Code
Class BasicTextEditor
New instance variable:
AboutBox m_dialog
: used to reference an instance of our custom "About" dialog class.The constructor now assigns a custom icon to the application frame, instantiates an
AboutBox, and directs our m_dlg reference to the resulting instance. In this way we can simply show and hide the dialog as necessary, without having to build a new instance each time it is requested. Notice that we use a this reference for its parent because BasicTextEditor extends JFrame.We also modify the
createMenuBar() method by adding a new "Help" menu containing an "About" menu item. This menu item is created as an Action implementation, and its actionPerformed() method determines the dimensions of our dialog as well as where it should be placed on the screen so that it will appear centered relative to its parent.Class AboutBox
This class extends
JDialog to implement our custom "About" dialog. The constructor creates a modal JDialog instance titled "About Swing Menu," and populates it with some simple components. A large icon is placed in the left side and two JTextAreas are placed in the center to display multiline text messages with different fonts. A push button titled "OK" is placed at the bottom. Its ActionListenerís actionPerformed() method invokes setVisible(false) when pressed.
Note: We could have constructed a similar "About" dialog using a
JOptionPane message dialog. However, the point of this example is to demonstrate the basics of custom dialog creation, which we will be using later in chapter 20 to create several complex custom dialogs that could not be derived from JOptionPane.Running the Code
Select the "About" menu item which brings up the dialog shown in figure 14.5. This dialog serves only to display information, and has no functionality other than the "OK" button which hides it. Note that no matter where the parent frame lies on the screen, when the dialog is invoked it appears centered. Also note that displaying the dialog is very fast because we are working with the same instance throughout the applicationís lifetime. This is, in general, a common practice that should be adhered to.
14.3 JOptionPane message dialogs
Message dialogs provided by the
JOptionPane class can be used for many purposes in Swing apps: to post a message, ask a question, or get simple user input. The following example brings up several message boxes of different types with a common Shakespeare theme. Both internal and regular dialogs are constructed, demonstrating how to use the convenient showXXDialog() methods (see 14.1.2), as well as how to manually create a JOptionPane component and place it in a dialog or internal frame for display.Each dialog is instantiated as needed and we perform no caching here (for purposes of demonstration). A more professional implementation might instantiate each dialog at startup and store them as variables for use throughout the applicationís lifetime.
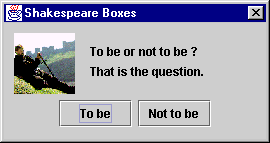
Figure 14.6 JOptionPane with custom icon, message, and option button strings in a JDialog.
<<file figure14-6.gif>>
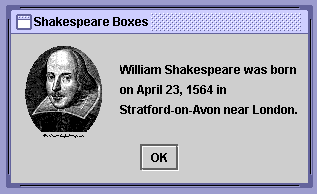
Figure 14.7 JOptionPane with custom icon and message in a JInternalFrame.
<<file figure14-7.gif>>

Figure 14.8 JOptionPane ERROR_MESSAGE message dialog with multi-line message.
<<file figure14-8.gif>>

Figure 14.9 JOptionPane INFORMATION_MESSAGE input dialog with custom icon, message, text field input, and initial selection.
<<file figure14-9.gif>>
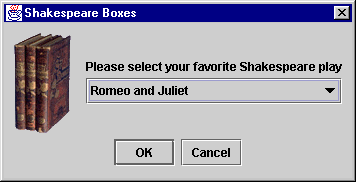
Figure 14.10 JOptionPane INFORMATION_MESSAGE input dialog with custom icon, message, combo box input, and initial selection.
<<file figure14-10.gif>>

Figure 14.11 JOptionPane YES_NO_OPTION confirm dialog.
<<file figure14-11.gif>>
The Code: DialogBoxes.java
see \Chapter14\2
import java.awt.*;
import java.awt.event.*;

import javax.swing.*;

public class DialogBoxes extends JFrame
{
        static final String BOX_TITLE = "Shakespeare Boxes";

        public DialogBoxes()
	{
		super(BOX_TITLE);
		setSize(400,300);
		setLayeredPane(new JDesktopPane());

		JMenuBar menuBar = createMenuBar();
		setJMenuBar(menuBar);

		WindowListener wndCloser = new WindowAdapter()
		{
			public void windowClosing(WindowEvent e)
			{
				System.exit(0);
			}
		};
		addWindowListener(wndCloser);

		setVisible(true);
	}

	protected JMenuBar createMenuBar()
	{
		JMenuBar menuBar = new JMenuBar();

		JMenu mFile = new JMenu("File");
		mFile.setMnemonic('f');

		JMenuItem mItem = new JMenuItem("Ask Question");
		mItem.setMnemonic('q');
		ActionListener lst = new ActionListener()
		{
			public void actionPerformed(ActionEvent e)
			{
				JOptionPane pane = new JOptionPane(
					"To be or not to be ?\nThat is the question.");
				pane.setIcon(new ImageIcon("Hamlet.gif"));
				Object[] options = new String[] {"To be", "Not to be"};
				pane.setOptions(options);
				JDialog dialog = pane.createDialog(DialogBoxes.this,
					BOX_TITLE);
				dialog.show();
				Object obj = pane.getValue();	// May be null
				int result = -1;
				for (int k = 0; k < options.length; k++)
					if (options[k].equals(obj))
						result = k;
				System.out.println("User's choice: "+result);
			}
		};
		mItem.addActionListener(lst);
		mFile.add(mItem);

		mItem = new JMenuItem("Info Message");
		mItem.setMnemonic('i');
		lst = new ActionListener()
		{
			public void actionPerformed(ActionEvent e)
			{
				String message = "William Shakespeare was born\n"+
					"on April 23, 1564 in\n"
					+"Stratford-on-Avon near London.";
				JOptionPane pane = new JOptionPane(message);
				pane.setIcon(new ImageIcon("Shakespeare.gif"));
				JInternalFrame frame = pane.createInternalFrame(
					(DialogBoxes.this).getLayeredPane(), BOX_TITLE);
				getLayeredPane().add(frame);
			}
		};
		mItem.addActionListener(lst);
		mFile.add(mItem);

		mItem = new JMenuItem("Error Message");
		mItem.setMnemonic('e');
		lst = new ActionListener()
		{
			public void actionPerformed(ActionEvent e)
			{
				String message = "\"The Comedy of Errors\"\n"+
					"is considered by many scholars to be\n"+
					"the first play Shakespeare wrote";
				JOptionPane.showMessageDialog(DialogBoxes.this, message,
					BOX_TITLE, JOptionPane.ERROR_MESSAGE);
			}
		};
		mItem.addActionListener(lst);
		mFile.add(mItem);

		mFile.addSeparator();

		mItem = new JMenuItem("Text Input");
		mItem.setMnemonic('t');
		lst = new ActionListener()
		{
			public void actionPerformed(ActionEvent e)
			{
				String input = (String)JOptionPane.showInputDialog(
					DialogBoxes.this,
					"Please enter your favorite Shakespeare play",
					BOX_TITLE, JOptionPane.INFORMATION_MESSAGE,
					new ImageIcon("Plays.jpg"), null,
					"Romeo and Juliet");
				System.out.println("User's input: "+input);
			}
		};
		mItem.addActionListener(lst);
		mFile.add(mItem);

		mItem = new JMenuItem("Combobox Input");
		mItem.setMnemonic('c');
		lst = new ActionListener()
		{
			public void actionPerformed(ActionEvent e)
			{
				String[] plays = new String[] {
					"Hamlet",
					"King Lear",
					"Otello",
					"Romeo and Juliet"
				};
				String input = (String)JOptionPane.showInputDialog(
					DialogBoxes.this,
					"Please select your favorite Shakespeare play",
					BOX_TITLE, JOptionPane.INFORMATION_MESSAGE,
					new ImageIcon("Books.gif"), plays,
					"Romeo and Juliet");
				System.out.println("User's input: "+input);
			}
		};
		mItem.addActionListener(lst);
		mFile.add(mItem);

		mFile.addSeparator();

		mItem = new JMenuItem("Exit");
		mItem.setMnemonic('x');
		lst = new ActionListener()
		{
			public void actionPerformed(ActionEvent e)
			{
				if (JOptionPane.showConfirmDialog(DialogBoxes.this,
					"Do you want to quit this application ?",
					BOX_TITLE, JOptionPane.YES_NO_OPTION )
					== JOptionPane.YES_OPTION)
					System.exit(0);
			}
		};
		mItem.addActionListener(lst);
		mFile.add(mItem);
		menuBar.add(mFile);

		return menuBar;
	}

	public static void main(String argv[])
	{
		new DialogBoxes();
	}
}
Understanding the Code
Class DialogBoxes
This class represents a simple frame which contains a menu bar created with our
createMenuBar() method, and a JDesktopPane (see chapter 16) which is used as the frameís layered pane. The menu bar contains a single menu titled "File," which holds several menu items.The
createMenuBar() method is responsible for populating our frameís menu bar with seven menu items, each with an ActionListener to invoke the display of a JOptionPane in either a JDialog or JInternalFrame. The first menu item titled "Ask Question" creates an instance of JOptionPane, assigns it a custom icon using its setIcon() method, and custom option button Strings using ! setOptions(). A JDialog is created to hold this message box, and the show() method displays this dialog on the screen and waits until it is dismissed. At that point the getValue() method retrieves the user's selection as an Object, which may be null or one of the option button Strings assigned to this message box. The resulting dialog is shown in figure 14.6.
UI Guideline : Affirmative Text
The use of the affirmative and unambiguous text "To Be" and "Not to be" greatly enhances the usability of the option dialog. For example, were the text to have read, "To be or not to be? That is the question", "Yes" or "No", this would have been somewhat ambiguous and may have confused some users. The explicit text, "To Be", "Not to be" is much clearer.
This is another example of improved usability with just a little more extra coding effort.
The second menu item titled "Info Message" creates a
JOptionPane with a multi-line message String and a custom icon. The createInternalFrame() method is used to create a JInternalFrame holding the resulting JOptionPane message box. This internal frame is then added to the layered pane, which is now a JDesktopPane instance. The resulting internal frame is shown on the figure 14.7.The third menu item titled "Error Message" produces a standard error message box using
JOptionPaneís static showMessageDialog() method and the ERROR_MESSAGE message type. The resulting dialog is shown in figure 14.8. Recall that JOptionPane dialogs appear, by default, centered with respect to the parent if the parent is a frame. This is why we donít do any manual positioning here.The next two menu items titled "Text Input" and "Combobox Input" produce
INFORMATION_MESSAGE JOptionPanes which take user input in a JTextField and JComboBox respectively. The static showInputDialog() is used to display these JOptionPanes in JDialogs. Figures 14.9 and 14.10 illustrate. The "Text Input" pane takes the initial text to display in its text field as a String parameter. The "Combobox Input" pane takes an array o! f Strings to display in the combo box as possible choices, as well as a String to display as initialy selected.
UI Guideline : Added Usability with Constrained Lists
Figures 14.9 and 14.10 clearly highlight how usability can be improved through effective component choice. The combobox with a constrained list of choices is clearly the better tool for the task at hand.
The Domain Problem in this example has a fixed number of choices. Shakespeare is clearly dead and the plays attributed to him are known. Thus the combobox in Fig 14.10 is a better choice. It should be populated with a list of all the known plays.
The Option Pane in Fig 14.9 would be better used for an unknown data entry such as "Please enter your name".
The final menu item titled "Exit" brings up a
YES_NO_OPTION confirmation JOptionPane in a JDialog (shown in figure 14.11) by calling showConfirmDialog(). The application is terminated if the user answers "Yes."14.4 Customizing JColorChooser
In chapter 12 we developed a custom menu item allowing quick and easy selection of a color for the background and foreground of a
JTextArea. In section 14.1 we built off of this example to add a simple "About" dialog. In this section we'll build off of it further, and construct a customized JColorChooser allowing a much wider range of color selection. Our implementation includes a preview component, PreviewPanel, that illustrates how text will appear with chosen background and foreground colors. Note that we have to return both background and foreground selection values when the user dismisses the color chooser in order to update the text component properly.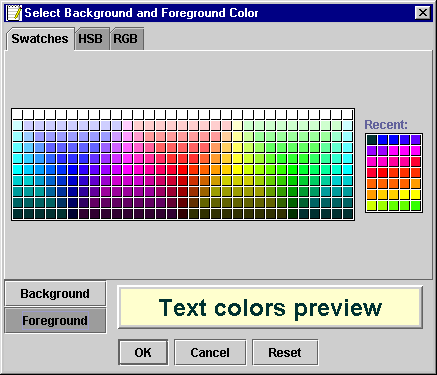
Figure 14.12 JColorChooser with custom PreviewPanel component capable of returning two Color selections.
<<file figure14-12.gif>>
UI Guideline : Preview Improves Usability
In this example, the User may have a goal of "Select suitable colours for a banner headline." By allowing the User to view a WYSIWYG preview, usability is improved. The user doesn't have to experiment with selection, which involves opening and closing the dialog several times. Instead, she can achieve the goal on a single visit to the color chooser dialog.
The Code: BasicTextEditor.java
see \Chapter14\3
import java.awt.*;
import java.awt.event.*;

import javax.swing.*;

public class BasicTextEditor extends JFrame
{
  // Unchanged code from section 14.2

  protected JColorChooser m_colorChooser;
  protected PreviewPanel m_previewPanel;
  protected JDialog m_colorDialog;

  public BasicTextEditor() {
    super("BasicTextEditor with JColorChooser");
    setSize(450, 350);
    ImageIcon icon = new ImageIcon("smallIcon.gif");
    setIconImage(icon.getImage());

    m_colorChooser = new JColorChooser();
    m_previewPanel = new PreviewPanel(m_colorChooser);
    m_colorChooser.setPreviewPanel(m_previewPanel);

    // Unchanged code from section 14.2
  }

  protected JMenuBar createMenuBar() {
    // Unchanged code from section 14.2

    Action actionChooser = new AbstractAction("Color Chooser") {
      public void actionPerformed(ActionEvent e) {
        BasicTextEditor.this.repaint();
        if (m_colorDialog == null)
        m_colorDialog = JColorChooser.createDialog(BasicTextEditor.this,
          "Select Background and Foreground Color",
          true, m_colorChooser, m_previewPanel, null);
        m_previewPanel.setTextForeground(
          m_monitor.getForeground());
        m_previewPanel.setTextBackground(
          m_monitor.getBackground());
        m_colorDialog.show();

        if (m_previewPanel.isSelected()) {
          m_monitor.setBackground(
            m_previewPanel.getTextBackground());
          m_monitor.setForeground(
            m_previewPanel.getTextForeground());
        }
      }
    };
    mOpt.addSeparator();
    item =  mOpt.add(actionChooser);
    item.setMnemonic('c');

    menuBar.add(mOpt);

    // Unchanged code from section 14.2
  }
}

// Unchanged code from section 14.2

class PreviewPanel extends JPanel implements ChangeListener, ActionListener
{
  protected JColorChooser m_chooser;
  protected JLabel m_preview;
  protected JToggleButton m_btBack;
  protected JToggleButton m_btFore;
  protected boolean m_isSelected = false;

  public PreviewPanel(JColorChooser chooser) {
    this(chooser, Color.white, Color.black);
  }

  public PreviewPanel(JColorChooser chooser, Color background, Color foreground) {
    m_chooser = chooser;
    chooser.getSelectionModel().addChangeListener(this);

    setLayout(new BorderLayout());
    JPanel p = new JPanel(new GridLayout(2, 1, 0, 0));
    ButtonGroup group = new ButtonGroup();
    m_btBack = new JToggleButton("Background");
    m_btBack.setSelected(true);
    m_btBack.addActionListener(this);
    group.add(m_btBack);
    p.add(m_btBack);
    m_btFore = new JToggleButton("Foreground");
    m_btFore.addActionListener(this);
    group.add(m_btFore);
    p.add(m_btFore);
    add(p, BorderLayout.WEST);

    p = new JPanel(new BorderLayout());
    Border b1 = new EmptyBorder(5, 10, 5, 10);
    Border b2 = new BevelBorder(BevelBorder.RAISED);
    Border b3 = new EmptyBorder(2, 2, 2, 2);
    Border cb1 = new CompoundBorder(b1, b2);
    Border cb2 = new CompoundBorder(cb1, b3);
    p.setBorder(cb2);

    m_preview = new JLabel("Text colors preview",
      JLabel.CENTER);
    m_preview.setBackground(background);
    m_preview.setForeground(foreground);
    m_preview.setFont(new Font("Arial",Font.BOLD, 24));
    m_preview.setOpaque(true);
    p.add(m_preview, BorderLayout.CENTER);
    add(p, BorderLayout.CENTER);

    m_chooser.setColor(background);
  }

  protected boolean isSelected() {
    return m_isSelected;
  }

  public void setTextBackground(Color c) {
    m_preview.setBackground(c);
  }

  public Color getTextBackground() {
    return m_preview.getBackground();
  }

  public void setTextForeground(Color c) {
    m_preview.setForeground(c);
  }

  public Color getTextForeground() {
    return m_preview.getForeground();
  }

  public void stateChanged(ChangeEvent evt) {
    Color c = m_chooser.getColor();
    if (c != null) {
      if (m_btBack.isSelected())
        m_preview.setBackground(c);
      else
        m_preview.setForeground(c);
    }
  }

  public void actionPerformed(ActionEvent evt) {
    if (evt.getSource() == m_btBack)
      m_chooser.setColor(getTextBackground());
    else if (evt.getSource() == m_btFore)
      m_chooser.setColor(getTextForeground());
    else
      m_isSelected = true;
  }
}
Understanding the Code
Class BasicTextEditor
New instance variables:
JColorChooser m_colorChooser
: stored JColorChooser to avoid unnecessary instantiation.PreviewPanel m_previewPanel
: instance of our custom color previewing component.JDialog m_colorDialog
: stored JDialog acting as the parent of m_colorChooser.The constructor instantiates
m_colorChooser and m_previewPanel, assigning m_previewPanel as m_colorChooserís preview component using the setPreviewPanel() method.The menu bar receives a new menu item titled "Color Chooser" set up in the
createMenuBar() method as an Action implementation. When selected, this item first repaints our application frame to ensure that the area covered by the popup menu is refreshed properly. Then it checks to see if our m_colorDialog has been instantiated yet. If not we call JColorChooserĎs static createDialog() method to wrap m_colorChooser in a dialog, and use m_previewPanel as an! ActionListener for the "OK" button (see 14.1.3). Note that this instantiation only occurs once.We then assign the current colors of
m_monitor to m_previewPanel (recall that m_monitor is the JTextArea central to this application). The reason we do this is because the foreground and background can also be assigned by our custom menu color choosers. If this occurs m_previewPanel is not notified, so we update the selected colors each time the dialog is invoked.The dialog is then shown and the main application thread waits for it to be dismissed. When the dialog is dismissed
m_previewPanel is checked for whether or not new colors have been selected, using its isSelected() method (see below). If new colors have been chosen they are assigned to m_monitor.
Note: We have purposely avoided updating the selected colors in our custom color menu components. The reason we did this is because in a more professional implementation we would most likely not offer both methods for choosing text component colors. If we did want to support both methods we would need to determine the closest color in our custom color menus that matches the corresponding color selected with
JColorChooser (because JColorChooser offers a much wider range of choices).
Class PreviewPanel
This class represents our custom color preview component designed for use with
JColorChooser. It extends JPanel and implements two listener interfaces, ChangeListener and ActionListener. It displays selected foreground and background colors in a label, and includes two JToggleButtons used to switch between background color and foreground color selection modes. Instance variables:JColorChooser m_chooser
: a reference to the hosting color chooser.JLabel m_preview
: label to preview background and foreground colors.JToggleButton m_btBack
: toggle button to switch to background color selection.JToggleButton m_btFore
: toggle button to switch to foreground color selection.boolean m_isSelected
: flag indicating a selection has taken place.The first
PreviewPanel constructor takes a JColorChooser as parameter and delegates its work to the second constructor, passing it the JColorChooser as well as white and black Colors for the initial background and foreground colors respectively. As we discussed in the beginning of this chapter, JColorChooserís ColorSelectionModel fires ChangeEventís when the selected Color changes. So we sta! rt by registering this component as a ChangeListener with the given color chooserís model.A
BorderLayout is used to manage this container and two toggle buttons are placed in a 2x1 GridLayout, which is added to the WEST region. Both buttons receive a this reference as an ActionListener. A label with a large font is then placed in the CENTER region. This label is surrounded by a decorative, doubly-compounded border consisting of an EmptyBorder, BevelBorder, and anotherSeveral methods are used to set and get the selected colors and do not require any special explanation. The
stateChanged() method will be called when the color chooser model fires ChangeEvents. Depending on which toggle button is selected, this method updates the background or foreground color of the preview label.The
actionPerformed() method will be called when one of the toggle buttons is pressed. It assignes the stored background or foreground, depending which button is pressed, as the color of the hosting JColorChooser. This method is also called when the "OK" button is pressed, in which case the m_isSelected flag is set to true.Running the Code
Select the "Color Chooser" menu item to bring up our customized
JColorChooser shown in figure 14.12. Select a background and foreground color using any of the available color panes. Verify that the preview label is updated accordingly to reflect the current color selection, and the currently selected toggle button. Press the "OK" button to dismiss the dialog and note that both the selected foreground and background colors are assigned to our applicationís text area. Also note that pressing the "Cancel" button dismisses the dialog without making any color changes.14.5 Customizing JFileChooser
Examples using
JFileChooser to load and save files are scattered throughout the whole book. In this section we'll take a closer look at the more advanced features of this component through building a powerful JAR and ZIP archive creation, viewing, and extraction tool. We will see how to implement a custom FileView and FileFilter, and how to access and manipulate the internals of JFileChooser to allow multiple file selection and add our own components. Since this example deals with Java 2 archive functionality, we will first briefly summarize the classes from the java.util.zip and java.util.jar packages we will be using.
Note: The interface presented in this section is extremely basic and professional implementations would surely construct a more ellaborate GUI. We have purposely avoided this here due to the complex nature of the example, and to avoid straying from the
JFileChooser topics central to its construction.14.5.1 ZipInputStream
class java.util.zip.ZipInputStream
This class represents a filtered input stream which uncompresses ZIP archive data. The constructor takes an instance of
InputStream as parameter. Before reading data from this stream we need to find a ZIP file entry using the getNextEntry() method. Each entry corresponds to an archived file. We can read() an an array of bytes from an entry, and then close it using the closeEntry() method when reading is complete.14.5.2 ZipOutputStream
class java.util.zip.ZipOutputStream
This class represents a filtered output stream which takes binary data and writes them into an archive in the compressed (default) or uncompressed (optional) form. The constructor of this class takes an instance of
OutputStream as parameter. Before writing data to this stream we need to create a new ZipEntry using the putNextEntry() method. Each ZipEntry corresponds to an archived file. We can write() an array of bytes to a ZipEntry, and close it using the c! loseEntry() method when writing is complete. We can also specify the compression method for storing ZipEntrys using ZipOutputStreamís setMethod() method.14.5.3 ZipFile
class java.util.zip.ZipFile
This class encapsulates a collection of
ZipEntrys and represents a read-only ZIP archive. We can fetch an Enumeration of the contained ZipEntrys using the entries() method. The size() method tells us how many files are contained and getName() returns the archiveís full path name. We can retrieve an InputStream for reading the contents of a contained ZipEntry using its getInputStream() method. When we are done reading we are expected to call the close() method to close the archive.14.5.4 ZipEntry
class java.util.zip.ZipEntry
This class represents a single archived file or directory within a ZIP archive. It allows retrieval of its name and can be cloned using the
clone() method. Using typical set/get accessors, we can access a ZipEntryís compression method, CRC-32 checksum, size, modification time, compression method, and a comment attachment. We can also query whether or not a ZipEntry is a directory using its isDirectory() method.14.5.5 The java.util.jar package
This package contains a set of classes for managing Java archives (JAR files). The relevant classes that we will be dealing with (
JarEntry, JarFile, JarInputStream, and JarOutputStream) are direct subclasses of the zip package counterparts, and thus inherit the functionality described above.14.5.6 Manifest
class java.util.jar.Manifest
This class represents a JAR
Manifest file. A Manifest contains a collection of names and their associated attributes specific both for the archive in whole and for a particular JarEntry (i.e. a file or directory in the archive). We are not concerned with the details of JAR manifest files in this chapter, and it suffices to say that the JarOutputStream constructor takes a Manifest instance as parameter, along with an OutputStream.In this example we create a simple, two-button GUI with a status bar (a label). One button corresponds to creating a ZIP or JAR archive, and another corresponds to decompressing an archive. In each case two
JFileChoosers are used to perform the operation. The first chooser is used to allow entry of an archive name to use, or selection of an archive to decompress. The second chooser is used to allow selection of files to compress or decompress. (As noted above, more professional implementations would most likely include a more elaborate GUI.) A custom FileView class is used to represent ZIP and JAR archives using a custom icon, and a FileFilter class is constructed to only allow viewing of ZIP (".zip") and JAR (".jar") files.! We also work with JFileChooser as a container by adding our own custom component, taking advantage of the fact that it uses a y-oriented BoxLayout to organize its children. Using similar tactics we show how to gain access to its JList (used for the display and selection of files and directories) to allow multiple selection (an unimplemented feature in JFileChooser as of Java 2 FCS).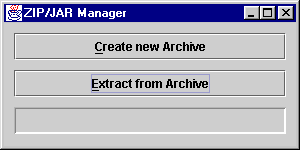
Figure 14.12 ZIP/JAR Manager JFileChooser example at startup.
<<file figure14-12.gif>>
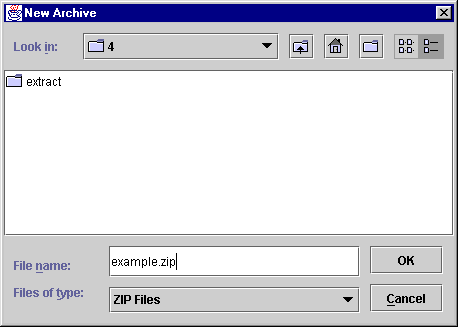
Figure 14.13 First step in creating an archive; using JFileChooser to select an archive location and name .
<<file figure14-13.gif>>
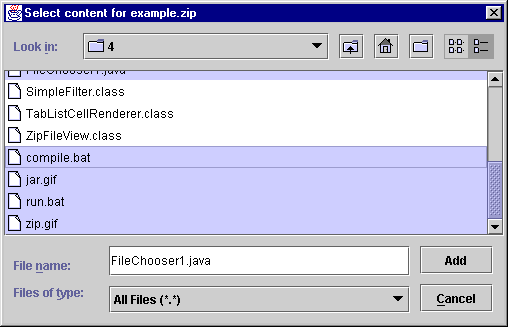
Figure 14.14 Second step in creating an archive; using JFileChooser to select archive content.
<<file figure14-14.gif>>
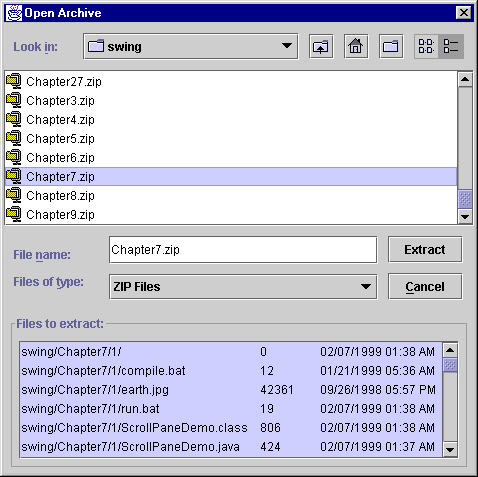
Figure 14.15 First step in uncompressing an archive; using a custom component in JFileChooser.
<<file figure14-15.gif>>
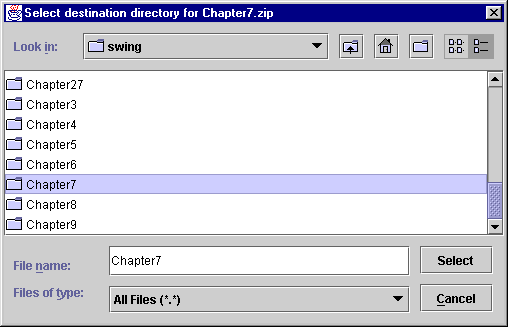
Figure 14.16 Second step in uncompressing an archive; using JFileChooser to select a destination directory.
<<file figure14-16.gif>>
The Code: ZipJarManager.java
see \Chapter14\4
import java.io.*;
import java.util.*;
import java.util.zip.*;
import java.util.jar.*;
import java.beans.*;
import java.text.SimpleDateFormat;

import javax.swing.*;
import javax.swing.event.*;
import javax.swing.border.*;

public class ZipJarManager extends JFrame
{
	public static int BUFFER_SIZE = 10240;

        protected JFileChooser chooser1;
        protected JFileChooser chooser2;

	protected File  m_currentDir = new File(".");
	protected SimpleFilter m_zipFilter;
	protected SimpleFilter m_jarFilter;
	protected ZipFileView  m_view;

	protected JButton m_btCreate;
	protected JButton m_btExtract;
	protected JLabel  m_status;

	protected JList m_zipEntries;
	protected File  m_selectedFile;

	public ZipJarManager()
	{
		super("ZIP/JAR Manager");

                JWindow jwin = new JWindow();
                jwin.getContentPane().add(new JLabel(
                	"Loading ZIP/JAR Manager...", SwingConstants.CENTER));
                jwin.setBounds(200,200,200,100);
                jwin.setVisible(true);

 		chooser1 = new JFileChooser();
		chooser2 = new JFileChooser();

		JPanel p = new JPanel(new GridLayout(3, 1, 10, 10));
		p.setBorder(new EmptyBorder(10, 10, 10, 10));

		m_btCreate = new JButton("Create new Archive");
		ActionListener lst = new ActionListener()
		{
			public void actionPerformed(ActionEvent e)
			{
				m_btCreate.setEnabled(false);
				m_btExtract.setEnabled(false);
				createArchive();
				m_btCreate.setEnabled(true);
				m_btExtract.setEnabled(true);
			}
		};
		m_btCreate.addActionListener(lst);
		m_btCreate.setMnemonic('c');
		p.add(m_btCreate);

		m_btExtract = new JButton("Extract from Archive");
		lst = new ActionListener()
		{
			public void actionPerformed(ActionEvent e)
			{
				m_btCreate.setEnabled(false);
				m_btExtract.setEnabled(false);
				extractArchive();
				m_btCreate.setEnabled(true);
				m_btExtract.setEnabled(true);
			}
		};
		m_btExtract.addActionListener(lst);
		m_btExtract.setMnemonic('e');
		p.add(m_btExtract);

		m_status = new JLabel();
		m_status.setBorder(new BevelBorder(BevelBorder.LOWERED,
			Color.white, Color.gray));
		p.add(m_status);

		m_zipFilter = new SimpleFilter("zip", "ZIP Files");
		m_jarFilter = new SimpleFilter("jar", "JAR Files");
		m_view = new ZipFileView();

		chooser1.addChoosableFileFilter(m_zipFilter);
		chooser1.addChoosableFileFilter(m_jarFilter);
		chooser1.setFileView(m_view);
		chooser1.setMultiSelectionEnabled(false);
		chooser1.setFileFilter(m_jarFilter);

		javax.swing.filechooser.FileFilter ft =
			chooser1.getAcceptAllFileFilter();
		chooser1.removeChoosableFileFilter(ft);

		getContentPane().add(p, BorderLayout.CENTER);
                setBounds(0,0,300,150);
		WindowListener wndCloser = new WindowAdapter()
		{
			public void windowClosing(WindowEvent e)
			{
				System.exit(0);
			}
		};
		addWindowListener(wndCloser);

		jwin.setVisible(false);
		jwin.dispose();

		setVisible(true);
	}

	public void setStatus(String str)
	{
		m_status.setText(str);
		m_status.repaint();
	}

	protected void createArchive()
	{
		// Show chooser to select archive
                chooser1.setCurrentDirectory(m_currentDir);
		chooser1.setDialogType(JFileChooser.SAVE_DIALOG);
		chooser1.setDialogTitle("New Archive");
                chooser1.setPreferredSize(new Dimension(450,300));

		if (chooser1.showDialog(this, "OK") != JFileChooser.APPROVE_OPTION)
			return;
		m_currentDir = chooser1.getCurrentDirectory();

		final File archiveFile = chooser1.getSelectedFile();
		if (!isArchiveFile(archiveFile))
			return;

		// Show chooser to select entries
		chooser2.setCurrentDirectory(m_currentDir);
		chooser2.setDialogType(JFileChooser.OPEN_DIALOG);
		chooser2.setDialogTitle("Select content for " + archiveFile.getName());
		chooser2.setMultiSelectionEnabled(true);
		chooser2.setFileSelectionMode(JFileChooser.FILES_ONLY);

		if (chooser2.showDialog(this, "Add") != JFileChooser.APPROVE_OPTION)
			return;

		m_currentDir = chooser2.getCurrentDirectory();
		final File[] selected = getSelectedFiles(chooser2);

		String name = archiveFile.getName().toLowerCase();
		if (name.endsWith(".zip"))
 		{
                	Thread runner = new Thread() {
   				public void run() {
					createZipArchive(archiveFile, selected);
				}
			};
			runner.start();
		}
		else if (name.endsWith(".jar"))
		{
                	Thread runner = new Thread() {
   				public void run() {
					createJarArchive(archiveFile, selected);
				}
			};
			runner.start();
		}
	}

	protected void createZipArchive(File archiveFile, File[] selected)
	{
		try
		{
			byte buffer[] = new byte[BUFFER_SIZE];
			// Open archive file
			FileOutputStream stream =
				new FileOutputStream(archiveFile);
			ZipOutputStream out = new ZipOutputStream(stream);

			for (int k = 0; k < selected.length; k++)
			{
				if (selected[k]==null || !selected[k].exists() ||
					selected[k].isDirectory())
					continue;	// Just in case...
				setStatus("Adding "+selected[k].getName());

				// Add archive entry
				ZipEntry zipAdd = new ZipEntry(selected[k].getName());
				zipAdd.setTime(selected[k].lastModified());
				out.putNextEntry(zipAdd);

				// Read input & write to output
				FileInputStream in = new FileInputStream(selected[k]);
				while (true)
				{
					int nRead = in.read(buffer, 0, buffer.length);
					if (nRead <= 0)
						break;
					out.write(buffer, 0, nRead);
				}
				in.close();
			}

			out.close();
			stream.close();
			setStatus("Adding completed OK");
		}
		catch (Exception e)
		{
			e.printStackTrace();
			setStatus("Error: "+e.getMessage());
			return;
		}
	}

	protected void createJarArchive(File archiveFile, File[] selected)
	{
		try
		{
			byte buffer[] = new byte[BUFFER_SIZE];
			// Open archive file
			FileOutputStream stream =
				new FileOutputStream(archiveFile);
			JarOutputStream out = new JarOutputStream(stream,
				new Manifest());

			for (int k = 0; k < selected.length; k++)
			{
				if (selected[k]==null || !selected[k].exists() ||
					selected[k].isDirectory())
					continue;	// Just in case...
				setStatus("Adding "+selected[k].getName());

				// Add archive entry
				JarEntry jarAdd = new JarEntry(selected[k].getName());
				jarAdd.setTime(selected[k].lastModified());
				out.putNextEntry(jarAdd);

				// Write file to archive
				FileInputStream in = new FileInputStream(selected[k]);
				while (true)
				{
					int nRead = in.read(buffer, 0, buffer.length);
					if (nRead <= 0)
						break;
					out.write(buffer, 0, nRead);
				}
				in.close();
			}

			out.close();
			stream.close();
			setStatus("Adding completed OK");
		}
		catch (Exception ex)
		{
			ex.printStackTrace();
			setStatus("Error: "+ex.getMessage());
		}

	}

	protected void extractArchive()
	{
		// Show dialog to select archive and entries
                chooser1.setCurrentDirectory(m_currentDir);
		chooser1.setDialogType(JFileChooser.OPEN_DIALOG);
		chooser1.setDialogTitle("Open Archive");
		chooser1.setMultiSelectionEnabled(false);
                chooser1.setPreferredSize(new Dimension(470,450));

		m_zipEntries = new JList();
		m_zipEntries.setSelectionMode(
			ListSelectionModel.MULTIPLE_INTERVAL_SELECTION);
		TabListCellRenderer renderer = new TabListCellRenderer();
		renderer.setTabs(new int[] {240, 300, 360});
		m_zipEntries.setCellRenderer(renderer);

		JPanel p = new JPanel(new BorderLayout());
		p.setBorder(new CompoundBorder(
                  new CompoundBorder(new EmptyBorder(5, 5, 5, 5),
                    new TitledBorder("Files to extract:")),
                  new EmptyBorder(5,5,5,5)));
		JScrollPane ps = new JScrollPane(m_zipEntries);
		p.add(ps, BorderLayout.CENTER);
		chooser1.add(p);

		PropertyChangeListener lst = new PropertyChangeListener()
		{
			SimpleDateFormat m_sdf = new SimpleDateFormat(
				"MM/dd/yyyy hh:mm a");
			DefaultListModel m_emptyModel = new DefaultListModel();

			public void propertyChange(PropertyChangeEvent e)
			{
                            if (e.getPropertyName() == JFileChooser.FILE_FILTER_CHANGED_PROPERTY)
			    {
				m_zipEntries.setModel(m_emptyModel);
				return;
			    }
                            else if (e.getPropertyName() == JFileChooser.SELECTED_FILE_CHANGED_PROPERTY)
			    {
                            	File f = chooser1.getSelectedFile();
                            	if (f != null)
			    	{
					if (m_selectedFile!=null && m_selectedFile.equals(f)
  						&& m_zipEntries.getModel().getSize() > 0)
					{
						return;
					}

					String name = f.getName().toLowerCase();
					if (!name.endsWith(".zip") && !name.endsWith(".jar"))
					{
						m_zipEntries.setModel(m_emptyModel);
						return;
					}

					try
					{
						ZipFile zipFile = new ZipFile(f.getPath());
						DefaultListModel model = new DefaultListModel();
						Enumeration en = zipFile.entries();
						while (en.hasMoreElements())
						{
							ZipEntry zipEntr = (ZipEntry)en.
								nextElement();
							Date d = new Date(zipEntr.getTime());
							String str = zipEntr.getName()+'\t'+
								zipEntr.getSize()+'\t'+m_sdf.format(d);
							model.addElement(str);
						}
						zipFile.close();
						m_zipEntries.setModel(model);
						m_zipEntries.setSelectionInterval(0,
							model.getSize()-1);
					}
					catch(Exception ex)
					{
						ex.printStackTrace();
						setStatus("Error: "+ex.getMessage());
					}
				}
			    }
			    else
			    {
				m_zipEntries.setModel(m_emptyModel);
				return;
			    }
			}
		};
		chooser1.addPropertyChangeListener(lst);
                chooser1.cancelSelection();

		if (chooser1.showDialog(this, "Extract") !=
			JFileChooser.APPROVE_OPTION)
                {
                        chooser1.remove(p);
                        chooser1.removePropertyChangeListener(lst);
			return;
                }
		m_currentDir = chooser1.getCurrentDirectory();
		final File archiveFile = chooser1.getSelectedFile();

		if (!archiveFile.exists() || !isArchiveFile(archiveFile))
                {
                        chooser1.remove(p);
                        chooser1.removePropertyChangeListener(lst);
			return;
		}

		Object[] selObj = m_zipEntries.getSelectedValues();
		if (selObj.length == 0)
		{
			setStatus("No entries have been selected for extraction");
                        chooser1.removePropertyChangeListener(lst);
                        chooser1.remove(p);
			return;
		}
		final String[] entries = new String[selObj.length];
		for (int k=0; k < selObj.length; k++)
		{
			String str = selObj[k].toString();
			int index = str.indexOf('\t');
			entries[k] = str.substring(0, index);
		}

		// Show dialog to select output directory
		chooser2.setCurrentDirectory(m_currentDir);
		chooser2.setDialogType(JFileChooser.OPEN_DIALOG);
		chooser2.setDialogTitle("Select destination directory for " + archiveFile.getName());
		chooser2.setMultiSelectionEnabled(false);
		chooser2.setFileSelectionMode(JFileChooser.DIRECTORIES_ONLY);

		if (chooser2.showDialog(this, "Select") !=
			JFileChooser.APPROVE_OPTION)
		{
                        chooser1.remove(p);
                        chooser1.removePropertyChangeListener(lst);
			return;
		}

		m_currentDir = chooser2.getCurrentDirectory();
		final File outputDir = chooser2.getSelectedFile();

                Thread runner = new Thread()
                {
                  public void run()
                  {
   		     try
		     {
			byte buffer[] = new byte[BUFFER_SIZE];
			// Open the archive file
			FileInputStream stream =
				new FileInputStream(archiveFile);
			ZipInputStream in = new ZipInputStream(stream);

			// Find archive entry
			while (true)
			{
				ZipEntry zipExtract = in.getNextEntry();
				if (zipExtract == null)
					break;
				boolean bFound = false;
				for (int k = 0; k < entries.length; k++)
				{
					if (zipExtract.getName().equals(entries[k]))
					{
						bFound = true;
						break;
					}
				}
				if (!bFound)
				{
					in.closeEntry();
					continue;
				}
				setStatus("Extracting "+zipExtract.getName());

				// Create output file and chack required directory
				File outFile = new File(outputDir,
					zipExtract.getName());
				File parent = outFile.getParentFile();
				if (parent != null && !parent.exists())
					parent.mkdirs();

				// Extract unzipped file
				FileOutputStream out =
					new FileOutputStream(outFile);
				while (true)
				{
					int nRead = in.read(buffer,
						0, buffer.length);
					if (nRead <= 0)
						break;
					out.write(buffer, 0, nRead);
				}
				out.close();
				in.closeEntry();
			}

			in.close();
			stream.close();
			setStatus("Extracting completed OK");
		    }
		    catch (Exception ex)
		    {
			ex.printStackTrace();
			setStatus("Error: "+ex.getMessage());
		    }
                  }
                };
                runner.start();
                chooser1.removePropertyChangeListener(lst);
		chooser1.remove(p);
	}


	public static File[] getSelectedFiles(JFileChooser chooser)
	{
		// Although JFileChooser won't give us this information,
		// we need it...
		Container c1 = (Container)chooser.getComponent(3);
		JList list = null;
		while (c1 != null)
		{
			Container c = (Container)c1.getComponent(0);
			if (c instanceof JList)
			{
				list = (JList)c;
				break;
			}
			c1 = c;
		}
		Object[] entries = list.getSelectedValues();
		File[] files = new File[entries.length];
		for (int k = 0; k < entries.length; k++)
		{
			if (entries[k] instanceof File)
				files[k] = (File)entries[k];
		}
		return files;
	}


	public static boolean isArchiveFile(File f)
	{
		String name = f.getName().toLowerCase();
		return (name.endsWith(".zip") || name.endsWith(".jar"));
	}

	public static void main(String argv[])
	{
		new ZipJarManager();
	}
}

class SimpleFilter extends javax.swing.filechooser.FileFilter
{
	private String m_description = null;
	private String m_extension = null;

	public SimpleFilter(String extension, String description)
	{
		m_description = description;
		m_extension = "."+extension.toLowerCase();
	}

        public String getDescription()
	{
		return m_description;
	}

	public boolean accept(File f)
	{
		if (f == null)
			return false;
		if (f.isDirectory())
			return true;
		return f.getName().toLowerCase().endsWith(m_extension);
	}
}

class ZipFileView extends javax.swing.filechooser.FileView
{
	protected static ImageIcon ZIP_ICON = new ImageIcon("zip.gif");
	protected static ImageIcon JAR_ICON = new ImageIcon("jar.gif");

	public String getName(File f)
	{
		String name = f.getName();
                return name.equals("") ? f.getPath() : name;
	}

	public String getDescription(File f)
	{
		return getTypeDescription(f);
	}

	public String getTypeDescription(File f)
	{
		String name = f.getName().toLowerCase();
		if (name.endsWith(".zip"))
			return "ZIP Archive File";
		else if (name.endsWith(".jar"))
			return "Java Archive File";
		else
			return "File";
	}

	public Icon getIcon(File f)
	{
		String name = f.getName().toLowerCase();
		if (name.endsWith(".zip"))
			return ZIP_ICON;
		else if (name.endsWith(".jar"))
			return JAR_ICON;
		else
			return null;
	}

	public Boolean isTraversable(File f)
	{
		return ( f.isDirectory() ? Boolean.TRUE : Boolean.FALSE);
	}
}
// Class TabListCellRenderer is taken from Chapter 10,
// section 10.3 without modification.
Understanding the Code
Class ZipJarManager
This class extends
JFrame to provide a very simple GUI for our ZIP/JAR archive manager application. One class variable is defined:int BUFFER_SIZE
: used to define the size of an array of bytes for reading and writing files.Instance variables:
JFileChooser chooser1
: file chooser used to select an archive for creation or extraction.JFileChooser chooser2
: file chooser used to select files to include or in an archive or files to extract from an archive.File m_currentDir
: the currently selected directory.SimpleFilter m_zipFilter
: filter for files with a ".zip" extension.SimpleFilter m_jarFilter
: filter for files with a ".jar"extension.ZipFileView m_view
: a custom FileView implementation for JAR and ZIP files.JButton m_btCreate
: initiates the creation of an archive.JButton m_btExtract
: initiates extraction from an archive.JLabel m_status
: label do display status messages.JList m_zipEntries
: list component to display an array of entries in an archive.File m_selectedFile
: the currently selected archive file.The
ZipJarManager constructor first creates and displays a simple JWindow splash screen to let the user know that the application is loading (a progress bar might be more effective here, but we want to stick to the point). Our two JFileChoosers are then instatiated, which takes a significant amount of time, and then the buttons and label are created, encapsulated in a JPanel using a GridLayout, and added to the content pane. The first button titled "Create new Archive" is assigned an ActionListener which invokes createArchive(). The second button titled "Extract from Archive" is assigned an ActionListener which invokes extractArchive(). Our custom SimpleFilters and FileView are then instantiated, and assigned to chooser1. We then set chooser1ís multiSelectionEnabled property to false, tell it to use the JAR filter initially, and remove the "All Files" filte! r. Finally, the splash window is disposed beforeThe
setStatus() method simply assigns a given String to the m_status label.The
createArchive() method is used to create a new archive file using both JFileChoosers. First we set chooser1ís title to "New Archive", its type to SAVE_DIALOG, and assign it a new preferred size (the reason we change its size will become clear below). Then we show chooser1 in a dialog to prompt the user for a new archive name. If the dialog is dismissed by pressing "Cancel" or the close button we do nothing and return. Otherwise we store the current directory in our m_currentDir instance variable and create aInterestingly,
JFileChooser does not check whether the filename entered in its text field is valid with respect to its filters when the approve button pressed. So we are forced to check if our FileĎs name has a ".zip" or ".jar" extension manually using our custom isArchiveFile() method. If this method returns false we do nothing and return. Otherwise we set up chooser2 to allow multiple selections to make up the content of the archive, and only allow file selections (by setting the fileSelectionMode property to FILES_ONLY) to avoid overcomplicating our archive processing scheme. Also note that we set the dialog title to specify the name of the archive we are creating.We use
JFileChooserĎs showDialog() method to display chooser2 in a JDialog and assign "Add" as its approve button text. If the approve button is not pressed we do nothing and return. Otherwise we create an array of Files to be placed in the specified archive using our custom getSelectedFiles() method (see below). Finally, we invoke our createZipArchive() method if the selected archive file has a ".zip" extension, or createJarArchive() if it has a ".jar" extension. These method calls are wrapped in separate threads to avoid clogging up the event dispatching thread.The
createZipArchive() method takes two parameters: a ZIP archive file and an array of the files to be added to the archive. It creates a ZipOutputStream to write the selected archive file. Then for each of files in the given array it creates a ZipEntry instance, places it in the ZipOutputStream, and performs standard read/write operations until all data has been written into the archive. The status label is updated, using our setStatus() method, each time a file is written and when the operation completes, to provide feedback duing long operations.The
createJarArchive() method works almost identically to createZipArchive(), using the corresponding java.util.jar classes. Note that a default Manifest instance is supplied to the JarOutputStream constructor.The
extractArchive() method extracts data from an archive file using both JFileChoosers. First we assign chooser1 a preferred size of 470x450 because we will be adding a custom component which requires a bit more space than JFileChooser normally offers (this is also why we set the preferred size of chooser1 in our createArchive() method). Since JFileChooser is derived from JComponent, we can! add our own components to it just like any other container. A quick look at the source code shows that JFileChooser uses a y-oriented BoxLayout. This implies that new components added to a JFileChooser will be placed below all other existing components (see chapter 4 for more about BoxLayout).We take advantage of this knowledge and add a
JList component, m_zipEntries, to allow selection of compressed entries to be extracted from the selected archive. This JList component receives an instance of our custom TabListCellRenderer as its cell renderer to process Strings with tabs (see chapter 10, section 10.3). The location of String segments between tabs are assigned using its setTabs() method. Finally, this list is placed in a JScrollPane to provide scrolling capabilities, and added to the bottom of the JFileChooser component.A
PropertyChangeListener is added to chooser1 to process the user's selection. This anonymous class maintains two instance variables:SimpleDateFormat m_sdf
: used to format file time stamps.DefaultListModel m_emptyModel
: assigned to m_zipEntries when non-archive files are selected, or when the file filter is changed.This listenerís
propertyChange() method will receive a PropertyChangeEvent when, among other things, chooser1ís selection changes. The selected file can then be retrieved using PropertyChangeEventís getNewValue() method. If this file represents a ZIP or JAR archive, our implementation creates a ZipFile instance to read it's content, and retrieves an Enumeration of ZipEntries in this archive ! (recall that JarFile and JarEntry are subclasses of ZipFile and ZipEntry, allowing us to display the contents of a JAR or a ZIP archive identically). For each entry we form a String containing that entry's name, size, and time stamp. This String is added to a DefaultListModel instance. After each entry has been processed, this model is assign to our JList, and all items are initially selected. The user can the! n modify the selection to specify entries to be extracted fro! m ! the archive.Once the
PropertyChangeListener is added, chooser1 is displayed with "Extract" as its approve button text. If it is dismissed we remove both the panel containing our list component and the PropertyChangeListener, as they are only temporary additions (remember that we use this same chooser to initiate creation of an archive in the createArchive() method). Otherwise, if the approve button is pressed we check whether the selected file exists and represents an archive. We then create an array of Objects corresponding to each selected item in our list (which are S! trings). If no items are selected we report an error in our status label, remove our temporary component and listener, and return. Then we form an array of entry names corresponding to each selected item (which is the portion of each String before the appearance of the first tab character).Now we need to select a directory to be used to extract the selected archive entries. We use
chooser2 for this purpose. We set its fileSelectionMode property to DIRECTORIES_ONLY, and allow only single selection by setting its multiSelectionEnabled property to false. We then show chooser2 using "Select" for its approve button text. If it is dismissed we remove our our temporary component and listener, and return. Otherwise we start the extraction process in a separate thread.To begin the extraction process we create a
ZipInputStream to read from the selected archive file. Then we process each entry in the archive by retrieving a corresponding ZipEntry and verifying whether each ZipEntryís name matches a String in our previously obtained array of selected file names (from our list component that was added to chooser1). If a match is found we create a File instance to write that entry to. If a ZipEntry includes sub-directories, we cre! ate these sub-directories using Fileís mkdirs() method. Finally we perform standard read/write operations until all files have been extracted from the archive. Note that we update the status label each time a file is extracted and when the opertion completes.The
getSelectedFiles() method takes a JFileChooser instance as parameter and returns an array of Files selected in the given chooserís list. Interestingly JFileChooser provides the getSelectedFiles() method which does not work properly as of Java 2 FCS (it always returns null). In order to work around this problem, we use java.awt.Container functionality (which, as we know, all Swing components inherit) to gain access to JFileC! hooserís components. With a little detective work we found that the component with index 3 represents the central part of the chooser. This component contains several children nested inside one another. One of these child components is the JList component we need access to in order to determine the current selection state. So we can simply loop through these nested containers until we find the JList. As soon as we have gained access to this component we can retrieve an array of the selected objects using JListís getSelectedValues() method. As expected, these objects are instances of the File class, so we need only upcast each and return them in ! a ! File[] array.
Note: This solution should be considered a temporary bug workaround. We expect the
getSelectedFiles() method to be implemented correctly in future releases, and suggest that you try substituting this method here to determine whether it has been fixed in the release you are working with.
Class SimpleFilter
This class represents a basic
FileFilter that accepts files with a given String extension, and displays a given String description in JFileChooserís "Files of Type" combo box. We have already seen and discussed this filter in section 14.1.9. It is used here to create our JAR and ZIP filters in the FileChooser1 constructor.Class ZipFileView
This class extends
FileView to provide a more user-friendly graphical representation of ZIP and JAR files in JFileChooser. Two instance variables, ImageIcon ZIP_ICON and ImageIcon JAR_ICON, represent small images corresponding to each archive type:Running the Code
Note that a
JWindow is displayed as a simple splash screen because instantiation JFileChooser takes a significant amount of time. Press the "Create new Archive" button and select a name and location for the new archive file in the first file chooser that appears. Press its "OK" button and then select files to be added to that archive in the second chooser. Figure 14.12 shows FileChooser1 in action, and figures 14.13 and 14.14 show the first and second choosers that appear during the archive creation process.Try uncompressing an existing archive. Press the "Extract from Archive" button and select an existing archive file in the first chooser that appears. Note the custom list component displayed in the bottom of this chooser, figure 14. 15 illustrates. Each time an archive is selected its contents are displayed in this list. Select entries to extract and press the "Extract" button. A second chooser will appear, shown in figure 14.16, allowing selection of a destination directory.
Bug Alert!: As of Java 2 FCS,
PropertyChangeEvents are not always fired as expected when JFileChooserís selection changes. This causes the updating of our custom list component to fail occasionaly. We expect this to be fixed in a future release.