Chapter 27. Contributions
In this chapter:
27.1 Multi-line tooltips and labels
...by Albert L. M. Ting of Artisan Components, alt@artisan.com
One common feature that was missing in Swing for significant amount of time was multi-line support, in particular, multi-line tooltips and labels. In this section we show how to implement this functionality ourseleves, with support for horizontal as well as vertical text. The implementation goals for this example are:
1. Be as lightweight as possible. Concatenating multiple
2. Transparently replace
JToolTip and JLabel, such that any Swing component (or third party component) that uses JToolTip or JLabel would automatically have multi-line support (and vertical labels support).3. Support all L&F's. Moreover, if the user changes L&F, the newly selected L&F will still have multi-line support.
The Swing pluggable L&F interface allows us to accomplish all of these goals, by defining a new
ToolTipUI and a new LabelUI and registering them with the UIManager.
Note: As of Swing 1.1.1 beta1, multi-line label and button support has been added by using an html renderer whenever the text appears to be html-based (see chapter 5 for an example). In this case each label has it’s own UI delegate instance and vertical text is not supported. Our implementation uses a single renderer for multi-line text and vertical text. If the text is html-based, we delegate all painting work to an html renderer.
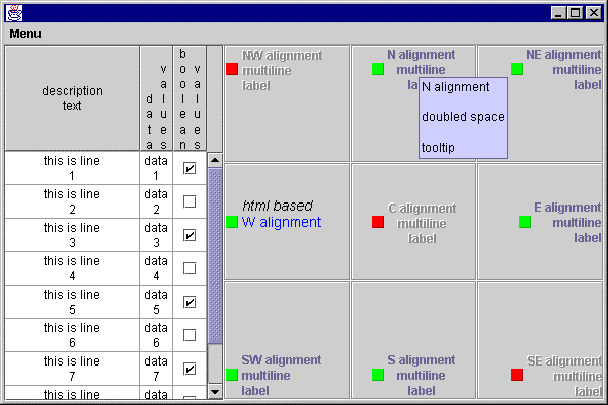
Figure 27.1 Multi-line tooltips and labels demo
<<file figure27-1.gif>>
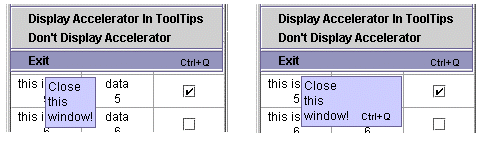
Figure 27.2 Multi-line tooltip with accelerator display option
<<file figure27-2.gif>>
The Code: PlafMacros.java
see \Chapter 27\Ting\jalt
package jalt;

import javax.swing.*;
import java.util.*;
import java.io.*;
import java.lang.*;
import java.awt.*;

public class PlafMacros implements SwingConstants
{
  // don't make these final, since the value is
  // different on each platform
  private static String LINE_SEPARATOR =
    System.getProperty("line.separator");
  private static int LINE_SEPARATOR_LEN =
    LINE_SEPARATOR.length();

  public static String[] breakupLines(String text)
  {
    int len = text.length();
    if (len == 0)
      return new String[] {""};
    else
    {
      Vector data = new Vector(10);
      int start=0;
      int i=0;
      while (i<len) {
        if (text.startsWith(LINE_SEPARATOR,i)) {
          data.addElement(text.substring(start,i));
          start=i+LINE_SEPARATOR_LEN;
          i=start;
        }
        else if (text.charAt(i)=='\n')
        {
          data.addElement(text.substring(start,i));
          start=i+1;
          i=start;
        }
        else { i++; }
      }
      if (start != len)
        data.addElement(text.substring(start));
      int numlines = data.size();
      String lines[] = new String[numlines];
      data.copyInto(lines);
      return lines;
    }
  }

  // See included source for the rest of this class
}
The Code: MultiLineToolTipUI.java
see \Chapter 27\Ting\jalt
package jalt;

import java.awt.*;
import java.awt.event.*;
import java.util.*;

import javax.swing.*;
import javax.swing.plaf.ToolTipUI;
import javax.swing.plaf.ComponentUI;

public class MultiLineToolTipUI extends ToolTipUI
{
  static MultiLineToolTipUI SINGLETON = new MultiLineToolTipUI();
  static boolean DISPLAY_ACCELERATOR=true;
  int accelerator_offset = 15;
  int inset = 3;

  private MultiLineToolTipUI() {}

  public static void initialize() {
    // don't hardcode class name, this way we can obfuscate.
    String key = "ToolTipUI";
    Class cls = SINGLETON.getClass();
    String name = cls.getName();
    UIManager.put(key,name);
    UIManager.put(name,cls);
  }

  public static ComponentUI createUI(JComponent c) {
    return SINGLETON;
  }

  public void installUI(JComponent c) {
    LookAndFeel.installColorsAndFont(c, "ToolTip.background",
      "ToolTip.foreground", "ToolTip.font");
    LookAndFeel.installBorder(c, "ToolTip.border");
  }

  public void uninstallUI(JComponent c) {
    LookAndFeel.uninstallBorder(c);
  }

   public static void setDisplayAcceleratorKey(boolean val) {
    displayAccelerator=val;
  }

  public Dimension getPreferredSize(JComponent c) {
    Font font = c.getFont();
    FontMetrics fontMetrics =
      Toolkit.getDefaultToolkit().getFontMetrics(font);
    int fontHeight = fontMetrics.getHeight();
    String tipText = ((JToolTip)c).getTipText();
    if (tipText == null)
      tipText = "";
    String lines[] = PlafMacros.breakupLines(tipText);
    int num_lines = lines.length;

    Dimension dimension;
    int width, height, onewidth;
    height = num_lines * fontHeight;
    width = 0;
    for (int i=0; i<num_lines; i++)
    {
      onewidth = fontMetrics.stringWidth(lines[i]);
      if (displayAccelerator && i == num_lines - 1)
      {
        String keyText = getAcceleratorString((JToolTip)c);
        if (!keyText.equals(""))
           onewidth += fontMetrics.stringWidth(keyText)
            + accelerator_offset;
      }
      width = Math.max(width,onewidth);
    }
    return new Dimension(width+inset*2,height+inset*2);
  }

  public Dimension getMinimumSize(JComponent c) {
    return getPreferredSize(c);
  }

  public Dimension getMaximumSize(JComponent c) {
    return getPreferredSize(c);
  }

  public void paint(Graphics g, JComponent c) {
    Font font = c.getFont();
    FontMetrics fontMetrics =
      Toolkit.getDefaultToolkit().getFontMetrics(font);
    Dimension dimension = c.getSize();
    int fontHeight = fontMetrics.getHeight();
    int fontAscent = fontMetrics.getAscent();
    String tipText = ((JToolTip)c).getTipText();
    String lines[] = PlafMacros.breakupLines(tipText);
    int num_lines = lines.length;
    int height;
    int i;

    g.setColor(c.getBackground());
    g.fillRect(0, 0, dimension.width, dimension.height);
    g.setColor(c.getForeground());
    for (i=0, height=2+fontAscent;
         i<num_lines; i++, height+=fontHeight)
    {
      g.drawString(lines[i], inset, height);
      if (displayAccelerator && i == num_lines - 1)
      {
        String keyText = getAcceleratorString((JToolTip)c);
        if (!keyText.equals(""))
        {
          Font smallFont = new Font(font.getName(),
            font.getStyle(), font.getSize()-2);
          g.setFont(smallFont);
          g.drawString(keyText, fontMetrics.stringWidth(lines[i])
            + accelerator_offset, height);
        }
      }
    }
  }

  public String getAcceleratorString(JToolTip tip) {
    JComponent comp = tip.getComponent();
    if (comp == null)
      return "";
    KeyStroke[] keys =comp.getRegisteredKeyStrokes();
    String controlKeyStr = "";
    KeyStroke postTip=KeyStroke.getKeyStroke(
      KeyEvent.VK_F1,Event.CTRL_MASK);

    for (int i = 0; i < keys.length; i++)
    {
      // Ignore ToolTipManager postTip action,
      // in swing1.1beta3 and onward
      if (postTip.equals(keys[i]))
        continue;
      char c = (char)keys[i].getKeyCode();
      int mod = keys[i].getModifiers();
      if ( mod == InputEvent.CTRL_MASK )
      {
        controlKeyStr = "Ctrl+"+(char)keys[i].getKeyCode();
        break;
      }
      else if (mod == InputEvent.ALT_MASK)
      {
        controlKeyStr = "Alt+"+(char)keys[i].getKeyCode();
        break;
      }
    }
    return controlKeyStr;
  }
}
Understanding the Code:
Multi-line tooltipsClass PlafMacros (first look)
In order to display the individual lines, we need a method to break up the tooltip text. Using
java.util.StringTokenizer is unacceptable because:1. It removes adjacent newlines, and we would like to support multiple blank lines.
2. Some platforms, such as Windows NT, use two characters for a line separator and
3. We would like to support text definition in a java resource file. Since the value for each property in a resource file must appear on a single line, we would like to use the conventional "\n" character to denote a newline, regardless of the running platform’s line separator.
Our solution is to write our own method,
breakupLines(). We define two class variables, LINE_SEPARATOR and LINE_SEPARATOR_LEN to hold the line separator and the character length of the separator. Within this method we first check to see if the text is empty and if so, return a single element array holding an empty string. If not, we loop through the text, one character at a time, and look for a line separator. If we find one, we extract the line of text preceding it and add it to our vector, data. We then repeat the process, but change the starting point to begin after the location of the line separator.If we cannot find a line separator, we normally increment the starting point by one and repeat the process. But to support text defined in a resource file, we now check to see if "\n" appears at the current location. If we see a "\n", we extract the line of text and add it to the vector,
data. When this process finishes, we add any trailing text to data. Finally, we copy this vector of lines into an array and return the array. Note that PlafMacros will also be used in MultiLineLabelUI, discussed below.Class MultiLineToolTipUI
The MultiLineToolTipUI
extends the ToolTipUI base class and implements multiline tooltip. We define two class variables and two instance variables.Class variables:
boolean displayAccelerator: indicates whether we should display the accelerator key, if any, for a tooltip.
Instance variables:
int inset: specifies the inset amount between the tooltip window and text.
There is nothing to be done in the constructor. However, we make it
private to insure only a single instance of this class gets created.
  public static void initialize() {
    String key = "ToolTipUI";
    Class cls = SINGLETON.getClass();
    String name = cls.getName();
    UIManager.put(key,name);
    UIManager.put(name,cls);
  }
The
initialize() method is the main routine you would call at the start of your program to register the new tooltip UI delegate. (Afterwards, you can create tooltips as you normally would, and embed newlines if you want multiline text.) We define the key, "ToolTipUI", and fetch the singleton’s class object and class name. We do it this way, rather than hardcoding the name, so that this class can be easily obfuscated (see note). The next two lines register our user defined ToolTipUI with the UIManager, by storing the class name and class object.
Note: Obfuscation is the process of renaming classes and variables to shorter, more ‘meaningless’ names, in an effort to make decompiled classes harder to understand. Many tools exist to perform obfuscation for us at compile time.
The methods:
createUI(), installUI(), and uninstallUI() override ComponentUI’s methods, and initialize the UI once a java component has been constructed. The createUI() method returns an instance (the only instance) of this class. The installUI() method initializes the tooltip color and font for the specific JComponent, if it was not set before hand. It al! so installs the tooltip border. The uninstallUI() method clears the border, so that the border can be garbage collected.The
setDisplayAcceleratorKey() method is a class method that the user can call to toggle between displaying and not displaying the accelerator key.In
getPreferredSize() we fetch the tooltip font information, along with the tooltip text. We then call PlafMacros.breakupLines() and store the individual lines in the array, lines. Next, we iterate through each line to determine the maximum width of the entire text. If we’re looking at the last line (and displayAccelerator is set to true), we take into account the accelerator string, if any, to determine the maximimum width. Lastly, we determine the height based on the number of lines. getMinimumSize() and getMaximumSize() simply returns the same results as getPreferredSize().Like
getPreferredSize(), the paint() method fetches the tooltip font information along with the tooltip text. It then calls PlafMacros.breakupLines() and store the individual lines in the array, lines. We set the foreground and background colors, then iterate through each line and draw the text. If there is an accelerator key (and displayAccelerator is set to true), we draw the accelerator key after the last line, and in a smaller font.So how do we create a multi-line tooltip?
1. import the
jalt package:import jalt.*;
2. Call the
MultiLineToolTipUI static method to register the MultiLineToolTipUI singleton as the delegate for use by all JToolTips:MultiLineToolTipUI.initialize();
3. Use "\n" in your tooltip string to specify multiple lines:
mylabel.setToolTipText(mytext + "\n\ndoubled space\n\ntooltip");
Understanding the Code: Multi-line labels
Much of the multi-line label code is modified from various existing methods in the Swing source code. Moreover, the mechanism is very similar to
MultiLineToolTipUI. Rather than displaying the entire code, we’ve decided to highlight the interesting sections and suggest that the reader follow through by referencing the included source code. For now, we will just discuss the multi-line support. Afterwards, we will explain how we support vertical text.Class PlafMacros (revisited)
In
javax.swing.SwingUtilities, there is a layoutCompoundLabel() method that is called by several UI classes whenever a component (possibly containing an icon) needs to be laid out. This method specifies where the label and icon should be laid out by updating three Rectangle instances that are passed in as parameters (along with other information). It also returns the text, and possibly clipped if the text string is too long. However, this method assumes a single line of text. It calculates the text height internally, and always clips the text if the text is too big.We’ve modified this method to now take into account multi-line text, along with the ability to optionally clip the text. This new method is stored in the
PlafMacros class under the same method name, layoutCompoundLabel(). The first thing we did is pass two additional parameters to the method:int textHeight
: rather than having the method internally determine the text height, we pass this value to the method.boolean clipIt
: instead of always clipping the text, we now make it an option.We then extract the text clipping code into a separate method,
getClippedText(), and optionally call the method if clipIt is true and the text width is wider than the display width available. Note that if the label has its own javax.swing.text.View renderer stored as the client’s html property, the method ignores the textheight parameter, and uses the renderer to size the text.Another method we’ve modified is
drawString(), as defined in javax.swing.plaf.basic.BasicGraphicsUtils. This method draws the string, and underlines the first character that matches the mnenomic (if any). We now make drawString() return true if it did underline the mnenomic character, otherwise it should return false. This will insure that the mnenomic character is underlined only once, even if the same character appears on multiple lines in the label.Class MultiLineLabelUI (horizontal text support)
We will first explain how we implement horizontal multi-line text and gloss over the code supporting vertical text. Afterwards, we will explain vertical text support in detail.
We first define several class variables, which will be used by the user to specify individual (and default) alignment modes and clip modes.
public static String MULTI_ALIGNMENT_MODE = "multiAlignment";
public static String BLOCK = "block";
public static String INDIVIDUAL = "individual";
public static String CLIPPED_MODE = "clippedMode";
public static String CLIPPED = "clipped";
public static String NOT_CLIPPED = "notClipped";
//
we only need a single instance to handle all labels.protected static MultiLineLabelUI SINGLETON = new MultiLineLabelUI();
private static String defaultAlignmentMode = INDIVIDUAL;
private static String defaultClippedMode = CLIPPED;
Like MultiLineToolTipUI, MultiLineLabelUI
defines a singleton for use by all labels. MultiLineLabelUI supports BLOCK and INDIVIDUAL alignment. This allows us to align all lines in a label together or separately. Figure 27.3 illustrates: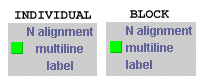
Figure 27.3 INDIVIDUAL and BLOCK alignment
<<file figure27-3.gif>>
The user can specify the default alignment mode of all labels using the
MultiLineLabelUI static method setDefaultAlignmentMode(). The user can also specify the alignment mode for each individual label, by assigning a MULTI_ALIGNMENT_MODE client property (using JComponent’s putClientProperty() method--refer back to chapter 1).For example, to set the individual alignment mode, regardless of the default alignment, on a label using
MultiLineLablUI, you would do this:myLabel.putClientProperty(MultiLineLabelUI.MULTI_ALIGNMENT_MODE, MultiLineLabelUI.INDIVIDUAL);
putClientProperty()
fires a PropertyChangeEvent, and the UI’s propertyChange() method receives it, and repaints the label accordingly. This method overrides its BasicLabelUI counterpart, and sends all traffic not corresponding to our alignment or clipping (see below) properties up to this class for processing:
  public void propertyChange(PropertyChangeEvent e) {
    if (e.getPropertyName().equals(MULTI_ALIGNMENT_MODE) ||
        e.getPropertyName().equals(CLIPPED_MODE)) {
      JLabel label = (JLabel) e.getSource();
      label.repaint();
    } else {
      super.propertyChange(e);
    }
  }
Note:
BasicLabelUI implements the PropertyChangeListener interface, and when this UI is installed (i.e. when its installUI() method is invoked) BasicLabelUI also attaches itself as a PropertyChangeListener through JComponent’s addPropertyChangeListener() method. Since MultiLineLabelUI extends this class, and its installU! I() method just calls super.installUI(), this functionality is fully inherited.MultiLineLabelUI
also supports CLIPPED and NOT_CLIPPED text. The user can specify the default clipped mode in setDefaultClippedMode().The user can also specify the clipping mode for each individual label, by assigning a CLIPPED_MODE property. Figure 27.4 illustrates. The left-most picture shows a label with enough room to fit the complete text, so clipping would not come into play whether enabled or not. The middle picture shows that same label with its bounds reduced and clipping enabled. The right-most pitcure shows that label with clipping turned off. Each of these labels is in INDIVIDUAL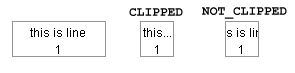
Figure 27.4 CLIPPED and NOT_CLIPPED clipping modes
<<file figure27-4.gif>>
Note: Clipping occurs when it is determined that assigned text will not fit within a label’s bounds. When clipping occurs "..." is appended to the end of the label text. Our
PlafMacros class provides a way around this, as it is often unacceptable behavior.The
initialize() method is similar to MultiLineToolTipUI’s initialize() method. We call this method to register the new UI delegate.
  public static void initialize() {
    // don't hardcode the class name, this way we can obfuscate.
    String key = "LabelUI";
    Class cls = SINGLETON.getClass();
    String name = cls.getName();
    UIManager.put(key,name);
    UIManager.put(name,cls);
  }
The
getPreferredSize() method first iterates through each line to determine the maximum width and total number of lines.
      FontMetrics fm = label.getToolkit().getFontMetrics(font);
      int fontHeight = fm.getHeight();
      String lines[] = PlafMacros.breakupLines(text);
      int num_lines = lines.length;
      String maxline = "";
      int maxwidth=0;
      boolean clippedMode = isClippedMode(label);

      for (int i=0; i<num_lines; i++) {
        int w = fm.stringWidth(lines[i]);
        if (w > maxwidth) {
          maxline = lines[i];
          maxwidth = w;
        }
      }
Then it calls
layoutCL() which then calls our version of layoutCompoundLabel(), passing it the text height (num_lines*fontHeight) and the clip mode (clippedMode).layoutCL(label,fm,maxline,icon,viewR,iconR,textR, num_lines*fontHeight,clippedMode);
If the label has its own renderer stored in the client property,
html, layoutCL() will use this renderer to size and layout the text, ignoring the given text and font height parameters.The
paint() method also iterates through each line to determine the maximum width and total number of lines. It then calls layoutCL() to get the label (and possibly icon) layout information. The next block of code does the actual painting.If the label has its own text renderer, it uses this renderer to do the actual painting. Otherwise, for
BLOCK alignment, it iterates through each line, clipping each line if necessary. For INDIVIDUAL alignment, layoutCL() is called again, since each line needs to be realigned horizontally. layoutCL() will then return the text, possibly clipped. For each line we then call paintEnabledText() or paintDisabledText(), depending on the label’s enabled state, to actually paint the text. These two routines will then return true if the mnemonic character has been underlined for the particular line. This provides us with a mechanism for guaranteeing that future lines will not underline any characters matching the mnemonic.So how do we create a multi-line label?
1. import the
jalt package:import jalt.*;
2. Call the
MultiLineLabelUI static method to register the MultiLineLabelUI singleton as the delegate for use by all JLabels:MultiLineLabelUI.initialize();
3. Use "\n" or get your system’s line separator string and use it in your label to specify multiple lines:
String separator = System.getProperty("line.separator");
JLabel label = new JLabel("some text" + separator +
"some more text" + separator +
"last line of text");
4. If you want html based text, specify the text using html tags:
JLabel label = new JLabel("<html>some text<br>some more text<br>");
Class MultiLineLabelUI (vertical text support)
Vertical text support is a bit slower to draw, mainly because each character needs to be rendered individually. However, since most applications require very little amount of vertical text, this is not likely to present any significant performance problems.
We first define a few more class variables.
public static String ORIENTATION_MODE = "orientationMode";
public static String HORIZONTAL = "horizontal";
public static String VERTICAL = "vertical";
public static String VERTICAL_SPACE = "verticalSpace";
public static String VERTICAL_WIDTH = "verticalWidth";
private static String DEFAULT_VERTICAL_WIDTH = "W";
private static String DEFAULT_VERTICAL_SPACE = " ";
ORIENTATION_MODE
is another property used to define the orientation for a specific label. VERTICAL_SPACE and VERTICAL_WIDTH are properties used to specify the text width of each column and the amount of space between each columm (the default is W and a blank space, respectively). Ideally, we would use integers to specify the number of points for the width and column spacing. However, in order to limit the number of changes to layoutCompoundLabel(), we use character strings instead.The user can specify the default vertical width and column spacing using the static methods
setDefaultVerticalSpace() and setDefaultVerticalWidth().We then define the
getTotalVerticalWidth() method which returns a string representing the maximum width of the text it will be painting. This string is based on the number of lines of text, multiplied by the column width and column spacing.
  protected String getTotalVerticalWidth(JLabel label, int numLines) {
    String space = getVerticalSpace(label);
    char[] spaceArr = space.toCharArray();
    int spaceLen = spaceArr.length;
    String width = getVerticalWidth(label);
    char[] widthArr = width.toCharArray();
    int widthLen = widthArr.length;
    char[] totalWidth = new char[spaceLen*numLines+widthLen*(numLines-1)];
    for (int i=0; i < numLines; i++) {
      System.arraycopy(widthArr,0,totalWidth,i*(spaceLen+widthLen),widthLen);
      if (i!=numLines-1) {
	System.arraycopy(spaceArr,
			 0,
                 	 totalWidth,
                 	 i*(spaceLen+widthLen)+widthLen,
                  	 spaceLen);
      }
    }
    return new String(totalWidth);
  }
In the
getPreferredSize() method, if the text should be drawn vertically, we call getTotalVerticalWidth() to fetch the string representing the maximum width. Next, we call layoutCL(), passing this string as the text. For the textHeight, we take the number of characters of the maximum line, and multiply it by the font height (maxline.length()*fontHeight).The
paint() method does the same thing, it calls getTotalVerticalWidth() and then calls layoutCL() to get the label (and possibly icon) layout information. It then iterates through each line, and draws each character, horizontally centered in the associated column. For INDIVIDUAL alignment, it calls layoutCL() on each line to re-layout the vertical position of the text.So how do we create a vertical label?
1. import the
jalt package:import jalt.*;
2. Call the
MultiLineLabelUI.initialize();
3. Define your label, using "\n" or the system’s line separator string to specify multiple lines and then set the
ORIENTATION_MODE property to specify vertical text.JLabel label = new JLabel("some text\nsome more text");
Label.putClientProperty(MultiLineLabelUI.ORIENTATION_MODE,
MultiLineLableUI.VERTICAL);
Running the Code:
An example has been included demonstrating mult-line tooltips and labels, along with vertical labels. Figure 27.1 shows it in action. The menu bar provides choices allowing us to change the alignment of the labels in both the table and the labels on the right-hand side. We can also change the clipping mode of the table’s cells, and toggle the display of accelerators in tooltips. Figure 27.2 shows the "Exit" menu item’s tooltip displayed with no accelerator (left) and with accelerator (right).
27.2 Swingscape browser
...by Ron Widitz. Sr. Technologist, Zeal, Inc. a modis Solutions Co., rwiditz@modisit.com, http://www.zealinc.com/
This application uses Swing HTML functionality and undo/redo facilities to provide a capable browser (see chapter 11 for an overview of
JEditorPane and the javax.swing.undo package). It demonstrates the use of context-sensitive tooltips with toolbar buttons, unlimited levels of undo, and an HTML 3.2 viewer supporting tables, frames, forms and links. It also provides navigation via dropdown menus, mnemonics, hyperlinks, form submits, toolbar buttons, and text entry.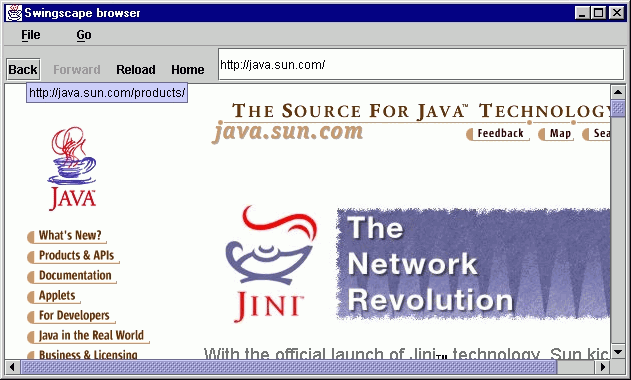
Figure 27.5 Running the Swingscape example displaying a complex HTML rendering.
<<file figure27-5.gif>>
The Code: Swingscape.java
see \Chapter27\Widitz
import java.awt.*;
import java.awt.event.*;
import javax.swing.*;
import javax.swing.undo.*;
import javax.swing.text.*;
import javax.swing.text.html.*;
import javax.swing.event.*;

public class Swingscape extends JFrame implements HyperlinkListener
{
  public static final String TITLE_TEXT = "Swingscape browser";
  public static final String HOME_DEFAULT =
    "http://java.sun.com/products/jfc/";
  protected String m_CurrentURL = HOME_DEFAULT;

  protected JEditorPane m_HtmlPane;
  protected JToolBar m_toolBar;
  protected JButton m_btnBack, m_btnForward, m_btnReload;
  protected JMenuItem m_mnuBack, m_mnuForward;
  protected JTextField m_txtURL;

  protected URLundoManager m_undo = new URLundoManager();

  public Swingscape() {
    super(TITLE_TEXT);

    Dimension dim = Toolkit.getDefaultToolkit().getScreenSize();
    if ( dim.width <= 640 ) {
      setSize(dim.width,dim.height);
    }
    else {
      int initWidth = dim.width - dim.width/10;
      int initHeight = dim.height - dim.height/10;
      setSize( initWidth, initHeight );
      setLocation( dim.width/2-initWidth/2,
        dim.height/2-initHeight/2 );
    }

    setJMenuBar(createMenuBar());
    getContentPane().add(m_toolBar, BorderLayout.NORTH);

    m_HtmlPane = new JEditorPane();
    m_HtmlPane.setEditorKit(new HTMLEditorKit());
    m_HtmlPane.setEditable(false);
    m_HtmlPane.addHyperlinkListener(this);

    JScrollPane mScroller = new JScrollPane();
    mScroller.getViewport().add(m_HtmlPane);
    getContentPane().add(mScroller, BorderLayout.CENTER);

    addWindowListener( new WindowAdapter() {
      public void windowClosing(WindowEvent e) {
        System.exit(0);
      }
    } );

    m_btnReload.doClick();
    setVisible(true);
  }

  protected JMenuBar createMenuBar() {
    JMenuBar menuBar = new JMenuBar();

    JMenu mFile = new JMenu("File");
    mFile.setMnemonic('f');

    JMenuItem item = new JMenuItem("Reload");
    item.setMnemonic('r');

    Action actionReload = new AbstractAction("Reload") {
      public void actionPerformed(ActionEvent e) {
        Thread runner = new Thread() {
          public void run() {
            m_HtmlPane.setText("reset doc & reload");
            DisplayPageDirect(m_CurrentURL);
          }
        };
        runner.start();
      }
    };

    item.addActionListener(actionReload);
    mFile.add(item);

    item = new JMenuItem("Exit");
    item.setMnemonic('x');

    item.addActionListener( new ActionListener() {
      public void actionPerformed(ActionEvent e) {
        System.exit(0);
      }
    });

    mFile.add(item);
    menuBar.add(mFile);

    JMenu mGo = new JMenu("Go");
    mGo.setMnemonic('g');

    m_mnuBack = new JMenuItem("Back");
    m_mnuBack.setMnemonic('b');
    m_mnuBack.setEnabled(false);

    Action actionBack = new AbstractAction("Back") {
      public void actionPerformed(ActionEvent e) {
        Thread runner = new Thread() {
          public void run() {
            try {
              String mDoURL = m_undo.swapURL(m_CurrentURL);
              m_undo.undo();  //URL now in redo
              DisplayPageDirect(mDoURL);
            }
            catch (CannotUndoException exc) {}
            finally {
              updateMenu_Buttons();
            }
          }
        };
        runner.start();
      }
    };

    m_mnuBack.addActionListener(actionBack);
    mGo.add(m_mnuBack);

    m_mnuForward = new JMenuItem("Forward");
    m_mnuForward.setMnemonic('f');
    m_mnuForward.setEnabled(false);

    Action actionForward = new AbstractAction("Forward") {
      public void actionPerformed(ActionEvent e) {
        Thread runner = new Thread() {
          public void run() {
            try {
              m_undo.redo();
              DisplayPageDirect(m_undo.swapURL(m_CurrentURL));
            }
            catch (CannotRedoException exc) {}
            finally {
              updateMenu_Buttons();
            }
          }
        };
        runner.start();
      }
    };

    m_mnuForward.addActionListener(actionForward);
    mGo.add(m_mnuForward);

    item = new JMenuItem("Home");
    item.setMnemonic('h');

    Action actionHome = new AbstractAction("Home") {
      public void actionPerformed(ActionEvent e) {
        Thread runner = new Thread() {
          public void run() {
            Display_RecordUndo(HOME_DEFAULT);
          }
        };
        runner.start();
      }
    };

    item.addActionListener(actionHome);
    mGo.add(item);
    menuBar.add(mGo);

    m_toolBar = new JToolBar();

    m_btnBack = m_toolBar.add(actionBack);
    m_btnBack.setEnabled(false);
    m_btnBack.setBorderPainted(false);
    m_btnBack.setRequestFocusEnabled(false);
    m_btnBack.addMouseListener(new PopButtonListener());
    m_toolBar.addSeparator();

    m_btnForward = m_toolBar.add(actionForward);
    m_btnForward.setEnabled(false);
    m_btnForward.setBorderPainted(false);
    m_btnForward.setRequestFocusEnabled(false);
    m_btnForward.addMouseListener(new PopButtonListener());
    m_toolBar.addSeparator();

    m_btnReload = m_toolBar.add(actionReload);
    m_btnReload.setToolTipText(HOME_DEFAULT);
    m_btnReload.setBorderPainted(false);
    m_btnReload.setRequestFocusEnabled(false);
    m_btnReload.addMouseListener(new PopButtonListener());
    m_toolBar.addSeparator();

    JButton btnHome = m_toolBar.add(actionHome);
    btnHome.setToolTipText(HOME_DEFAULT);
    btnHome.setBorderPainted(false);
    btnHome.setRequestFocusEnabled(false);
    btnHome.addMouseListener(new PopButtonListener());
    m_toolBar.addSeparator();

    m_txtURL = new JTextField(HOME_DEFAULT);

    m_txtURL.addActionListener( new ActionListener() {
      public void actionPerformed(ActionEvent e) {
        Thread runner = new Thread() {
          public void run() {
            String m_URL = m_txtURL.getText().trim();
            if ( m_URL.length() > 0 )
            {
              String checkForProtocol =
                m_URL.substring(0,7).toLowerCase();
              if (!checkForProtocol.equals("http://") &&
                  !checkForProtocol.startsWith("file:/"))
              {
                if (checkForProtocol.indexOf(':') == 1)
                { // Drive letter?
                  m_URL = "file:/"+m_URL;
                }
                else
                { // Assume a website...
                  m_URL = "http://"+m_URL;
                }
              }
              Display_RecordUndo(m_URL);
            }
          }
        };
        runner.start();
      }
    });

    m_toolBar.add(m_txtURL);
    m_toolBar.setFloatable(false);

    return menuBar;
  }

  public void hyperlinkUpdate(HyperlinkEvent e) {
    if ( e.getEventType() == HyperlinkEvent.EventType.ACTIVATED ) {
      final String dest =  e.getURL().toString();
      Thread runner = new Thread() {
        public void run() {
          Display_RecordUndo(dest);
        }
      };
      runner.start();
    }
  }

  public void updateMenu_Buttons() {
    boolean mDoState = m_undo.canUndo();

    m_mnuBack.setEnabled(mDoState);
    m_btnBack.setEnabled(mDoState);

    if ( mDoState ) {
      m_btnBack.setToolTipText(m_undo.getUndoPresentationName());
    }
    else {
      m_btnBack.setToolTipText(null);
    }

    mDoState = m_undo.canRedo();

    m_mnuForward.setEnabled(mDoState);
    m_btnForward.setEnabled(mDoState);

    if ( mDoState ) {
      m_btnForward.setToolTipText(m_undo.getRedoPresentationName());
    }
    else {
      m_btnForward.setToolTipText(null);
    }
  }

  public void Display_RecordUndo(String strURL) {
    String mCompareURL = strURL.intern();

    if ( m_CurrentURL != mCompareURL ) {
      m_undo.addURL(m_CurrentURL);
      updateMenu_Buttons();
      DisplayPageDirect(mCompareURL);
    }
  }

  public void DisplayPageDirect(String strURL) {
    m_CurrentURL = strURL;
    m_txtURL.setText(strURL);
    m_btnReload.setToolTipText(strURL);

    try {
      // setCursor(Cursor.getPredefinedCursor(Cursor.WAIT_CURSOR));
      // future feature
      m_HtmlPane.setPage(strURL);
    }
    catch (Exception exc) {
      System.out.println("Problem loading URL...");
    }
    /*  setCursor() expected to work properly in
        JDK1.1.8 & JDK1.2.2, bug#4160474
    finally {
      setCursor(Cursor.getPredefinedCursor(Cursor.DEFAULT_CURSOR));
    }
    */
  }

  public static void main(String[] args) {
    new Swingscape();
  }

  class PopButtonListener extends MouseAdapter {
    public void mouseEntered(MouseEvent e) {
      ( (JButton)e.getSource() ).setBorderPainted(true);
    }

    public void mouseExited(MouseEvent e) {
      ( (JButton)e.getSource() ).setBorderPainted(false);
    }
  }

  class UndoableURL extends AbstractUndoableEdit {
    private String m_URL;

    public UndoableURL(String m_URL) {
      this.m_URL = m_URL;
    }

    public String getPresentationName() {
      return m_URL;
    }
  }

  class URLundoManager extends CompoundEdit {
    int m_IdxAdd = 0;

    public String getUndoPresentationName() {
      return ((UndoableURL)
        edits.elementAt(m_IdxAdd-1)).getPresentationName();
    }

    public String getRedoPresentationName() {
      return ((UndoableURL)
        edits.elementAt(m_IdxAdd)).getPresentationName();
    }

    public void addURL(String newURL) {
      if ( edits.size()>m_IdxAdd ) {
        edits.setElementAt(new UndoableURL(newURL),m_IdxAdd++);
        for ( int i=m_IdxAdd; i < edits.size(); i++ ) {
          edits.removeElementAt(i);
        }
      }
      else {
        edits.addElement(new UndoableURL(newURL));
        m_IdxAdd++;
      }
    }

    public String swapURL(String newURL) {
      String m_oldURL = getUndoPresentationName();
      edits.setElementAt(new UndoableURL(newURL),m_IdxAdd-1);
      return m_oldURL;
    }

    public synchronized boolean canUndo() {
      if ( m_IdxAdd > 0 ) {
        UndoableURL edit = (UndoableURL)edits.elementAt(m_IdxAdd-1);
        return edit != null && edit.canUndo();
      }
      return false;
    }

    public synchronized boolean canRedo() {
      if ( edits.size()>m_IdxAdd ) {
        UndoableURL edit = (UndoableURL)edits.elementAt(m_IdxAdd);
        return edit != null && edit.canRedo();
      }
      return false;
    }

    public synchronized void undo() throws CannotUndoException {
      ( (UndoableURL)edits.elementAt(--m_IdxAdd) ).undo();
    }

    public synchronized void redo() throws CannotRedoException {
      ( (UndoableURL)edits.elementAt(m_IdxAdd++) ).redo();
    }
  }
}
Understanding the Code
Class Swingscape
This class extends
JFrame to provide the supporting frame for this example, and implements HyperlinkListener to handle URL changes that can occur in the contained editor pane. Two class variables are defined:String TITLE_TEXT
: title bar text for the application frame.String HOME_DEFAULT
: browser pre-defined homepage.Instance variables:
String m_CurrentURL
: the URL being displayed (defaults to HOME_DEFAULT).JEditorPane m_HtmlPane
: text component for HTML display.JToolbar m_toolBar
: browser navigation controls toolbar.JButton m_btnBack
: push button to move back to a previously visited URL.JButton m_btnForward
: push button to move foreward to a previously visited URL.JButton m_btnReload
: push button to refresh the current page.JMenuItem m_mnuBack
: menu selection to move back to a previously visited URL.JMenuItem m_mnuForward
: menu selection to move foreward to a previously visited URL.JTextField m_txtURL
: URL text entry field.URLundoManager m_undo
: an object that manages back/forward operations via undo/redo.The default constructor for
Swingscape creates and initializes all GUI components. The frame is initialized by calling super() and passing it our TITLE_TEXT constant, "Swingscape browser." Its initial size is set to the maximum screen dimensions if the screen width is found to be 640 or less. Otherwise 10% is deducted from each dimension and it is centered via setLocation(). A call to createMenuBar() is made, which initializes and returns a JMenuBar, ! and initializes the m_toolBar JToolBar. The resulting menu bar is then assigned to our frame, and the toolbar is placed in the NORTH region of the content pane.An editor pane is created and set to expect HTML documents in read-only (non-editing) mode. Because
Swingscape implements the HyperlinkListener interface, we pass the editor a this reference as the destination of HyperlinkEvents (see the hyperlinkUpdate() method below):
    m_HtmlPane = new JEditorPane();

    m_HtmlPane.setEditorKit(new HTMLEditorKit());

    m_HtmlPane.setEditable(false);

    m_HtmlPane.addHyperlinkListener(this);
The editor is then placed in a scroll pane which is placed in the
CENTER of the content pane. The constructor ends with a programmatic click on the "reload" button which will attempt to load the URL represented by DEFAULT_HOME. The reason we perform a programmatic click is because the action handling code for that button is wrapped in a separate thread which will not affect the responsiveness of our interface.The
createMenuBar() method creates and populates our dropdown menus, toolbar, and the associated action listeners. They both receive components based on Action objects that are responsible for the program’s navigational features. The action handling code of each Action object is wrapped in a separate thread to ensure that our GUI remains responsive at all times.Menu item "Reload" from the menu "File" provides a browser page refresh:
    Action actionReload = new AbstractAction("Reload") {
      public void actionPerformed(ActionEvent e) {
        Thread runner = new Thread() {
          public void run() {
            m_HtmlPane.setText("reset doc & reload");
            DisplayPageDirect(m_CurrentURL);
          }
        };
        runner.start();
      }
    };
The action handling code temporarily sets the editor pane text to "reset doc & reload" and then requests the current URL to be loaded.
Menu item "Exit" terminates the
Swingscape’s execution via System.exit(0). Because we don’t place an "Exit" button on the toolbar, we simply create an ActionListener as an anonymous inner class to handle this menu item.The "Go" menu has three menu items each with corresponding toolbar buttons. Menu items "Back" and "Forward" are implemented with similar code. The "Back" menu item provides a way of revisiting previous URLs in reverse order. It accomplishes this by moving the current URL into a redoable state while requesting the undoable URL:
    Action actionBack = new AbstractAction("Back") {
      public void actionPerformed(ActionEvent e) {
        Thread runner = new Thread() {
          public void run() {
            try {
              String mDoURL = m_undo.swapURL(m_CurrentURL);
              m_undo.undo();  // URL now in redo
              DisplayPageDirect(mDoURL);
            }
            catch (CannotUndoException exc) {}
            finally {
              updateMenu_Buttons();
            }
          }
        };
        runner.start();
      }
    };
The
swapURL() method (see below) grabs the undo/"Back" URL String while placing the current one on the undo stack. The undo() method is called to move this URL to a redo/"Forward" state. The URL corresponding to undo/"Back" is requested using our custom DisplayPageDirect() method. Since undo() can throw an exception, it is wrapped within a try/catch block. The updateMenu_Buttons() call is placed in a finally clause so that no matter what happens, the state of the toolbar buttons and menu items will be u! pdated according to the undo/redo state of our URLundoManager instance, m_undo (see below).Menu item "Forward" reverses any undo/"Back"s by displaying URLs in the order they were originally visited. The relevant code moves the current URL into an undoable state and then the redoable URL is requested:
m_undo.redo();
DisplayPageDirect(m_undo.swapURL(m_CurrentURL));
Initially, the redo/"Forward" URL is shifted to a temporary undo state via
redo(). Our swapURL() method is then used to grab the former redo/"Forward" URL while placing the currently displayed URL on the undo stack.Menu item "Home" displays the URL obtained via the
HOME_DEFAULT String representation. The Display_RecordUndo() method (see below) is called to provide undo/redo functionality for this URL change as well.For a more modernized feel, each toolbar button is created with: no painted border, no keyboard focus changing abilities, and a custom
PopButtonListener to toggle between border painting modes when the mouse moves in and out of its bounds (see below).A text field is added to the toolbar for display and entry of destination URLs. Its associated
ActionListener is constructed as an anonymous inner class. It trims white space, checks for http and the local file protocols, and attempts to select an appropriate protocol, if none is typed, before attempting to load the resulting URL:
     String checkForProtocol = m_URL.substring(0,7).toLowerCase();

     if (!checkForProtocol.equals("http://") &&
        !checkForProtocol.startsWith("file:/"))
     {
         if (checkForProtocol.indexOf(':') == 1)
         { // Drive letter?
            m_URL = "file:/"+m_URL;
         }
         else
         { // Assume a website...
           m_URL = "http://"+m_URL;
         }
     }

     Display_RecordUndo(m_URL);
Initially, any leading or trailing white spaces are trimmed away using the
String trim() method. If anything remains, the first seven characters are forced to be lower case for case-insensitive text comparison. If a protocol of "http" or "file" is present, we assume that we can proceed with an attempt to display the URL. If neither protocol is found, a quick check is made for a colon that may represent the second character of a drive specification (e.g. c: or d: in Windows/DOS-based systems). If this is found we attach "file:/" as a prefix. The URL is then requested via Display_RecordUndo() which also places the current URL in an undo/"Back" state.
Note: Operating system specific code might be added to do a better job recognizing filepaths. This functionality is beyond the scope of this example, but would be expected of a commercial implementation.
The
createMenuBar() method ends by setting the toolbar’s floatable property to false and returning the menu bar. Both items are dealt with accordingly in the constructor, as discussed above.Method
hyperlinkUpdate() is called whenever an HTML link is selected from our m_HtmlPane editor pane. The referenced URL is requested if the event proves to be an ACTIVATED link:if (e.getEventType() == HyperlinkEvent.EventType.ACTIVATED) {
Display_RecordUndo(e.getURL().toString());
}
Method
updateMenu_Buttons() checks the undoable and redoable states via URLundoManager methods, and sets the menu and toolbar button states accordingly. The tooltips are changed to the current undo and redo URLs, or are temporarily disabled if no undo or redo URLs exist.Method
Display_RecordUndo() efficiently stores a single URL String. The intern() method is called so unique String pool references will be used (this can save memory and provides faster String comparisons). It then checks if the given URL is different than the current URL. If so, it gets added to the undo list, menus/toolbar buttons are updated, and the URL is then requested for display:
    String mCompareURL = strURL.intern();

    if ( m_CurrentURL != mCompareURL ) {
      m_undo.addURL(m_CurrentURL);
      updateMenu_Buttons();
      DisplayPageDirect(mCompareURL);
    }
As we have seen, all
Swingscape URL requests are forwarded to DisplayPageDirect() whose job it is to attempt to load the destination page in our m_HtmlPane editor pane. The URL String parameter becomes the current page and the it is shown in the toolbar’s text field. The Reload button’s tooltip text is updated to indicate this URL is the one that will be refreshed when pressed.
    public void DisplayPageDirect(String strURL) {
      m_CurrentURL = strURL;
      m_txtURL.setText(strURL);
      m_btnReload.setToolTipText(strURL);
This method assigns a wait cursor to our editor pane as an attempt is made to load the requested URL via
m_HtmlPane.setPage(strURL). A finally clause serves to reset the cursor to the default cursor whether the page was successfully loaded or not. (This functionality is commented out--see note below.)
Note:
setCursor() logic intermittently functions on Windows™ platforms but Sunsoft claims to have a fix according to Bug Parade#4160474 included in JDK1.1.8 and JDK1.2.2 releases.Method
main() provides the entry point for the application and calls the Swingscape constructor to get things rolling.Class PopButtonListener
This class extends
MouseAdapter to provide popup/hidden button border support for the toolbar. Method mouseEntered() shows the button’s border when the mouse enters its bounds, making the buttons appear to popup in a rollover fashion. Method mouseExited() turns off the button border when the mouse moves out of its bounds.Class UndoableURL
This class extends
AbstractUndoableEdit to provide the undoable/redoable URL objects (which correspond to "Back"/"Forward" actions, respectively). URLundoManager (see below) collectively organizes these objects. One instance variable is declared:String m_URL
: "Back" or "Forward" String URL including protocol and any trailing arguments.The constructor of the
UndoableURL() initializes this variable as the given String parameter. Method getPresentationName() simply returns this String when requested by our URLundoManager.Class URLundoManager
This class extends
CompoundEdit to provide the mechanism behind the browser’s undo/redo ("Back"/"Forward") functionality. As we learned in chapter 19, CompoundEdit contains a protected Vector called edits used to store its UndoableEdits. We also learned that the UndoManager class extends CompoundEdit to provide a convenient mechanism for undoing and redoing single edits.Our
URLundoManager class functions similar to UndoManager, but streamlines its methods for the browser’s needs while providing additional control over undo/redo states. The most significant difference is that we support an intermediate state between undo and redo. For instance, when an undo is invoked, the associated UndoableURL will not automatically move to the redo state. It will only move to the redo state after it has been displayed and a new URL is entered, or another undo is performed. This will become clear as we explain the methods below. Additionaly, because URLundoManager performs its own management of its edits Vector, whenever a new edit is added all redoable edits need to be removed.One instance variable is declared:
int m_IdxAdd
: offset into the edits Vector used to determine where undo’s end and redo’s begin. It always points to the position where we would next add an undoable; this would also be the current redoable (i.e. "Forward") if there are any. m_IdxAdd-1 will point to the most recent undo (assuming m_IdxAdd is greater than 0).Method
getUndoPresentationName() retrieves the String URL of the most recent undoable UndoableURL by calling its getPresentationName() method:return ((UndoableURL)
edits.elementAt(m_IdxAdd-1)).getPresentationName();
Method
getRedoPresentationName() retrieves the String URL from the current redoable. It works identical to getUndoPresentationName()except it uses m_IdxAdd as its offset into the edits Vector.Method
addURL() creates a new UndoableURL and adds it to the edits Vector. Initially, it checks if any redos exist:if ( edits.size()>m_IdxAdd ) {
If so, it stores the new edit in the most recent redoable position and eliminates any remaining redoables:
      edits.setElementAt(new UndoableURL(newURL),m_IdxAdd++);
      for ( int i=edits.size()-1; i > m_IdxAdd-1; i-- ) {
        edits.removeElementAt(i);
      }
    }
If there aren’t any redoables, the edit is simply added to the end of the
edits Vector, and the current offset is incremented:edits.addElement(new UndoableURL(newURL));
m_IdxAdd++;
Method
swapURL() returns the most recent UndoableURL’s URL and replaces it with a new one based on the given String URL parameter:
    public String swapURL(String newURL) {
      String m_oldURL = getUndoPresentationName();
      edits.setElementAt(new UndoableURL(newURL),m_IdxAdd-1);
      return m_oldURL;
    }
This method helps provide an intermediate state between undo and redo. The current URL is neither undoable nor redoable until it is replaced.
Method
canUndo() determines whether any undoables exist. This is used to visually set the "Back" menu item and button states. It checks whether the undoable offset corresponds to a valid edit and then whether that edit is undoable:
    if (m_IdxAdd > 0) {
      UndoableURL edit = (UndoableURL)edits.elementAt(m_IdxAdd-1);
      return edit != null && edit.canUndo();
    }
    return false;
Method
canRedo() determines whether any redoables exist. This is used to visually set the "Forward" menu item and button states, and works very similar to canUndo().Method
undo() executes the most recent UndoableURL’s internal housekeeping (by calling its inherited undo() method). Before using this method, we are expected to call the swapURL() method so the current URL will be placed in a redo/"Forward" state. Method redo() works similarly, however, proper browser redo/"Forward" behavior necessitates calling swapURL() after this method so that the current URL will be moved to an undo state.Running the Code
The default homepage is Sun’s JFC product webpage. It demonstrates HTML tables, forms, graphics and even an animated Java mascot--Duke is swinging near the bottom of the page. Choose some links or enter a different URL in the text field. You will see the "Back" button become bold and its tooltip will reflect the last page visited. If you press "Back" or choose Go/"Back" from the menu, you’ll see that the "Forward" button becomes enabled (as expected). Notice how the menu item, button states and tooltips reflect the currently allowed options.
Bug Alert! The HTMLEditorKit is not completely matured yet. Expect occasional exceptions. See bug #4180751 at the JDC Bug Parade for the most common exception we experienced. It is a good idea to run this example and test whether this bug has been fixed in your version of Java. The exception message has the following format:
Exception occurred during event dispatching:
Javax.swing.text.StateInvariantError: infinite loop in formatting