In this chapter:
- JComponent properties, sizing, and positioning
- Event handling and dispatching
- Multithreading
- Timers
- AppContext & service classes
- Inside Timers & the TimerQueue
- JavaBeans
- Fonts, Colors, Graphics & text
- Using the Graphics clipping area
- Graphics Debugging
- Painting and Validation
- Focus Management
- Keyboard input, KeyStrokes, and Actions
- SwingUtilities
2.1 JComponent properties, size, and positioning
2.1.1 Properties
All Swing components conform to the JavaBeans specification. In section 2.7 we will discuss this in detail. Among the five features a JavaBean is expected to support is a set of properties and associated accessor methods. A property is a global variable, and its accessor methods, if any, are normally of the form
setPropertyname(), getPropertyname() or isPropertyname().
A property that has no event firing associated with a change in its value is called a simple property. A bound property is one for which
PropertyChangeEvents are fired after it changes state. We can register PropertyChangeListeners to listen for PropertyChangeEvents through JComponent‘s addPropertyChangeListener() method. A constrained property is one for which PropertyChangeEvents are fired before a change in state occurs. We can register VetoableChangeListeners to listen for PropertyChangeEvents through JComponent’s addVetoableChangeListener() method. A change can be vetoed in the event handling code of a VetoableChangeListener by throwing a PropertyVetoException. (There is only one Swing class with constrained properties: JInternalFrame).
Note: Each of these event and listener classes is defined in the
java.awt.beans package.
PropertyChangeEvent
’s carry three pieces of information with them: name of the property, old value, and new value. Beans can use an instance of PropertyChangeSupport to manage the dispatching of PropertyChangeEvents corresponding to each bound property, to each registered listener. Similarly, an instance of VetoableChangeSupport can be used to manage the sending of all PropertyChangeEvents corresponding to each constrained property.
Swing introduces a new class called
SwingPropertyChangeSupport (defined in javax.swing.event) which is a subclass of, and almost identical to, PropertyChangeSupport. The difference is that SwingPropertyChangeSupport has been built to be more efficient. It does this by sacrificing thread safety, which, as we will see later in this chapter, is not an issue in Swing if the multithreading guidelines are followed consistently (because all event processing should occur on only one thread--the event-dispatching thread). So if we are confident that our code has been constructed in a thread-safe mannar, we are encouraged to use this more efficent version, rather than PropertyChangeSupport.
Note: There is no Swing equivalent of
VetoableChangeSupport because there are currently only four constrained properties in Swing--all defined in JInternalFrame.
Swing also introduces a new type of property which we will call a change property, for lack of a given name. We use
ChangeListeners to listen for ChangeEvents that get fired when these properties change state. A ChangeEvent only carries one piece of information with it: the source of the event. For this reason, change properties are less powerful than bound or constrained properties, but they are more widespread. A JButton, for instance, sends change events whenever it is armed (pressed for the first time), pressed, and released (see chapter 5).
Another new property-like feature Swing introduces is the notion of client properties. These are basically key/value pairs stored in a
Hashtable provided by each Swing component. This allows properties to be added and removed at run-time, and is often a convenient place to store data without having to build a separate subclass.
Warning: Client properties may seem like a great way to add property change support for custom components, but we are explicitly advised against this: "The
clientProperty dictionary is not intended to support large scale extensions to JComponent nor should it be considered an alternative to subclassing when designing a new component."API
Client properties are bound properties: when a client property changes, a
PropertyChangeEvent is dispatched to all registered PropertyChangeListeners. To add a property to a component’s client properties Hashtable, we do the following:
myComponent.putClientProperty("myname", myValue);
To retrieve a client property:
myObject = myComponent.getClientProperty("myname");
To remove a client propery we can provide a
null value:
myComponent.putClientProperty("myname", null);
For example,
JDesktopPane uses a client property to control the outline dragging mode for JInternalFrames (this will work no matter which L&F is in use):
myDesktop.putClientProperty("JDesktopPane.dragMode", "outline");
Note: You can always find out which properties have change events associated with them, as well as any other type of event, by referencing to the Swing source code. Unless you are using Swing for simple interfaces, we strongly suggest getting used to this.
Five Swing components have special client properties that only the Metal L&F pays attention to. Briefly these are:
JTree.lineStyle
A
String used to specify whether node relationships are displayed as angular connecting lines ("Angled"), horizontal lines defining cell boundaries ("Horizontal" -- default), or no lines at all ("None"). JScrollBar.isFreeStandingA
Boolean value used to specify whether all sides of a JScrollbar will have an etched border (Boolean.FALSE -- default) or only the top and left edges (Boolean.TRUE). JSlider.isFilledA
Boolean value used to specify whether the lower portion of a slider should be filled (Boolean.TRUE) or not (Boolean.FALSE -- default). JToolBar.isRolloverA
Boolean value used to specify whether a toolbar button displays an etched border only when the mouse is within its bounds and no border if not (Boolean.TRUE), or always use an etched border (Boolean.FALSE -- default). JInternalFrame.isPaletteA
Boolean value used to specify whether a very thin border is used (Boolean.TRUE) or the regular border is used (Boolean.FALSE -- default). As of Java 2 FCS this property is not used.2.1.2 Size and positioning
Because
JComponent extends java.awt.Container it inherits all the sizing and positioning functionality we are used to. We are encouraged to manage a component’s preferred, minimum, and maximum sizes using the following methods:
setPreferredSize()
, getPreferredSize()The most comfortable size of a component. Used by most layout managers to size each component.
setMinimumSize()
, getMinimumSize()Used during layout to act as a lower bounds for a component’s dimensions.
setMaximumSize()
, getMaximumSize()Used during layout to act as an upper bounds for a component’s dimensions.
Each
setXX()/getXX() method accepts/returns a Dimension instance. We will learn more about what these sizes mean in terms of each layout manager in chapter 4. Whether or not a layout manager pays attention to these sizes is solely based on that layout manager’s implementation. It is perfectly feasible to construct a layout manager that simply ignores all of them, or pays attention to only one. The sizing of components in a container is layout-manager specific.
JComponent
’s setBounds() method can be used to assign a component both a size and a position within its parent container. This overloaded method can take either a Rectangle parameter (java.awt.Rectangle) or four int paramaters representing x-coordinate, y-coordinate, width, and height. For example, the following two are equivalent:
    myComponent.setBounds(120,120,300,300);

    Rectangle rec = new Rectangle(120,120,300,300);
    myComponent.setBounds(rec);
Note that
setBounds() will not override any layout policies in effect due to a parent container’s layout manager. For this reason a call to setBounds() may appear to have been ignored in some situations because it tried to do its job and was forced back to its original size by the layout manager (layout managers always have first crack at setting the size of a component).
setBounds()
is commonly used to manage child components in containers with no layout manager (such as JLayeredPane, JDesktopPane, and JComponent itself). For instance, we normally use setBounds() when adding a JInternalFrame to a JDesktopPane.
A component’s size can safely be queried in typical AWT style, such as:
    int h = myComponent.getHeight();
    int w = myComponent.getWidth();
Size can also be retrieved as a
Rectangle or a Dimension instance:
    Rectangle rec2 = myComponent.getBounds();
    Dimension dim = myComponent.getSize();
Rectangle
contains four publically accessible properties describing its location and size:
    int recX = rec2.x;
    int recY = rec2.y;
    int recWidth = rec2.width;
    int recHeight = rec2.height;
Dimension
contains two publically accessible properties describing size:
    int dimWidth = dim.width;
    int dimHeight = dim.height;
The coordinates returned in the
Rectangle instance using getBounds() represent a component’s location within its parent. These coordinates can also be obtained using the getX() and getY() methods. Additionaly, we can set a component’s position within its container using the setLocation(int x, int y) method.
JComponent
also maintains an alignment. Horizontal and vertical alignments can be specified by float values between 0.0 and 1.0: 0.5 means center, closer to 0.0 means left or top, and closer to 1.0 means right or bottom. The corresponding JComponent methods are:
    setAlignmentX(float f);
    setAlignmentY(float f);
These values are only used in containers managed by
BoxLayout and OverlayLayout.2.2 Event handling and dispatching
Events occur anytime a key or mouse button is pressed. The way components receive and process events has not changed from JDK1.1. There are many different types of events that Swing components can generate, including those in
java.awt.event and even more in javax.swing.event. Many of the new Swing event types are component-specific. Each event type is represented by an object that, at the very least, identifies the source of the event, and often carries additional information about what specific kind of event it is, and information about the state of the source before and after the event was generated. Sources of events are most commonly components or models, but there are also different kinds of objects that can generate events.
As we discussed in the last chapter, in order to receive notification of events, we need to register listeners with the target object. A listener is an implementation of any of the
XXListener classes (where XX is an event type) defined in the java.awt.event, java.beans, and javax.swing.event packages. There is always at least one method defined in each interface that takes a corresponding XXEvent as parameter. Classes that support notification of XXEvents generally implement the XXListener interface, and have support for registering and unregistering those listeners through the use of addXXListener() and removeXXListener() methods respectively. Most event targets allow any number of listeners to be registered with them. Similarly, any listener instance can be registered to receive events from any number of event sources. Usually classes that support XXEvents provide protected fireXX() methods used for constructing event objects and sending them to the event handlers for processing.2.2.1 class javax.swing.event.EventListenerList
EventListenerList
is an array of XXEvent/XXListener pairs. JComponent and each of its decendants use an EventListenerList to maintain their listeners. All default models also maintain listeners and an EventListenerList. When a listener is added to a Swing component or model, the associated event’s Class instance (used to identify event type) is added to its EventListenerList array, followed by the listener itself. Since these pairs are stored in an array rather than a mutable collection (for efficiency purposes), a new array is created on each addition or removal using the System.arrayCopy() method. When events are received, the list is walked through and events are sent to each listener with a matching type. Because the array is ordered in an XXEvent, XXListener, YYEvent, YYListener, etc. fashion, a listener corresponding to a given event type is always next in the array. This approach allows very efficient event-dispatching routines (see section 2.7.7). For thread safety the methods for adding and removing listeners from an EventListenerList synchronize access to the array when it is manipulated.
JComponent
defines its EventListenerList as a protected field called listenerList so that all subclasses inherit it. Swing components manage most of their listeners directly through listenerList.2.2.2 Event-dispatching thread
All events are processed by the listeners that receive them within the event-dispatching thread (an instance of
java.awt.EventDispatchThread). All painting and component layout is expected to occur within this thread as well. The event-dispatching thread is of primary importance to Swing and AWT, and plays a key role in keeping updates to component state and display in an app under control.
Associated with this thread is a FIFO queue of events -- the system event queue (an instance of
java.awt.EventQueue). This gets filled up, as any FIFO queue, in a serial fashion. Each request takes its turn executing event handling code, whether this be updating component properties, layout, or repainting. All events are processed serially to avoid such situations as a component’s state being modified in the middle of a repaint. Knowing this, we must be careful not to dispatch events outside of the event-dispatching thread. For instance, calling a fireXX() method directly from a separate thread of execution is unsafe. We must also be sure that event handling code, and painting code can be executed quickly. Otherwise the whole system event queue will be blocked waiting for one event process, repaint, or layout to occur, and our application will appear frozen or locked up.2.3 Multithreading
To help us in ensuring that all our event handling code gets executed only from within the event-dispatching thread, Swing provides a very helpful class that, among other things, allows us to add
Runnable objects to the system event queue. This class is called SwingUtilities and it contains two methods that we are interested in here: invokeLater() and invokeAndWait(). The first method adds a Runnable to the system event queue and returns immediately. The second method adds a Runnable and waits for it to be dispatched, then returns after it finishes. The basic syntax of each follows:
    Runnable trivialRunnable = new Runnable() {
      public void run() {
        doWork(); // do some work
      }
    };
    SwingUtilities.invokeLater(trivialRunnable);

    try {
      Runnable trivialRunnable2 = new Runnable() {
        public void run() {
          doWork(); // do some work
        }
      };
      SwingUtilities.invokeAndWait(trivialRunnable2);
    }
    catch (InterruptedException ie) {
      System.out.println("...waiting thread interrupted!");
    }
    catch (InvocationTargetException ite) {
      System.out.println(
        "...uncaught exception within Runnable’s run()");
    }
Because these
Runnables are placed into the system event queue for execution within the event-dispatching thread, we should be just as careful that they execute quickly, as any other event handling code. In the above two examples, if the doWork() method did something that takes a long time (like loading a large file) we would find that the application would freeze up until the load finishes. In time-intensive cases such as this, we should use our own separate thread to maintain responsiveness.
The following code shows a typical way to build our own thread to do some time-intensive work. In order to safely update the state of any components from inside this thread, we must use
invokeLater() or invokeAndWait():
    Thread workHard = new Thread() {
      public void run() {
        doToughWork(); // do some really time-intensive work
        SwingUtilities.invokeLater( new Runnable () {
          public void run() {
            updateComponents(); // update the state of component(s)
          }
        });
      }
    };
    workHard.start();
Note:
invokeLater() should be instead of invokeAndWait() whenever possible. If we do have to use invokeAndWait(), we should make sure that there are no locks (i.e.synchronized blocks) held by the calling thread that another thread might need during the operation.
This solves the problem of responsiveness, and it does dispatch component-related code to the event-dispatching thread, but it still cannot be considered completely user-friendly. Normally the user should be able to interrupt a time-intensive procedure. If we are waiting to establish a network connection, we certainly don’t want to continue waiting indefinitely if the destination no longer exists. In most circumstances the user should have the option to interrupt our thread. The following pseudocode code shows a typical way to accomplish this, where
stopButton causes the thread to be interrupted, updating component state accordingly:
    Thread workHarder = new Thread() {
      public void run() {
        doTougherWork();
        SwingUtilities.invokeLater( new Runnable () {
          public void run() {
            updateMyComponents(); // update the state of component(s)
          }
        });
      }
    };
    workHarder.start();

    public void doTougherWork() {

      try {
        // [some sort of loop]
        // ...if, at any point, this involves changing
        // component state we’ll have to use invokeLater
        // here because this is a separate thread.
        //
        // We must do at least one of the following:
        // 1. Periodically check Thread.interrupted()
        // 2. Periodically sleep or wait

        if (Thread.interrupted()) {

          throw new InterruptedException();

        }

        Thread.wait(1000);

      }

      catch (InterruptedException e) {

        // let somebody know we’ve been interrupted
        // ...if this involves changing component state
        // we’ll have to use invokeLater here.

      }

    }

    JButton stopButton = new JButton("Stop");
    ActionListener stopListener = new ActionListener() {
      public void actionPerformed(ActionEvent event) {
        // interrupt the thread and let the user know the
        // thread has been interrupted by disabling the
        // stop button.
        // ...this will occur on the regular event dispatch thread
        workHarder.interrupt();
        stopButton.setEnabled(false);
      }
    };
    stopButton.addActionListener(stopListener);
Our
stopButton interrupts the workHarder thread when pressed. There are two ways that doTougherWork() will know whether workHarder, the thread it is executed in, has been interrupted. If it is currently sleeping or waiting, an InterruptedException will be thrown which we can catch and process accordingly. The only other way to detect interruption is to periodically check the interrupted state by calling Thread.interrupted().
This approach is commonly used for constructing and displaying complex dialogs, I/O processes that result in component state changes (such as loading a document into a text component), intensive class loading or calculations, waiting for messages or to establish a network connection, etc.
Reference: Members of the Swing team have written a few articles about using threads with Swing, and have provided a class called
SwingWorker that makes managing the type of multithreading described here more convenient. See http://java.sun.com/products/jfc/tsc/archive/tech_topics_arch/threads/threads.html2.3.1 Special cases
There are some special cases in which we do not need to delegate code affecting the state of components to the event-dispatching thread:
1. Some methods in Swing, although few and far between, are marked as thread-safe and do not need special consideration. Some methods are thread-safe but are not marked as such:
repaint(), revalidate(), and invalidate().
2. A component can be constructed and manipulated in any fashion we like, without regard for threads, as long as it has not yet been realized (i.e. its has been displayed or a repaint request has been queued). Top-level containers (
JFrame, JDialog, JApplet) are realized after any of setVisible(true), show(), or pack() have been called on them. Also note that a component is considered realized as soon as it is added to a realized container.
3. When dealing with Swing applets (
JApplets) all components can be constructed and manipulated without regard to threads until the start() method has been called, which occurs after the init() method. 2.3.2 How do we build our own thread-safe methods?This is quite easy. Here is a thread-safe method template we can use to guarantee this method’s code only executes in the event-dispatching thread:
    public void doThreadSafeWork() {
      if (SwingUtilities.isEventDispatchThread()) {
        //
        // do all work here...
        //
      }
      else {
        Runnable callDoThreadSafeWork =  new Runnable() {
          public void run() {
            doThreadSafeWork();
          }
        };
        SwingUtilities.invokeLater(callDoThreadSafeWork);
      }
    }
2.3.3 How do invokeLater() and invokeAndWait() work?
class javax.swing.SystemEventQueueUtilities [package private]
When
SwingUtilities receives a Runnable object through invokeLater(), it passes it immediately to the postRunnable() method of a class called SystemEventQueueUtilities. If a Runnable is received through invokeAndWait(), first the current thread is checked to make sure that it is not the event-dispatching thread. (It would be fatal to allow invokeAndWait() to be invoked from the event-dispatch thread itself!) An error is thrown if this is the case. Otherwise, we construct an Object to use as the lock on a critical section (i.e. a synchronized block). This block contains two statements. The first sends the Runnable to SystemEventQueueUtilities’ postRunnable() method, along with a reference to the lock object. The second waits on the lock object so the calling thread won’t proceed until this object is notified--hence "invoke and wait."
The
postRunnable() method first communicates with the private SystemEventQueue, an inner class of SystemEventQueueUtilities, to return a reference to the system event queue. We then wrap the Runnable in an instance of RunnableEvent, another private inner class. The RunnableEvent constructor takes a Runnable and an Object representing the lock object (null if invokeLater() was called) as parameters.
The
RunnableEvent class is a subclass of AWTEvent, and defines its own static int event ID -- EVENT_ID. (Note that whenever we define our own event we are expected to use an event ID greater than the value of AWTEvent.RESERVED_ID_MAX.) RunnableEvent‘s EVENT_ID is AWTEvent.RESERVED_ID_MAX + 1000. RunnableEvent also contains a static instance of a RunnableTarget, yet another private inner class. RunnableTarget is a subclass of Component and its only purpose is to act as the source and target of RunnableEvents.
How does
RunnableTarget do this? Its constructor enables events with event ID matching RunnableEvent’s ID:
enableEvents(RunnableEvent.EVENT_ID);
It also overrides
Component’s protected processEvent() method to receive RunnableEvents. Inside this method it first checks to see if the event passed as parameter is in fact an instance of RunnableEvent. If it is, it is passed to SystemEventQueueUtilities’ processRunnableEvent() method (this occurs after the RunnableEvent has been dispatched from the system event queue.)
Now back to
RunnableEvent. The RunnableEvent constructor calls its superclass (AWTEvent) constructor passing its static instance of RunnableTarget as the event source, and EVENT_ID as the event ID. It also keeps references to the given Runnable and lock object.
So in short: when
invokeLater() or invokeAndWait() is called, the Runnable passed to them is then passed to the SystemEventQueueUtilities.postRunnable() method along with a lock object that the calling thread (if it was invokeAndWait()) is waiting on. This method first tries to gain access to the system event queue and then wraps the Runnable and the lock object in an instance of RunnableEvent.
Once the
RunnableEvent instance has been created, the postRunnable() method (which we have been in this whole time) checks to see if it did successfully gain access to the system event queue. This will only occur if we are not running as an applet, because applets do not have direct access to the system event queue. At this point, there are two possible paths depending on whether we are running an applet or an application: Applications:Since we have direct access to the AWT Sytstem event queue we just post the
RunnableEvent and return. Then the event gets dispatched at some point in the event-dispatching thread by being sent to RunnableTarget’s processEvent() method, which then sends it to the processRunnableEvent() method. If there was no lock used (i.e. invokeLater() was called) the Runnable is just executed and we are done. If there was a lock used (i.e. invokeAndWait() was called), we enter a a synchronized block on the lock object so that nothing else can access that object when we execute the Runnable. Remember that this is the same lock object that the calling thread is waiting on from within SwingUtilities.invokeAndWait(). Once the Runnable finishes, we call notify on this object, which then wakes up the calling thread and we are done. Applets:SystemEventQueueUtilities
does some very interesting things to get around the fact that applets do not have direct access to the system event queue. To summarize a quite involved workaround procedure, an invisible RunnableCanvas (a private inner class that extends java.awt.Canvas) is maintained for each applet and stored in a static Hashtable using the calling thread as its key. A Vector of RunnableEvents is also maintained and instead of manually posting an event to the system event queue, a RunnableCanvas posts a repaint() request. Then, when the repaint request is dispatched in the event-dispatching thread, the appropriate RunnableCanvas’s paint() method is called as expected. This method has been constructed to locate any RunnableEvents (stored in the Vector) associated with a given RunnableCanvas, and execute them (somewhat of a hack, but it works).2.4 Timers
class javax.swing.Timer
You can think of the
Timer as a unique thread conveniently provided by Swing to fire ActionEvents at specified intervals (although this is not exactly how a Timer works internally, as we will see in section 2.6). ActionListeners can be registered to received these events just as we register them on buttons, and other components. To create a simple Timer that fires ActionEvents every second we can do something like the following:
import java.awt.event.*;
import javax.swing.*;

class TimerTest
{
  public TimerTest() {
    ActionListener act = new ActionListener() {
      public void actionPerformed(ActionEvent e) {
        System.out.println("Swing is powerful!!");
      }
    };
    Timer tim = new Timer(1000, act);
    tim.start();

    while(true) {};
  }

  public static void main( String args[] ) {
    new TimerTest();
  }
}
First we set up an
ActionListener to receive ActionEvents. Then we built a new Timer passing the time in milliseconds between events, the delay, and an ActionListener to send them to. Finally we call the Timer’s start() method to turn it on. Since there is no GUI running for us the program will immediately exit, so we set up a loop to let the Timer continue to do its job indefinitely (we will explain why this is necessary in section 2.6).
When you run this code you will see "Swing is powerful!!" sent to standard output every second. Note that the
Timer does not fire an event right when it is started. This is because its initial delay time defaults to the delay time passed to the constructor. If we want the Timer to fire an event right when it is started we would set the initial delay time to 0 using its setInitialDelay() method.
At any point we can call
stop() to stop the Timer and start() to restart it (start() does nothing if it is already running). We can call restart() on a Timer to start the whole process over. The restart() method is just a shortcut way to call stop() and start() sequentually.
We can set a
Timer’s delay using the setDelay() method and tell it whether to repeat or not using the setRepeats() method. Once a Timer has been set to non-repeating it will fire only one action when started (or if it is currently running), and then it will stop.
The
setCoalesce() method allows several Timer event postings to be combined (coalesced) into one. This can be useful under heavy loads when the TimerQueue (see below) thread doesn’t have enough processing time to handle all its Timers.
Timer
s are easy to use and can often be used as convenient replacements for building our own threads. However, there is a lot more going on behind the scenes that deserves a bit of revealing. Before we are ready to look at how Timers work under the hood, we’ll take a look at Swing’s SecurityContext-to-AppContext service class mapping for applets, as well as how applications manage their service classes (also using AppContext). If you are not curious about how Swing manages the sharing of service classes behind the scenes, you will want to skip the next section. Although we will refer to AppContext from time to time, it is by no means necessary to understand the details.2.5 AppContext services
class sun.awt.AppContext [platform specific]
Warning:
AppContext is not meant to be used by any developer, as it is not part of the Java 2 core API. We are discussing it here only to facilitate a more thorough understanding of how Swing service classes work behind the scenes.
AppContext
is an application/applet (we’ll say "app" for short) service table that is unique to each Java session (applet or application). For applets, a separate AppContext exists for each SecurityContext which corresponds to an applet’s codebase. For instance, if we have two applets on the same page, each using code from a different directory, both of those applets would have distinct SecurityContexts associated with them. If, however, they each were loaded from the same codebase, they would necessarily share a SecurityContext. Java applications do not have SecurityContexts. Rather, they run in namespaces which are distinguished by ClassLoaders. We will not go into the details of SecurityContexts or ClassLoaders here, but it suffices to say that they can be used by SecurityManagers to indicate security domains, and the AppContext class is designed to take advantage of this by only allowing one instance of itself to exist per security domain. In this way, applets from different codebases cannot access each other’s AppContext. So why is this significant? We’re getting there...
A shared instance is an instance of a class that is normally retreivable using a static method defined in that class. Each
AppContext maintains a Hashtable of shared instances available to the associated security domain, and each instances is referred to as a service. When a service is requested for the first time it registers its shared instance with the associated AppContext. This consists of creating a new instance of itself and adding it to the AppContext key/value mapping.
One reason these shared instances are registered with an
AppContext instead of being implemented as normal static instances, directly retreivable by the service class, is for security purposes. Services registered with an AppContext can only be accessed by trusted apps, whereas classes directly providing static instances of themselves allow these instances to be used on a global basis (requiring us to implement our own security mechanism if we want to limit access to them). Another reason for this is robustness. The less applets interact with each other in undocumented ways, the more robust they can be.
For example, suppose an app tries to access all of the key events on the system
EventQueue (where all events get queued for processing in the event-dispatching thread) to try and steal passwords. By using distinct EventQueues in each AppContext, the only key events that the app would have access to are its own. (There is in fact only one EventQueue per AppContext.)
So how do we access our
AppContext to add, remove, and retrieve services? AppContext is not meant to be accessed by developers. But we can if we really need to, and this would guarantee that our code would never be certified as 100% pure, because AppContext is not part of the core API. Nevertheless, here’s what is involved: The static AppContext.getAppContext() method determines the correct AppContext to use depending on whether we are running an applet or application. We can then use the returned AppletContext’s put(), get(), and remove() methods to manage shared instances. In order to do this we would need to implement our own methods such as the following:
    private static Object appContextGet(Object key) {
      return sun.awt.AppContext.getAppContext().get(key);
    }

    private static void appContextPut(Object key, Object value) {
      sun.awt.AppContext.getAppContext().put(key, value);
    }

    private static void appContextRemove(Object key) {
      sun.awt.AppContext.getAppContext().remove(key);
    }
In Swing, this functionality is implemented as three
SwingUtilities static methods (refer to SwingUtilities.java source code):
    static void appContextPut(Object key, Object value)
    static void appContextRemove(Object key, Object value)
    static Object appContextGet(Object key)
However, we cannot access these because they are package private. These are the methods used by Swing’s service classes. Some of the Swing service classes that register shared instances with
AppContext include: EventQueue, TimerQueue, ToolTipManager, RepaintManager, FocusManager and UIManager.LAFState (all of which we will discuss at some point in this book). Interestingly, SwingUtilities secretly provides an invisible Frame instance registered with AppContext to act as the parent to all JDialogs and JWindows with null owners.2.6 Inside Timers & the TimerQueue
class javax.swing.TimerQueue [package private]
A
Timer is an object containing a small Runnable capable of dispatching ActionEvents to a list of ActionListeners (stored in an EventListenerList). Each Timer instance is managed by the shared TimerQueue instance (registered with AppContext).
A
TimerQueue is a service class whose job it is to manage all Timer instances in a Java session. The TimerQueue class provides the static sharedInstance() method to retreive the TimerQueue service from AppContext. Whenever a new Timer is created and started it is added to the shared TimerQueue, which maintains a singly-linked list of Timers sorted by the order in which they will expire (i.e. time to fire the next event).
The
TimerQueue is a daemon thread which is started immediately upon instantiation. This occurs when TimerQueue.sharedInstance() is called for the first time (i.e. when the first Timer in a Java session is started). It continusouly waits for the Timer with the nearest expiration time to expire. Once this occurs it signals that Timer to post ActionEvents to all its listeners, then assigns a new Timer as the head of the list, and finally removes the expired Timer. If the expired Timer’s repeat mode is set to true it is added back into the list at the appropriate place based on its delay time.
Note: The real reason why the
Timer example from section 2.4 would exit immediately if we didn’t build a loop, is because the TimerQueue is a daemon thread. Daemon threads are service threads and when the Java virtual machine only has daemon threads running it will exit because it assumes that no real work is being done. Normally this behavior is desirable.
A
Timer’s events are always posted in a thread-safe mannar to the event dispatching thread by sending it’s Runnable object to SwingUtilities.invokeLater().2.7 JavaBeans architecture
Since we are concerned with creating Swing applications in this book, we need to understand and appreciate the fact that every component in Swing is a JavaBean.
2.7.1 The JavaBeans component model
The JavaBeans specification identifies five features that each bean is expected to provide. We will review these features here, along with the classes and mechanisms that make them possible. The first thing to do is think of a simple component, such as a button, and apply what we discuss here to this component. Second, we are assuming basic knowledge of the Java Reflection API:
"Instances of
"A
Method provides information about, and access to, a single method on a class or interface."API"A
Field provides information about, and dynamic access to, a single field of a class or an interface."API
2.7.2 Introspection
Introspection is the ability to discover the methods, properties, and events information of a bean. This is accomplished through use of the
java.beans.Introspector class. Introspector provides static methods to generate a BeanInfo object containing all discoverable information about a specific bean. This includes information from each of a bean’s superclasses, unless we specify which superclass introspection should stop at (i.e. we can specify the ‘depth’ of an instrospection). The following retrieves all discoverable information of a bean:BeanInfo myJavaBeanInfo = Introspector.getBeanInfo(myJavaBean);
A
BeanInfo object partitions all of a bean’s information into several groups, some of which are:
- A
As we discussed in section 2.1.1, beans support different types of properties. Simple properties are variables such that, when modified, a bean will do nothing. Bound and constrained properties are variables such that, when modified, a bean will send notification events to any listeners. This notification takes the form of an event object which contains the property name, the old property value, and the new property value. Whenever a bound property changes, the bean should send out a
PropertyChangeEvent. Whenever a constrained property is about to change, the bean should send out a PropertyChangeEvent before the change occurs, allowing it to possibly be vetoed. Other objects can listen for these events and process them accordingly (which leads to communication).
Associated with properties are a bean’s
setXX()/getXX() and isXX() methods. If a setXX() method is available the associated property is said to be writeable. If a getXX() or isXX() method is available the associated property is said to be readable. An isXX() method normally corresponds to retrieval of a boolean property (occasionaly getXX() methods are used for this as well).2.7.4 Customization
A bean’s properties are exposed through its
setXX()/getXX() and isXX() methods, and can be modified at run-time (or design-time). JavaBeans are commonly used in interface development environments where property sheets can be displayed for each bean allowing read/write (depending on the available accessors) property functionality.2.7.5 Communication
Beans are designed to send events that notify all event listeners registered with that bean, when a bound or constrained property changes value. Apps are constructed by registering listeners from bean to bean. Since we can use introspection to determine event sending and receiving information about any bean, design tools can take advantage of this knowledge to allow more powerful, design-time customization. Communication is the basic glue that holds an interactive GUI together.
2.7.6 Persistency
All JavaBeans must implement the
Serializable interface (directly or indirectly) to allow serialization of their state into persistent storage (storage that exists beyond program termination). All objects are saved except those declared transient. (Note that JComponent directly implements this interface.)
Classes which need special processing during serialization need to implement the following private methods:
    private void writeObject(java.io.ObjectOutputStreamout) and
    private void readObject(java.io.ObjectInputStream in )
These methods are called to write or read an instance of this class to a stream. Note that the default serialization mechanism will be invoked to serialize all sub-classes because these are private methods. (Refer to the API documentation or Java tutorial for more information about serialization.)
Note: As of the first release of Java 2,
JComponent implements readObject() and writeObject() as private. All subclasses need to implement these methods if special processing is desired. Currently long-term persistance is not recommended and is subject to change in future releases. However, there is nothing wrong with implementing Short-term persistance (e.g. for RMI, misc. data transfer, etc.).
Classes that intend to take comple control of their serialization and deserialization should, instead, implement the
Externalizable interface.
Two methods are defined in the
Externalizable interface:
    public void writeExternal(ObjectOutput out)
    public void readExternal(ObjectInput in)
These methods will be invoked when
writeObject() and readObject() (discussed above) are invoked to handle any serialization/deserialization.2.7.7 A simple Swing-based JavaBean
The following code demonstrates how to build a Swing-based JavaBean with simple, bound, constrained, and ‘change’ properties.
The code: BakedBean.java
see \Chapter1\1
import javax.swing.*;
import javax.swing.event.*;
import java.beans.*;
import java.awt.*;
import java.io.*;

public class BakedBean extends JComponent implements Externalizable
{
  // Property names (only needed for bound or constrained properties)
  public static final String BEAN_VALUE = "Value";
  public static final String BEAN_COLOR = "Color";

  // Properties
  private Font m_beanFont;           // simple
  private Dimension m_beanDimension; // simple
  private int m_beanValue;           // bound
  private Color m_beanColor;         // constrained
  private String m_beanString;       // change

  // Manages all PropertyChangeListeners
  protected SwingPropertyChangeSupport m_supporter =
    new SwingPropertyChangeSupport(this);

  // Manages all VetoableChangeListeners
  protected VetoableChangeSupport m_vetoer =
    new VetoableChangeSupport(this);

  // Only one ChangeEvent is needed since the event's only
  // state is the source property.  The source of events generated
  // is always "this". You’ll see this in lots of Swing source.
  protected transient ChangeEvent m_changeEvent = null;

  // This can manage all types of listeners, as long as we set
  // up the fireXX methods to correctly look through this list.
  // This makes you appreciate the XXSupport classes.
  protected EventListenerList m_listenerList =
    new EventListenerList();

  public BakedBean() {
    m_beanFont = new Font("SanSerif", Font.BOLD | Font.ITALIC, 12);
    m_beanDimension = new Dimension(150,100);
    m_beanValue = 0;
    m_beanColor = Color.black;
    m_beanString = "BakedBean #";
  }

  public void paintComponent(Graphics g) {
    super.paintComponent(g);
    g.setColor(m_beanColor);
    g.setFont(m_beanFont);
    g.drawString(m_beanString + m_beanValue,30,30);
  }

  public void setBeanFont(Font font) {
    m_beanFont = font;
  }

  public Font getBeanFont() {
    return m_beanFont;
  }

  public void setBeanValue(int newValue) {
    int oldValue = m_beanValue;
    m_beanValue = newValue;

    // Notify all PropertyChangeListeners
    m_supporter.firePropertyChange(BEAN_VALUE,
      new Integer(oldValue), new Integer(newValue));
  }

  public int getBeanValue() {
    return m_beanValue;
  }

  public void setBeanColor(Color newColor)
   throws PropertyVetoException {
    Color oldColor = m_beanColor;

    // Notify all VetoableChangeListeners before making change
    // ...exception will be thrown here if there is a veto
    // ...if not we continue on and make the change
    m_vetoer.fireVetoableChange(BEAN_COLOR, oldColor, newColor);

    m_beanColor = newColor;
    m_supporter.firePropertyChange(BEAN_COLOR, oldColor, newColor);
  }

  public Color getBeanColor() {
    return m_beanColor;
  }

  public void setBeanString(String newString) {
    m_beanString = newString;

    // Notify all ChangeListeners
    fireStateChanged();
  }

  public String getBeanString() {
    return m_beanString;
  }

  public void setPreferredSize(Dimension dim) {
    m_beanDimension = dim;
  }

  public Dimension getPreferredSize() {
    return m_beanDimension;
  }

  public void setMinimumSize(Dimension dim) {
    m_beanDimension = dim;
  }

  public Dimension getMinimumSize() {
    return m_beanDimension;
  }

  public void addPropertyChangeListener(
   PropertyChangeListener l) {
    m_supporter.addPropertyChangeListener(l);
  }

  public void removePropertyChangeListener(
   PropertyChangeListener l) {
    m_supporter.removePropertyChangeListener(l);
  }

  public void addVetoableChangeListener(
   VetoableChangeListener l) {
    m_vetoer.addVetoableChangeListener(l);
  }

  public void removeVetoableChangeListener(
   VetoableChangeListener l) {
    m_vetoer.removeVetoableChangeListener(l);
  }

  // Remember that EventListenerList is an array of
  // key/value pairs:
  //   key = XXListener class reference
  //   value = XXListener instance
  public void addChangeListener(ChangeListener l) {
    m_listenerList.add(ChangeListener.class, l);
  }

  public void removeChangeListener(ChangeListener l) {
    m_listenerList.remove(ChangeListener.class, l);
  }

  // This is typical EventListenerList dispatching code.
  // You’ll see this in lots of Swing source.
  protected void fireStateChanged() {
    Object[] listeners = m_listenerList.getListenerList();
    // Process the listeners last to first, notifying
    // those that are interested in this event
    for (int i = listeners.length-2; i>=0; i-=2) {
      if (listeners[i]==ChangeListener.class) {
       if (m_changeEvent == null)
         m_changeEvent = new ChangeEvent(this);
         ((ChangeListener)listeners[i+1]).stateChanged(m_changeEvent);
      }
    }
  }

  public void writeExternal(ObjectOutput out) throws IOException {
    out.writeObject(m_beanFont);
    out.writeObject(m_beanDimension);
    out.writeInt(m_beanValue);
    out.writeObject(m_beanColor);
    out.writeObject(m_beanString);
  }

  public void readExternal(ObjectInput in)
   throws IOException, ClassNotFoundException {
    setBeanFont((Font)in.readObject());
    setPreferredSize((Dimension)in.readObject());
    // Use preferred size for minimum size..
    setMinimumSize(getPreferredSize());
    setBeanValue(in.readInt());
    try {
      setBeanColor((Color)in.readObject());
    }
    catch (PropertyVetoException pve) {
      System.out.println("Color change vetoed..");
    }
    setBeanString((String)in.readObject());
  }

  public static void main(String[] args) {
    JFrame frame = new JFrame("BakedBean");
    frame.getContentPane().add(new BakedBean());
    frame.setVisible(true);
    frame.pack();
  }
}
BakedBean
has a visual representation (not a requirement for a bean). It has properties: m_beanValue, m_beanColor, m_beanFont, m_beanDimension, and m_beanString. It supports persistency by implementing the Externalizable interface and implementing the writeExternal() and readExternal() methods to control its own serialization (note that the order in which data is written and read match). BakedBean supports customization through its setXX() and getXX() methods, and it supports communication by allowing the registration of PropertyChangeListeners, VetoableChangeListeners, and ChangeListeners. And, without having to do anything special, it supports introspection.
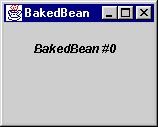
Attaching a main method to display
BakedBean in a frame does not get in the way of any JavaBeans functionality. Figure 2.1 shows BakedBean when executed as an application.
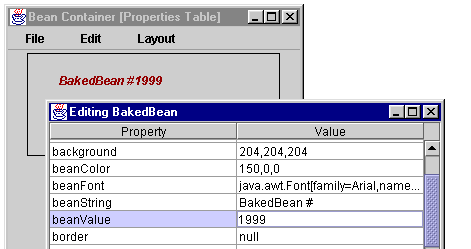
In chapter 18 (section 18.9) we construct a full-featured JavaBeans property editing environment. Figure 2.2 shows a
BakedBean instance in this environment. The BakedBean shown has had its m_beanDimension, m_beanColor, and m_beanValue properties modified with our property editor and was then serialized to disk. What figure 2.2 really shows is an instance of that BakedBean after it had been deserialized (loaded from disk). Note that any Swing component can be created, modified, serialized, and deserialized using this environment because they are all JavaBeans compliant!
2.8 Fonts, Colors, Graphics and text
2.8.1 Fonts
class java.awt.Font, abstract class java.awt.GraphicsEnvironment
As we saw in
BakedBean above, fonts are quite easy to create:m_beanFont = new Font("SanSerif", Font.BOLD | Font.ITALIC, 12);
In this code
"SanSerif" is the font name, Font.Bold | Font.PLAIN is the style (which in this case is both bold and italic), and 12 is the size. The Font class defines three static int constants to denote font style: Font.BOLD, Font.ITALIC, FONT.PLAIN. We can specify font size as any int in the Font constructor (as shown above). Using Java 2, in order to get a list of available font names at run-time we ask the local GraphicsEnvironment:
    GraphicsEnvironment ge = GraphicsEnvironment.
      getLocalGraphicsEnvironment();
    String[] fontNames = ge.getAvailableFontFamilyNames();
Note: Java 2 introduces a whole new powerful mechanism for communicating with devices that can render graphics, such as screens, printers or image bufferes. These devices are represented as instances of the
GraphicsDevice class. Interstingly, a GraphicsDevice might reside on the local machine, or it might reside on a remote machine. Each GraphicsDevice has a set of GraphicsConfiguration objects associated with it. A GraphicsConfiguration describes specific characteristics of the associated device. Usually each GraphicsConfiguration of a GraphicsDevice represents a different mode of operation (for instance resolution and number of colors).
Note: In JDK1.1 code, getting a list of font names often looked like this:
String[] fontnames = Toolkit.getDefaultToolkit().getFontList();
The
Toolkit.getFontList() method has been deprecated in Java 2 and this code should be updated.
GraphicsEnvironment
is an abstract class that describes a collection of GraphicsDevices. Subclasses of GraphicsEnvironment must provide three methods for retreiving arrays of Fonts and Font information:
String[] getAvailableFontFamilyNames(): retreives the names of all font families available.
String[] getAvailableFontFamilyNames(Locale l): retreives the names of all font families available using the specifice Locale (internationalization support).
GraphicsEnvironment
also provides static methods for retrieving GraphicsDevices and the local GraphicsEnvironment instance. In order to find out what Fonts are available to the system our program is running on, we must refer to this local GraphicsEnvironment instance, as shown above. It is much more efficient and convenient to retreive the available names and use them to construct Fonts than it is to retreive an actual array of Font objects (no less, in one-point size).
We might think that, given a
Font object, we can use typical getXX()/setXX() accessors to alter its name, style, and size. Well, we would be half right. We can use getXX() methods to retrieve this information from a Font:
    String getName()
    int getSize()
    float getSize2D()
    int getStyle
However, we cannot use typical
setXX() methods. Instead we must use one of the following Font instance methods to derive a new Font:
    deriveFont(float size)
    deriveFont(int style)
    deriveFont(int style, float size)
    deriveFont(Map attributes)
    deriveFont(AffineTransform trans)
    deriveFont(int style, AffineTransform trans)
Normally we will only be interested in the first three methods.
Note:
AffineTransforms are used in the world of Java 2D to perform things such as translations, scales, flips, rotations, and shears. A Map is an object that maps keys to values (it does not contain the objects involved) and the attributes referred to here are key/value pairs as described in the API docs for java.text.TextAttribute (this class is defined in the java.awt.font package that is new to Java 2, and considered part of Java 2D -- see chapter 23).
2.8.2 Colors
The
Color class provides several static Color instances to be used for convenience (e.g. Color.blue, Color.yellow, etc.). We can also construct a Color using, among others, the following constructors:
    Color(float r, float g, float b)
    Color(int r, int g, int b)
    Color(float r, float g, float b, float a)
    Color(int r, int g, int b, int a)
Normally we use the first two methods, and those familiar with JDK1.1 will most likely recognize them. The first allows red, green, and blue values to be specified as
floats from 0.0 to 1.0. The second takes these values as ints from 0 to 255.
The second two methods are new to Java 2. They each contain a fourth parameter which represents the
Color’s alpha value. The alpha value directly controls transparency. It defaults to 1.0 or 255 which means completely opaque. 0.0 or 0 means completely transparent.
Note that, as with
Fonts, there are plenty of getXX() accessors but no setXX() accessors. Instead of modifying a Color object we are normally expected to create a new one.
Note: The
Color class does have static brighter() and darker() methods that return a Color brighter or darker than the Color specified, but their behavior is unpredicatble due to internal rounding errors and we suggest staying away from them for most practical purposes.
By specifying an alpha value we can use the resulting
Color as a component’s background to make it transparent! This will work for any lightweight component provided by Swing such as labels, text components, internal frames, etc. Of course there will be component-specific issues involved (such as making the borders and title bar of an internal frame transparent). The next section demonstrates a simple Swing canvas example showing how to use the alpha value to paint some transparent shapes.
Note: A Swing component’s opaque property, controlled using
setOpaque(), is not directly related to Color transparency. For instance, if we have an opaque JLabel whose background has been set to a transparent green (e.g. Color(0,255,0,150)) the label’s bounds will be completely filled with this color only because it is opaque. We will be able to see through it only because the color is transparent. If we then turn off opacity the background of the label would not be rendered. Both need to be used together to create transparent components, but they are not directly related.
2.8.3 Graphics and text
abstract class java.awt.Graphics, abstract class java.awt.FontMetrics
Painting is much different in Swing than it is in AWT. In AWT we typically override
Component’s paint() method to do rendering and the update() method for things like implementing our own double-buffering or filling the background before paint() is called.
With Swing, component rendering is much more complex. Though
JComponent is a subclass of Component, it uses the update() and paint() methods for different reasons. In fact, the update() method is never invoked at all. There are also five additional stages of painting that normally occur from within the paint() method. We will discuss this process in section 2.11, but it suffices to say here that any JComponent subclass that wants to take control of its own rendering should override the paintComponent() method and not the paint() method. Additionally, it should always begin its paintComponent() method with a call to super.paintComponent().
Knowing this, it is quite easy to build a
JComponent that acts as our own lightweight canvas. All we have to do is subclass it and override the paintComponent() method. Inside this method we can do all of our painting. This is how to take control of the rendering of simple custom components. However, this should not be attempted with normal Swing components because UI delegates are in charge of their rendering (we will see how to take customize UI delegate rendering at the end of chapter 6, and throughout chapter 21).
Note: The awt
Canvas class can be replaced by a simplified version of the JCanvas class we define in the following example.
Inside the
paintComponent() method we have access to that component’s Graphics object (often referred to as a component’s graphics context) which we can use to paint shapes and draw lines and text. The Graphics class defines many methods used for these purposes and we refer you to the API docs for these. The following code shows how to construct a JComponent subclass that paints an ImageIcon and some shapes and text using various Fonts and Colors, some completely opaque and some partially transparent (we saw similar, but less interesting, functionality in BakedBean). Figure 2.3 illustrates.
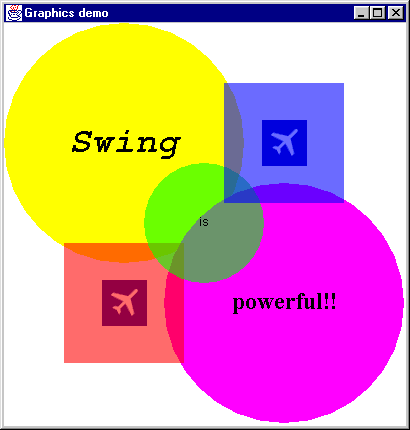
The Code: TestFrame.java
see \Chapter1\2
import java.awt.*;
import javax.swing.*;

class TestFrame extends JFrame
{
  public TestFrame() {
    super( "Graphics demo" );
    getContentPane().add(new JCanvas());
  }

  public static void main( String args[] ) {
    TestFrame mainFrame = new TestFrame();
    mainFrame.pack();
    mainFrame.setVisible( true );
  }
}

class JCanvas extends JComponent {
  private static Color m_tRed = new Color(255,0,0,150);
  private static Color m_tGreen = new Color(0,255,0,150);
  private static Color m_tBlue = new Color(0,0,255,150);

  private static Font m_biFont =
    new Font("Monospaced", Font.BOLD | Font.ITALIC, 36);
  private static Font m_pFont =
    new Font("SanSerif", Font.PLAIN, 12);
  private static Font m_bFont = new Font("Serif", Font.BOLD, 24);

  private static ImageIcon m_flight = new ImageIcon("flight.gif");

  public JCanvas() {
    setDoubleBuffered(true);
    setOpaque(true);
  }

  public void paintComponent(Graphics g) {
    super.paintComponent(g);

    // fill entire component white
    g.setColor(Color.white);
    g.fillRect(0,0,getWidth(),getHeight());

    // filled yellow circle
    g.setColor(Color.yellow);
    g.fillOval(0,0,240,240);

    // filled magenta circle
    g.setColor(Color.magenta);
    g.fillOval(160,160,240,240);

    // paint the icon below blue sqaure
    int w = m_flight.getIconWidth();
    int h = m_flight.getIconHeight();
    m_flight.paintIcon(this,g,280-(w/2),120-(h/2));

    // paint the icon below red sqaure
    m_flight.paintIcon(this,g,120-(w/2),280-(h/2));

    // filled transparent red square
    g.setColor(m_tRed);
    g.fillRect(60,220,120,120);

    // filled transparent green circle
    g.setColor(m_tGreen);
    g.fillOval(140,140,120,120);

    // filled transparent blue square
    g.setColor(m_tBlue);
    g.fillRect(220,60,120,120);

    g.setColor(Color.black);

    // Bold, Italic, 36-point "Swing"
    g.setFont(m_biFont);
    FontMetrics fm = g.getFontMetrics();
    w = fm.stringWidth("Swing");
    h = fm.getAscent();
    g.drawString("Swing",120-(w/2),120+(h/4));

    // Plain, 12-point "is"
    g.setFont(m_pFont);
    fm = g.getFontMetrics();
    w = fm.stringWidth("is");
    h = fm.getAscent();
    g.drawString("is",200-(w/2),200+(h/4));

    // Bold 24-point "powerful!!"
    g.setFont(m_bFont);
    fm = g.getFontMetrics();
    w = fm.stringWidth("powerful!!");
    h = fm.getAscent();
    g.drawString("powerful!!",280-(w/2),280+(h/4));
  }

  // Most layout managers need this information
  public Dimension getPreferredSize() {
    return new Dimension(400,400);
  }

  public Dimension getMinimumSize() {
    return getPreferredSize();
  }

  public Dimension getMaximumSize() {
    return getPreferredSize();
  }
}
Note that we override
JComponent’s getPreferredSize(), getMinimumSize(), and getMaximumSize(), methods so most layout managers can intelligably size this component (otherwise some layout managers will set its size to 0x0). It is always good practice to override these methods when implementing custom components.
The
Graphics class uses what is called the clipping area. Inside a component’s paint() method, this is the region of that component’s view that is being repainted (we often say that the clipping area represents the damaged or dirtied region of the component’s view). Only painting done within the clipping area’s bounds will actually be rendered. We can get the size and position of these bounds by calling getClipBounds() which will give us back a Rectangle instance describing it. The reason a clipping area is used is for efficiency purposes: there is no reason to paint undamaged or invisible regions when we don’t have to. (We will show how to extend this example to work with the clipping area for maximum efficiency in the next section).
Note: All Swing components are double buffered by default. If we are building our own lightweight canvas we do not have to worry about double-buffering. This is not the case with an awt
Canvas.
As we mentioned earlier,
Fonts and Font manipulation is very complex under the hood. We are certainly glossing over their structure, but one thing we should discuss is how to obtain useful information about fonts and the text rendered using them. This involves use of the FontMetrics class. In the example above, FontMetrics allowed us to determine the width and hieght of three Strings, rendered in the current Font associated with the Graphics object, so that we could draw them centered in the circles.
Figure 2.4 illustrates some of the most common information that can be retreived from a
FontMetrics object. The meaning of baseline, ascent, descent, and height should be clear from the diagram. The ascent is supposed to be the distance from the baseline to the top of most characters in that font. Note that when we use g.drawString() to render text, the coordinates specified represent the position to place the baseline of the first character.
FontMetric
s provides several methods for retrieving this and more detailed information, such as the width of a String rendered in the associated Font.
In order to get a
FontMetrics instance we first tell our Graphics object to use the Font we are intersted in examining using the setFont() method. Then we create the FontMetrics instance by calling getFontMetrics() on our Graphics object:
    g.setFont(m_biFont);
    FontMetrics fm = g.getFontMetrics();
A typical operation when rendering text is to center it on a given point. Suppose we want to center the text "Swing" on 200,200. Here is the code we would use (assuming we have retrieved the
FontMetrics object, fm, as shown above):
     int w = fm.stringWidth("Swing");
     int h = fm.getAscent();
     g.drawString("Swing",200-(w/2),200+(h/4));
We get the width of "Swing" in the current font, divide it by two, and subtract it from 200 to center the text horizontally. To center it vertically we get the ascent of the current font, divide it by four, and add 200. The reason we divide the ascent by four is probably NOT so clear.
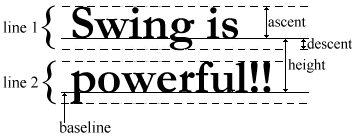
It is now time to address a common mistake that has arisen with Java 2. Figure 2.4 is not an accurate way to document
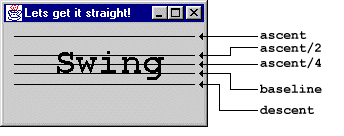
FontMetrics. This is the way we have seen things documented in the Java tutorial and just about everywhere else that we have referenced. However, there appears to be a few problems with FontMetrics as of Java 2 FCS. Here we’ll write a simple program that demonstrates these problems. Our program will draw the text "Swing" in a 36-point bold, monospaced font. We draw lines where its ascent, ascent/2, ascent/4, baseline, and descent lie. Figure 2.5 illustrates.
The Code: TestFrame.java
See \Chapter1\2\fontmetrics
import java.awt.*;
import javax.swing.*;

class TestFrame extends JFrame
{
  public TestFrame() {
    super( "Lets get it straight!" );
    getContentPane().add(new JCanvas());
  }

  public static void main( String args[] ) {
    TestFrame mainFrame = new TestFrame();
    mainFrame.pack();
    mainFrame.setVisible( true );
  }
}

class JCanvas extends JComponent
{
  private static Font m_biFont = new Font("Monospaced", Font.BOLD, 36);

  public void paintComponent(Graphics g) {
    g.setColor(Color.black);

    // Bold 36-point "Swing"
    g.setFont(m_biFont);
    FontMetrics fm = g.getFontMetrics();
    int h = fm.getAscent();

    g.drawString("Swing",50,50); // Try these as well: Ñ Ö Ü ^

    // draw Ascent line
    g.drawLine(10,50-h,190,50-h);

    // draw Ascent/2 line
    g.drawLine(10,50-(h/2),190,50-(h/2));

    // draw Ascent/4 line
    g.drawLine(10,50-(h/4),190,50-(h/4));

    // draw baseline line
    g.drawLine(10,50,190,50);

    // draw Descent line
    g.drawLine(10,50+fm.getDescent(),190,50+fm.getDescent());
  }

  public Dimension getPreferredSize() {
    return new Dimension(200,100);
  }
}
We encourage you to try this demo program with various different fonts, font sizes, and even characters with diacritical marks such as Ñ, Ö, or Ü. You will find that the ascent is always much higher than it is typically documented to be, and the descent is always lower. The most reliable means of vertically centering text we found turned out to be baseline + ascent/4. However, baseline + descent might also be used and, depending on the font in use, may provide more accurate centering.
The point is that there is no correct way to perform this task due to the current state of
FontMetrics in Java 2.You may experience very different results if not using the first release of Java 2. It is a good idea to run this program and verify whether or not results similar to those shown in figure 2.5 are produced on your system. If not you will want to use a different centering mechanism for your text which should be fairly simple to determine through experimentation with this application.
Note: In JDK1.1 code, getting a
FontMetrics instance often looked like this:FontMetrics fm = Toolkit.getDefaultToolkit().getFontMetrics(myfont);
The
Toolkit.getFontMetrics method has been deprecated in Java 2 and this code should be updated.2.9 Using the Graphics clipping area
We can use the clipping area to optimize component rendering. This may not noticably improve rendering speed for simple components such as our
JCanvas above, but it is important to understand how to implement such functionality, as Swing’s whole painting system is based on this concept (we will find out more about this in the next section).
We now modify
JCanvas so that each of our shapes, strings, and images is only painted if the clipping area intersects its bounding rectangular region. (These intersections are fairly simple to compute, and it may be helpful for you to work through, and verify each one.) Additionaly, we maintain a local counter that is incremented each time one of our items is painted. At the end of the paintComponent() method we display the total number of items that were painted. Below is our optimized JCanvas paintComponent() method (with counter):
The Code: JCanvas.java
see \Chapter1\3
  public void paintComponent(Graphics g) {
    super.paintComponent(g);

    // counter
    int c = 0;

    // for use below
    int w = 0;
    int h = 0;
    int d = 0;

    // get damaged region
    Rectangle r = g.getClipBounds();
    int clipx = r.x;
    int clipy = r.y;
    int clipw = r.width;
    int cliph = r.height;

    // fill only damaged region only
    g.setColor(Color.white);
    g.fillRect(clipx,clipy,clipw,cliph);

    // filled yellow circle if bounding region has been damaged
    if (clipx <= 240 && clipy <= 240) {
      g.setColor(Color.yellow);
      g.fillOval(0,0,240,240); c++;
    }

    // filled magenta circle if bounding region has been damaged
    if (clipx + clipw >= 160 && clipx <= 400
        && clipy + cliph >= 160 && clipy <= 400) {
      g.setColor(Color.magenta);
      g.fillOval(160,160,240,240); c++;
    }

    w = m_flight.getIconWidth();
    h = m_flight.getIconHeight();
    // paint the icon below blue sqaure if bounding region damaged
    if (clipx + clipw >= 280-(w/2) && clipx <= (280+(w/2))
        && clipy + cliph >= 120-(h/2) && clipy <= (120+(h/2))) {
      m_flight.paintIcon(this,g,280-(w/2),120-(h/2)); c++;
    }

    // paint the icon below red sqaure if bounding region damaged
    if (clipx + clipw >= 120-(w/2) && clipx <= (120+(w/2))
        && clipy + cliph >= 280-(h/2) && clipy <= (280+(h/2))) {
      m_flight.paintIcon(this,g,120-(w/2),280-(h/2)); c++;
    }

    // filled transparent red square if bounding region damaged
    if (clipx + clipw >= 60 && clipx <= 180
        && clipy + cliph >= 220 && clipy <= 340) {
      g.setColor(m_tRed);
      g.fillRect(60,220,120,120); c++;
    }

    // filled transparent green circle if bounding region damaged
    if (clipx + clipw > 140 && clipx < 260
        && clipy + cliph > 140 && clipy < 260) {
      g.setColor(m_tGreen);
      g.fillOval(140,140,120,120); c++;
    }

    // filled transparent blue square if bounding region damaged
    if (clipx + clipw > 220 && clipx < 380
        && clipy + cliph > 60 && clipy < 180) {
      g.setColor(m_tBlue);
      g.fillRect(220,60,120,120); c++;
    }

    g.setColor(Color.black);

    g.setFont(m_biFont);
    FontMetrics fm = g.getFontMetrics();
    w = fm.stringWidth("Swing");
    h = fm.getAscent();
    d = fm.getDescent();
    // Bold, Italic, 36-point "Swing" if bounding regiondamaged
    if (clipx + clipw > 120-(w/2) && clipx < (120+(w/2))
        && clipy + cliph > (120+(h/4))-h && clipy < (120+(h/4))+d)
    {
      g.drawString("Swing",120-(w/2),120+(h/4)); c++;
    }

    g.setFont(m_pFont);
    fm = g.getFontMetrics();
    w = fm.stringWidth("is");
    h = fm.getAscent();
    d = fm.getDescent();
    // Plain, 12-point "is" if bounding region damaged
    if (clipx + clipw > 200-(w/2) && clipx < (200+(w/2))
        && clipy + cliph > (200+(h/4))-h && clipy < (200+(h/4))+d)
    {
      g.drawString("is",200-(w/2),200+(h/4)); c++;
    }

    g.setFont(m_bFont);
    fm = g.getFontMetrics();
    w = fm.stringWidth("powerful!!");
    h = fm.getAscent();
    d = fm.getDescent();
    // Bold 24-point "powerful!!" if bounding region damaged
    if (clipx + clipw > 280-(w/2) && clipx < (280+(w/2))
        && clipy + cliph > (280+(h/4))-h && clipy < (280+(h/4))+d)
    {
      g.drawString("powerful!!",280-(w/2),280+(h/4)); c++;
    }

    System.out.println("# items repainted = " + c + "/10");
  }
Try running this example and dragging another window in your desktop over parts of the
JCanvas. Keep your console in view so that you can monitor how many items are painted during each repaint. Your output should be displayed something like the following (of course you’ll probably see different numbers):
# items repainted = 4/10
# items repainted = 0/10
# items repainted = 2/10
# items repainted = 2/10
# items repainted = 1/10
# items repainted = 2/10
# items repainted = 10/10
# items repainted = 10/10
# items repainted = 8/10
# items repainted = 4/10
Optimizing this canvas wasn’t that bad, but imagine how tough it would be to optimize a container with a variable number of children, possibly overlapping, with double-buffering options and transparency. This is what
JComponent does, and it does it quite efficiently. We will learn a little more about how this is done in section 2.11. But first we’ll finish our high level overview of graphics by introducing a very powerful and well-met feature new to Swing: graphics debugging.2.10 Graphics debugging
Graphics debugging provides the ability to observe each painting operation that occurs during the rendering of a component and all of its children. This is done in slow-motion, using distinct flashes to indicate the region being painted. It is intended to help find problems with rendering, layouts, and container hierarchies -- just about anything display related. If graphics debugging is enabled, the
Graphics object used in painting is actually an instance of DebugGraphics (a subclass of Graphics). JComponent, and thus all Swing components, support graphics debugging and it can be turned on/off with JComponent’s setDebugGraphicsOptions() method. This method takes an int parameter which is normally one of (or a bitmask combination -- using the bitwise | operator) four static values defined in DebugGraphics.2.10.1 Graphics debugging options
1.
DebugGraphics.FLASH_OPTION: Each paint operation flashes a specified number of times, in a specified flash color, with a specified flash interval. The default values are: 250ms flash interval, 4 flashes, and red flash color. These values can be set with the following DebugGraphics static methods:
    setFlashTime(int flashTime)
    setFlashCount(int flashCount)
    setFlashColor(Color flashColor)
If we don’t disable double-buffering in the
RepaintManager (discussed in the next section) we will not see the painting as it occurs:
    RepaintManager.currentManager(null).
      setDoubleBufferingEnabled(false);
Note: Turning off buffering in the
RepaintManager has the effect of ignoring every component’s doubleBuffered property.
2.
DebugGraphics.LOG_OPTION: This sends messages describing each paint operation as they occur. By default these messages are directed to standard output (the console -- System.out). However, we can change the log destination with DebugGraphics’ static setLogStream() method. This method takes a PrintStream parameter. To send output to a file we would do something like the following:
    PrintStream debugStream = null;
    try {
      debugStream = new PrintStream(
        new FileOutputStream("JCDebug.txt"));
    }
    catch (Exception e) {
      System.out.println("can't open JCDebug.txt..");
    }
    DebugGraphics.setLogStream(debugStream);
If at some point we need to change the log stream back to standard output:
DebugGraphics.setLogStream(System.out);
We can insert any string into the log by retreiving it with
DebugGraphics’ static logStream() method, and then printing into it:
    PrintStream ps = DebugGraphics.logStream();
    ps.println("\n===> paintComponent ENTERED <===");
Warning: Writing a log to a file will overwrite that file each time we reset the stream.
Each operation is printed with the following syntax:
    "Graphics" + (isDrawingBuffer() ? "<B>" : "") +
      "(" + graphicsID + "-" +   debugOptions + ")"
Each line starts with "Graphics." The
isDrawingBuffer() method tells us whether buffering is enabled. If it is, a "<B>" is appended. The graphicsID and debugOptions values are then placed in parenthesis, and separated by a "-". The graphicsID value represents the number of DebugGraphics instances that have been created during the application’s lifetime (i.e. it’s a static int counter). The debugOptions value represents the current debugging mode:
    LOG_OPTION = 1
    LOG_OPTION and FLASH_OPTION = 3
    LOG_OPTION and BUFFERED_OPTION = 5
    LOG_OPTION, FLASH_OPTION, and BUFFERED_OPTION = 7
For example, with logging and flashing enabled, we see output similar to this for each operation:
Graphics(1-3) Setting color: java.awt.Color[r=0,g=255,b=0]
Calls to each
Graphics method will get logged when this option is enabled. The above line was generated when a call to setColor()was made.
3.
DebugGraphics.BUFFERED_OPTION: This is supposed to pop up a frame showing rendering as it occurs in the offscreen buffer if double-buffereing is enabled. As of the Java 2 FCS this option is not functional.
4.
DebugGraphics.NONE_OPTION: This nullifies graphics debugging settings and basically shuts it off.2.10.2 Graphics debugging caveats
There are several issues to be aware of when using graphics debugging:
1. Graphics debugging will not work for any component whose UI is
null. Thus, if you have created a direct JComponent subclass without a UI delegate, as we did with JCanvas above, graphics debugging will simply do nothing. The simplest way to work around this is to define a trivial (empty) UI delegate. We’ll show how to do this in the example below.
2.
DebugGraphics does not properly clean up after itself. By default, a solid red flash color is used. When a region is flashed, that region is filled in with this red flash color and it does not get erased (it just gets painted over). This presents a problem because transparent rendering will not show up transparent. Instead, it will be alpha-blended with the red below (or whatever the flash color happens to be set to). This is not necessarily a design flaw because there is nothing stopping us from using a completely transparent flash color. With an alpha value of 0 the flash color will never be seen. The only downside is that we don’t see any flashing. However, in most cases it is easy to follow what is being drawn if we set the flashTime and flashCount to wait long enough between operations.2.10.3 Using graphics debugging
We now enable graphics debugging in our
JCanvas example from the last two sections. Because we must have a non-null UI delegate, we define a trivial extension of ComponentUI and implement its createUI() method to return a static instance of itself:
  class EmptyUI extends ComponentUI
  {
    private static final EmptyUI sharedInstance = new EmptyUI();

    public static ComponentUI createUI(JComponent c) {
      return sharedInstance;
    }
  }
In order to properly associate this UI delegate with
JCanvas we simply call super.setUI(EmptyUI.createUI(this)) from the JCanvas constructor. We also set up a PrintStream variable in JCanvas and use it to add a few of our own lines to the log stream during the paintComponent method (to log when the method starts and finishes). Other than this, no changes have been made to the JCanvas’s paintComponent() code.
In our test application,
TestFrame, we create an instance of JCanvas and enable graphics debugging with the LOG_OPTION and FLASH_OPTION options. We disable buffering in the RepaintManager, set the flash time to 100ms, set the flash count to 2, and use a completely transparent flash color.
The Code: TestFrame.java
see \Chapter1\4
import java.awt.*;
import javax.swing.*;
import javax.swing.plaf.*;
import java.io.*;

class TestFrame extends JFrame
{
  public TestFrame() {
    super( "Graphics demo" );
    JCanvas jc = new JCanvas();
    RepaintManager.currentManager(jc).
      setDoubleBufferingEnabled(false);
    jc.setDebugGraphicsOptions(DebugGraphics.LOG_OPTION |
      DebugGraphics.FLASH_OPTION);
    DebugGraphics.setFlashTime( 100 );
    DebugGraphics.setFlashCount( 2 );
    DebugGraphics.setFlashColor(new Color(0,0,0,0));
    getContentPane().add(jc);
  }

  public static void main( String args[] ) {
    TestFrame mainFrame = new TestFrame();
    mainFrame.pack();
    mainFrame.setVisible( true );
  }
}

class JCanvas extends JComponent
{
  // Unchanged code from section 2.9

  private PrintStream ps;

  public JCanvas() {
    super.setUI(EmptyUI.createUI(this));
  }

  public void paintComponent(Graphics g) {
    super.paintComponent(g);

    ps = DebugGraphics.logStream();
    ps.println("\n===> paintComponent ENTERED <===");

    // All painting code unchanged

    ps.println("\n# items repainted = " + c + "/10");
    ps.println("===> paintComponent FINISHED <===\n");
  }

  // Unchanged code from section 2.9
}

class EmptyUI extends ComponentUI
{
  private static final EmptyUI sharedInstance = new EmptyUI();

  public static ComponentUI createUI(JComponent c) {
    return sharedInstance;
  }
}
By setting the
LOG_OPTION, graphics debugging provides us with a more informative way of checking how well our clipping area optimization (from the last section) works. When this example is run the following output should be seen in your console (assuming you don’t obscure JCanvas’s visible region as it is painted for the first time):
Graphics(0-3) Enabling debug
Graphics(0-3) Setting color:
    javax.swing.plaf.ColorUIResource[r=0,g=0,b=0]
Graphics(0-3) Setting font:
    javax.swing.plaf.FontUIResource[family=dialog,name=Dialog,
    style=plain,size=12]

===> paintComponent ENTERED <===
Graphics(1-3) Setting color: java.awt.Color[r=255,g=255,b=255]
Graphics(1-3) Filling rect: java.awt.Rectangle[x=0,y=0,
    width=400,height=400]
Graphics(1-3) Setting color: java.awt.Color[r=255,g=255,b=0]
Graphics(1-3) Filling oval: java.awt.Rectangle[x=0,y=0,
    width=240,height=240]
Graphics(1-3) Setting color: java.awt.Color[r=255,g=0,b=255]
Graphics(1-3) Filling oval:
    java.awt.Rectangle[x=160,y=160,width=240,height=240]
Graphics(1-3) Drawing image: sun.awt.windows.WImage@32a5625a at:
    java.awt.Point[x=258,y=97]
Graphics(1-3) Drawing image: sun.awt.windows.WImage@32a5625a at:
    java.awt.Point[x=98,y=257]
Graphics(1-3) Setting color: java.awt.Color[r=255,g=0,b=0]
Graphics(1-3) Filling rect:
    java.awt.Rectangle[x=60,y=220,width=120,height=120]
Graphics(1-3) Setting color: java.awt.Color[r=0,g=255,b=0]
Graphics(1-3) Filling oval:
    java.awt.Rectangle[x=140,y=140,width=120,height=120]
Graphics(1-3) Setting color: java.awt.Color[r=0,g=0,b=255]
Graphics(1-3) Filling rect:
    java.awt.Rectangle[x=220,y=60,width=120,height=120]
Graphics(1-3) Setting color: java.awt.Color[r=0,g=0,b=0]
Graphics(1-3) Setting font:
    java.awt.Font[family=monospaced.bolditalic,name=Mono
    spaced,style=bolditalic,size=36]
Graphics(1-3) Drawing string: "Swing" at:
    java.awt.Point[x=65,y=129]
Graphics(1-3) Setting font:
    java.awt.Font[family=Arial,name=SanSerif,style=plain,size=12]
Graphics(1-3) Drawing string: "is" at:
    java.awt.Point[x=195,y=203]
Graphics(1-3) Setting font:
    java.awt.Font[family=serif.bold,name=Serif,style=bold,size=34]
Graphics(1-3) Drawing string: "powerful!!" at:
    java.awt.Point[x=228,y=286]

# items repainted = 10/10
===> paintComponent FINISHED <===
2.11 Painting and validation
At the heart of
JComponent’s painting and validation mechanism lies a service class called RepaintManager. It is the RepaintManager that is responsible for sending painting and validation requests to the AWT system event queue for dispatching. To summarize, it does this by intercepting repaint() and revalidate() requests, coalescing any requests where possible, wrapping them in Runnable objects, and sending them to invokeLater(). There are a few issues we have encountered in this chapter that deserve more attention here before we actually discuss details of the painting and validation processes.
Note: This section contains a relatively exhaustive explanation of the most complex mechanism underlying Swing. If you are relatively new to Java or Swing we encourage you to skim this section now, but to come back at a later time for a more complete reading. If you are just looking for information on how to override and use your own painting methods, see section 2.8. For customizing UI delegate rendering see chapter 21.
2.11.1 Double buffering
We’ve mentioned double-buffering, how to disable it in the
RepaintManager, and how to specify the double-buffering of individual components with JComponent’s setDoubleBuffered() method. But how does it work?
Double buffering is the technique of painting into an off-screen image rather than painting directly to a visible component. In the end, the resulting image is painted to the screen (which occurs relatively quickly). Using awt components, developers were required to implement their own double-buffering to reduce flashing. It was clear that double-buffering should be a built-in feature because of its widespread use. Thus, it is not much of a surprise to find this feature in all Swing components.
Behind the scenes, double-buffering consists of creating an
Image and retrieving its Graphics object to use in all painting methods. If the component being repainted has children, this Graphics object will be passed down to them to use for painting, and so on. So if we are using double-buffering for a component, all its children will also be using double-buffering (whether or not they have double-buffering enabled or not) because they will be rendering into the same Graphics object. Note that there is only one off-screen image per RepaintManager, and there is normally only one RepaintManager instance per applet or application (RepaintManager is a service class that registers a shared instance of itself with AppContext--see section 2.5).
As we discuss in chapter 3,
JRootPane is the top-level Swing component in any window (this includes JInternalFrame -- although it isn’t really a window). By enabling double-buffering on JRootPane, all of its children will also be painted using double-buffering. As we saw in the last section, RepaintManager also provides global control over all component double-buffering. So another way to guarantee that all components will use double-buffering is to call:
RepaintManager.currentManager(null).setDoubleBufferingEnabled(true);
2.11.2 Optimized drawing
We didn’t really discuss the fact that components can overlap each other in Swing yet, but they can.
JLayeredPane, for example, is a container allowing any number of components to overlap each other. Repainting such a container is much more complex than repainting a container we know does not allow overlapping, mainly because of the ability for components to be transparent.
What does it mean for a component to be transparent? Technically this means its
isOpaque() method returns false. We can set this property by calling setOpaque(). What opacity means, in this context, is that a component will paint every pixel within its bounds. If this is set to false, we are not guaranteed that this will happen. This is generally set to true, but we will see that when it is set to false it increases the workload of the whole painting mechanism. Unless we are constructing a component that must not fill its entire rectangular region (as we will do in chapter 5 with custom polygonal buttons), we should always leave this set to true, as it is by default for most components. (This value is normally set by a component’s UI delegate.)
JComponent
’s isOptimizedDrawingEnabled() method is overriden to return true for almost all JComponent subclasses except: JLayeredPane, JViewport, and JDesktopPane (a subclass of JLayeredpane). Basically, calling this method is equivalent to asking a component: is it possible that any of your child components can overlap each other? If it is then there is a lot more repainting work to do to take into account that fact that any number of components, from virtually anywhere in our container hierarchy, can overlap each other. Additionaly, since components can be transparent, components layered completely behind others may still show through. Such components are not necessarily siblings (i.e. in the same container) because we could conceivably have several non-opaque containers layered one on top of another. In situations like this, we must do a whole lot of ‘tree walking’ to figure out which components need to be refreshed. If isOptimizedDrawingEnabled() is overriden to return true, then we assume we do not have to consider any situations like this. Thus, painting becomes more efficient, or ‘optimized.’2.11.3 Root validation
A
revalidate() request is generated when a component needs to be laid out again. When a request is received from a certail component there must be some way of determining whether laying that component out will affect anything else/ JComponent’s isValidateRoot() method returns false for most components. Basically, calling this method is equivalent to asking: if I lay your contents out again, can you guarantee that none of your parents or siblings will be adversely affected (i.e. need to be laid out again)? By default only JRootPane, JScrollPane, and JTextField return true. This seems surprizing at first, but apparently it is true that these components are the only Swing components whose contents can be successfully laid out, in any situation (assuming no heavyweight components), without affecting parents or siblings. No matter how big we make anything inside a JRootPane, JScrollPane, or JTextField, they will not change size or location unless some outside influence comes into play (i.e. a sibling or parent). To help convince you of this, try adding a multi-line text component to a container without placing it in a scroll pane. You may notice that creating new lines will change its size (depending on the layout). The point is not that it rarely happens or that it can be prevented, but that it can happen. This is the type of thing that isValidateRoot() is supposed to warn us about. So where is this method used?
A component or its parent is normally revalidated when a property value changes and that component’s size, location, or internal layout has been affected. By recursively calling
isValidateRoot() on a Swing component’s parent until we obtain true, we will end with the closest ancestor of that component that guarantees us its validation will not affect its siblings or parents. We will see that RepaintManager relies on this method for dispatching validation requests.
Note: By siblings we mean components in the same container. By parents we mean parent containers.
2.11.4 RepaintManager
As we know there is usually only one instance of a service class in use per applet or application. So unless we specifically create our own instance of
RepaintManager, which we will almost never need to do, all repainting is managed by the shared instance which is registered with AppContext. We normally retreive it using RepaintManager’s static currentManager() method:
myRepaintManager = RepaintManager.currentManager(null);
This method takes a
Component as its parameter. However, it doesn’t matter what we pass it. In fact the component passed to this method is not used anywhere inside the method at all (see the RepaintManager.java source code), so a value of null can safely be used here. (This definition exists for sub-classes to use if they want to work with more than one RepaintManager, possibly on a per-component basis.)
RepaintManager
exists for two purposes: to provide efficient revalidation and repainting. It intercepts all repaint() and revalidate() requests. This class also handles all double-buffering in Swing and maintains a single Image used for this purpose. This Image’s maximum size is, by default, the size of the screen. However, we can set its size manually using RepaintManager’s setDoubleBufferMaximumSize() method. (All other RepaintManager functionality will be discussed throughout this section where applicable.)
Note: Cell renderers used in components such as
JList, JTree, and JTable are special in that they are wrapped in instances of CellRendererPane and all validation and repainting requests do not propogate up the containment hierarchy. See chapter 17 for more about CellRendererPane and why this behvaior exists. It suffices to say here that cell renderers do not follow the painting and validation scheme discussed in this section.2.11.5 Revalidation
RepaintManager
maintains a Vector of components that need to be validated. Whenever a revalidate request is intercepted, the source component is sent to the addInvalidComponent() method and its "validateRoot" property is checked using isValidateRoot(). This occurs recursively on that component’s parent until isValidateRoot() returns true. The resulting component, if any, is then checked for visibility. If any one of its parent containers is not visible there is no reason to validate it. Otherwise RepaintManager ‘walks down its tree’ until it reaches the ‘root’ component, a Window or Applet. RepaintManager then checks the invalid components Vector and if the component isn’t already there it is added. After being successfully added, RepaintManager then passes the ‘root’ to the SystemEventQueueUtilities’ queueComponentWorkRequest() method (we saw this class in section 2.3). This method checks to see if there is a ComponentWorkRequest (this is a private static class in SystemEventQueueUtilities that implements Runnable) corresponding to that ‘root’ already stored in the work requests table. If there isn’t one, a new one is created. If there is one already, we just grab a reference to it. Then we synchronize access to that ComponentWorkRequest, place it in the work requests table if it is a new one, and check if it is pending (i.e. it has been added to the AWT system event queue). If it isn’t pending, we send it to SwingUtilities.invokeLater(). It is then marked as pending and we leave the synchronized block. When it is finally run from the event-dispatching thread it notifies RepaintManager to execute validateInvalidComponents(), followed by paintDirtyRegions().
The
validateInvalidComponents() method basically checks RepaintManager’s Vector containing the components in need of validation, and calls validate() on each one. (This method is actually a bit more careful than we describe here, as it synchronizes access to prevent the addition of invalid components while executing).
Note: Remember that
validateInvalidComponents() should only be called from within the event-dispatching thread. Never call this method from any other thread. The same rules apply for paintDirtyRegions().
The
paintDirtyRegions() method is much more complicated, and we’ll discuss some of its details below. For now, it suffices to say that this method paints all damaged regions of each component maintained by RepaintManager.2.11.6 Repainting
JComponent
defines two repaint() methods, and the no-argument version of repaint() is inherited from java.awt.Container:
   public void repaint(long tm, int x, int y, int width, int height)
   public void repaint(Rectangle r)
   public repaint() // inherited from java.awt.Container
If you call the no-argument version the whole component is repainted. For small, simple components this is fine. But for larger, more complex components this is certainly not efficient. The other two methods take the bounding region to be repainted (the dirtied region) as parameters. The first method’s
int parameters correspond to the x-coordinate, y-coordinate, width, and height of that region. The second method takes the same information encapsulated in a Rectange instance. The second repaint() method shown above just sends its traffic to the first. The first method sends the dirtied region’s parameters to RepaintManager’s addDirtyRegion() method.
Note: The long parameter in the first
repaint() method represents absolutely nothing and is not used at all. It does not matter what value you use for this. The only reason this is here is to override the correct repaint() method from java.awt.Component.
RepaintManager
maintains a Hashtable of dirty regions. Each component will have at most one dirty region in this table at any time. When a dirty region is added, using addDirtyRegion(), the size of the region and the component are checked. On the off chance that either has a width or height <= 0 the method returns and nothing happens. If it is bigger than 0x0, the source component’s visibility is then tested along with each of its ancestors, and, if they are all visible, its ‘root’ component, a Window or Applet, is located by ‘walking down its tree’ (similar to what occurs in addInvalidateComponent()). The dirty regions Hashtable is then asked if it already has a dirty region of our component stored. If it does it returns its value, a Rectangle, and the handy SwingUtilities.computeUnion() method is used to combine the new dirty region with the old one. Finally, RepaintManager passes the ‘root’ to the SystemEventQueueUtilities’ queueComponentWorkRequest() method. What happens from here on is identical to what we saw for revalidation (see above).
Now we can talk a bit about the
paintDirtyRegions() method we summarized earlier. (Remember that this should only be called from within the event-dispatching thread.) This method starts out by creating a local reference to RepaintManger’s dirty regions Hashtable, and redirecting Repaintmanager’s dirty regions Hashtable reference to a different, empty one. This is all done in a critical section so that no dirty regions can be added while the swap occurs. The remainder of this method is fairly long and complicated so we’ll conclude with a summary of the most significant code (see RepaintManager.java for details).
The
paintDirtyRegions() method continues by iterating through an Enumeration of the dirty components, calling RepaintManager’s collectDirtyComponents() method for each. This method looks at all the ancestors of the specified dirty component and checks each one for any overlap with its dirty region using the SwingUtilities.computeIntersection() method. In this way each dirty region’s bouds are minimized so that only its visible region remains. (Note that collectDirtyComponents() does take transparency into account.) Once this has been done for each dirty component, the paintDirtyRegions() method enters a loop. This loop computes the final intersection of each dirty component and its dirty region. At the end of each iteration paintImmediately() is called on the associated dirty component, which actually paints each minimized dirty region in its correct location (we’ll discuss this below). This completes the paintDirtyRegions() method, but we still have the most significant feature of the whole process left to discuss: painting.2.11.7 Painting
JComponent
includes an update() method which simply calls paint(). The update() method is never actually used by any Swing components at all, but is provided for backward compatibility. The JComponent paint() method, unlike typical AWT paint() implementations, does not handle all of a component’s painting. In fact it very rarely handles any of it directly. The only rendering work JComponent’s paint() method is really responsible for is working with clipping areas, translations, and painting pieces of the Image used by RepaintManager for double-buffering. The rest of the work is delegated to several other methods. We will briefly discuss each of these methods and the order in which painting operations occur. But first we need to discuss how paint() is actually invoked.
As we know from our discussion of the repainting process above,
RepaintManager is responsible for invoking a method called paintImmediately() on each component to paint its dirty region (remember there is always just one dirty region per component because they are intelligently coalesced by RepaintManager). This method, and the private ones it calls, make an intelligently crafted repainting process even more impressive. It first checks to see if the target component is visible, as it could have been moved, hidden, or disposed since the original request was made. Then it recursively searches the component’s non-opaque (using isOpaque()) parents and increases the bounds of the region to repaint accordingly until it reaches an opaque parent:1. If the parent reached is a
A. If double-buffering is enabled, it calls
B. If double-buffering is not enabled, a single call to
paint() is made on the parent.
2. If the parent is not a
JComponent, the region’s bounds are sent to that parent’s repaint() method, which will normally invoke the java.awt.Component paint() method. This method will then forward traffic to each of its lightweight children’s paint() method. However, before doing this it makes sure that each lightweight child it notifies is not completely covered by the current clipping area of the Graphics object that was passed in.
In all cases we have finally reached
JComponent’s paint() method!
Inside
JComponent’s paint() method, if graphics debugging is enabled a DebugGraphics instance will be used for all rendering. Interestingly, a quick look at JComponent’s painting code shows heavy use of a class called SwingGraphics. This isn’t in the API docs because its package private. It appears to be a very slick class for handling custom translations, clipping area management, and a Stack of Graphics objects used for caching, recyclability, and undo-type operations. SwingGraphics actually acts as a wrapper for all Graphics instances used during the painting process. It can only be instantiated by passing it an existing Graphics object. This functionality is made even more explicit, by the fact that it implements an interface called GraphicsWrapper, which is also package private.
The
paint() method checks whether double-buffering is enabled and whether this method was called by paintWithBuffer() (see above):1. If
2. If double-buffering is enabled and this method was not called from
paintWithBuffer(), it will use the off-screen Graphics object associated with RepaintManager’s buffered Image throughout the remainder of this method. Then it will check whether the clipping area of the current Graphics object is completely obscured by any child components. If it isn’t, paintComponent(), paintBorder(), and paintChildren() will be called in that order. If it is completely obscured, only paintChildren() needs to be called.A. The
B. The
paintBorder() method simply paints the component’s border if it has one.
C. The
paintChildren() method is a bit more involved. To summarize, it searches through all child components and determines whether paint() should be invoked on them using the current Graphics clipping area, the isOpaque() method, and the isOptimizedDrawingEnabled() method. The paint() method called on each child will essentially start that child’s painting process from part 2 above, and this process will repeat until either no more children exist or need to be painted.
The bottom line: When building or extending lightweight Swing components it is normally expected that if we want to do any painting within the component itself (vs. in the UI delegate where it normally should be done) we will override the
paintComponent() method and immediately call super.paintComponent(). In this way the UI delegate will be given a chance to render the component first. Overriding the paint() method, or any of the other methods mentioned above should rarely be necessary, and it is always good practice to avoid doing so.2.12 Focus Management
When Swing components are placed in a Swing container, the route of keyboard focus is, by default, left to right and top to bottom. This route is referred to as a focus cycle, and moving focus from one component to the next in a cycle is accomplished using the TAB key or CTRL-TAB. To move in the reverse direction through a cycle we use SHIFT-TAB or CTRL-SHIFT-TAB. This cycle is controlled by an instance of the abstract
FocusManager class.
FocusManager
relies on five JComponent properties of each component to tell it how to treat each component when the current focus reaches or leaves it:focusCycleRoot
: this specifies whether or not the component contains a focus cycle of its own. If it contains a focus cycle, focus will enter that component and loop through its focus cycle until it is manually or programatically moved out of that component. By default this property is false (for most components), and it cannot be assigned with a typical setXX() accessor. It can only be changed through overriding the isFocusCycleRoot() method and returning the appropriate boolean value.managingFocus
: this specifies whether or not KeyEvents corresponding to a focus change will be sent to the component itself or intercepted and devoured by the FocusManager. By default this property is false (for most components), and it cannot be assigned with a typical setXX() accessor. It can only be changed through overriding the isManagingFocus() method and returning the appropriate boolean value.focusTraversable
: this specifies whether or not focus can be transfered to the component by the FocusManager due to a focus shift in the focus cycle. By default this property is true (for most components), and it cannot be assigned with a typical setXX() accessor. It can only be changed through overriding the isFocusTraversable() method and returning the appropriate boolean value. (Note that when focus reaches a component through a mouse click its requestFocus() method is called. By overriding requestFocus() we can respond to focus requests on a component-specific basis.)requestFocusEnabled
: this specifies whether or not a mouse click will give focus to that component. This does not affect how the FocusManager works, which will continue to transfer focus to the component as part of the focus cycle. By default this property is true (for most components), and it can be assigned with JComponent’s setRequestFocusEnabled() method.nextFocusableComponent
: this specifies the component to transfer focus to when the TAB key is pressed. By default this is set to null, as focus traversal is handled for us by a default FocusManager service. Assigning a component as the nextFocusableComponent will overpower FocusManager’s focus traversal mechanism. This is done by passing the component to JComponent’s setNextFocusableComponent() method.2.12.1 FocusManager
abstract class javax.swing.FocusManager
This abstract class defines the responsibility of determining how focus moves from one component to another.
FocusManager is a service class whose shared instance is stored in AppContext’s service table (see 2.5). To access the FocusManager we use its static getCurrentManager() method. To assign a new FocusManager we us the static setCurrentManager() method. We can disable the current FocusManager service using the static disableFocusManager() method, and we can check whether it is enabled or not at any given point using the static isFocusManagerEnabled() method.
The following three abstract methods must be defined by sub-classes:
focusNextComponent(Component aComponent)
: should be called to shift focus to the next component in the focus cycle whose focusTraversable property is true.focusPreviousComponent(Component aComponent)
: should be called to shift focus to the previous focusable component in the focus cycle whoe focusTraversable property is true.processKeyEvent(Component focusedComponent, KeyEvent anEvent)
: should be called to either consume a KeyEvent sent to the given component, or allow it to pass through and be processed by that component itself. This method is normally used to determine whether a key press corresponds to a shift in focus. If this is determined to be the case, the KeyEvent is normally consumed and focus is moved forward or backward using the focusNextComponent() or focusPreviousComponent() methods respectively.
Note: "FocusManager will receive
KEY_PRESSED, KEY_RELEASED and KEY_TYPED key events. If one event is consumed, all other events should be consumed."API
2.12.2 DefaultFocusManager
class javax.swing.DefaultFocusManager
DefaultFocusManager
extends FocusManager and defines the three required methods as well as several additional methods. The most significant method in this class is compareTabOrder(), which takes two Components as parameters and determines first which component is located closer to the top of the container acting as their focus cycle root. If they are both located at the same height this method will determine which is left-most. A value of true will be returned if the first component passed in should be given focus before the second. Otherwise false will be returned.
The
focusNextComponent() and focusPreviousComponent() methods shift focus as expected, and the getComponentBefore() and getComponentAfter() methods are defined to return the previous or next component, respectively, that will receive the focus after a given component in the focus cycle. The getFirstComponent() and getLastComponent() methods return the first and last component to receive focus in a given container’s focus cycle.
The
processKeyEvent() method intercepts KeyEvents sent to the currently focused component. If these events correspond to a shift in focus (i.e. TAB, CTRL-TAB, SHIFT-TAB, and SHIFT-CTRL-TAB) they are consumed and the focus is changed accordingly. Otherwise these events are sent to the component for processing (see section 2.13). Note that the FocusManager always has first crack at keyboard events.
Note: By default, CTRL-TAB and SHIFT-CTRL-TAB can be used to shift focus out of text components. TAB and SHIFT-TAB will move the caret instead (see chapters 11 and 19).
2.12.3 Listening for focus changes
As with AWT components, we can listen for focus changes on a component by attaching an instance of the
java.awt.FocusListener interface. FocusListener defines two methods, each of which take a java.awt.FocusEvent instance as parameter:focusGained(FocusEvent e)
: this method receives a FocusEvent when focus is given to a component this listener is attached to.focusLost(FocusEvent e)
: this method receives a FocusEvent when focus is removed from a component this listener is attached to.FocusEvent
extends java.awt.ComponentEvent and defines, among others, the FOCUS_LOST and FOCUS_GAINED ids to distinguish between its two event types. A FOCUS_LOST event will occur corresponding to the temporary or permanent loss of focus. Temporary loss occurs when another app or window is given focus. When focus returns to this window, the component that originally lost the focus will once again gain the current focus, and a FOCUS_GAINED event will be dispatched at that time. Permanent focus loss occurs when the focus is moved by either clicking on another component in the same window, programmatically invoking requestFocus() on another component, or dispatching of any KeyEvents that cause a focus change when sent to the current FocusManager’s processKeyEvent() method. As expected, we can attach and remove FocusListener implementations to any Swing component using Component’s addFocusListener() and removeFocusListener() methods respectively.2.13 Keyboard input, KeyStrokes, and Actions
2.13.1 Listening for keyboard input
KeyEvent
s are fired by a component whenever that component has the current focus and the user presses a key. To listen for these events on a particular component we can attach KeyListeners using the addKeyListener() method. KeyEvent extends InputEvent and, contrary to most events, KeyEvents are dispatched before the corresponding operation takes place (e.g. in a text field the operation might be adding a specific character to the document content). We can devour these events using the consume() method before they are handled further by key bindings or other listeners (below we’ll discuss exactly who gets notification of keyboard input, and what order this occurs in).
There are three
KeyEvent event types, each of which normally occurs at least once per keyboard activation (i.e. a press and release of a single keyboard key):KEY_PRESSED
: this type of key event is generated whenever a keyboard key is pressed. The key that is pressed is specified by the keyCode property and a virtual key code representing it can be retrieved with KeyEvent’s getKeyCode() method. A virtual key code is used to report the exact keyboard key that caused the event, such as KeyEvent.VK_ENTER. KeyEvent defines numerous static int constants each starting with prefix "VK," meaning Virtual Key (see KeyEvent API docs for a complete list). For example, if CTRL-C is typed, two KEY_PRESSED events will be fired. The int returned by getKeyCode() corresponding to pressing CTRL will be a value matching KeyEvent.VK_CTRL. Similarly, the int returned by getKeyCode() corresponding to pressing the "C" key will be a value matching KeyEvent.VK_C. (Note that the order in which these are fired depends on the order in which they are pressed.) KeyEvent also maintains a keyChar property which specifies the Unicode representation of the character pressed (if there is no Unicode representation KeyEvent.CHAR_UNDEFINED is used--e.g. the function keys on a typical PC keyboard). We can retrieve the keyChar character corresponding to any KeyEvent using the getKeyChar() method. For example, the character returned by getKeyChar() corresponding to pressing the "C" key will be ‘c’. If SHIFT was pressed and held while the "C" key was pressed, the character returned by getKeyChar() corresponding to the "C" key press would be ‘C’. (Note that distinct keyChars are returned for upper and lower case characters, wheras the same keyCode is used in both situations--e.g. the value of VK_C will be returned by getKeyCode() regardless of whether SHIFT is held down when the "C" key is pressed or not. Also note that there is no keyChar associated with keys such as CTRL, and getKeyChar() will simply return ‘’ in this case.)KEY_RELEASED
: this type of key event is generated whenever a keyboard key is released. Other than this difference, KEY_RELEASED events are identical to KEY_PRESSED events (however, as we will discuss below, they occur much less frequently).KEY_TYPED
: this type of event is fired somewhere between a KEY_PRESSED and KEY_RELEASED event. It never carries a keyCode property corresponding to the actual key pressed, and 0 will be returned whenever getKeyCode() is called on an event of this type. Note that for keys with no Unicode representation (such as PAGE UP, PRINT SCREEN, etc.), no KEY_TYPED event will be generated at all.
Most keys with Unicode representations, when held down for longer than a few moments, repeatedly generate
KEY_PRESSED and KEY_TYPED events (in this order). The set of keys that exhibit this behavior, and the rate at which they do so, cannot be controlled and is platform-specific.
Each
KeyEvent maintains a set of modifiers which specifies the state of the SHIFT, CTRL, ALT, and META keys. This is an int value that is the result of the bit-wise OR of InputEvent.SHIFT_MASK, InputEvent.CTRL_MASK, InputEvent.ALT_MASK, and InputEvent.META_MASK (depending on which keys are pressed at the time of the event). We can retrieve this value with getModifiers(), and we can query specifically whether any of these keys was pressed at the time the event was fired using isShiftDown(), isControlDown(), isAltDown(), and isMetaDown().
KeyEvent
also maintains the boolean actionKey property which specifies whether the invoking keyboard key corresponds to an action that should be performed by that app (true) vs. data that is normally used for such things as addition to a text component’s document content (false). We can use KeyEvent’s isActionKey() method to retrieve the value of this property.2.13.2 KeyStrokes
Using
KeyListeners to handle all keyboard input on a component-by-component basis was required pre-Java 2. Because of this, a significant, and often tedious, amount of time needed to spent planning and debugging keyboard operations. The Swing team recognized this, and thankfully included functionality for key event interception regardless of which component currently has the focus. This functionality is implemented by binding instances of the javax.swing.KeyStroke class with ActionListeners (normally instances of javax.swing.Action).
Note: Registered keyboard actions are also commonly referred to as keyboard accelerators.
Each
KeyStroke instance encapsulates a KeyEvent keyCode (see above), a modifiers value (identical to that of KeyEvent -- see above), and a boolean property specifying whether it should be activated on a key press (false -- default) or on a key release (true). The KeyStroke class provides five static methods for creating KeyStroke objects (note that all KeyStrokes are cached, and it is not necessarily the case that these methods will always return a brand new instance):getKeyStroke(char keyChar)getKeyStroke(int keyCode, int modifiers)
getKeyStroke(int keyCode, int modifiers, boolean onKeyRelease)
getKeyStroke(String representation)
getKeyStroke(KeyEvent anEvent)
The last method will return a
KeyStroke with properties corresponding to the given KeyEvent’s attributes. The keyCode, keyChar, and modifiers properties are taken from the KeyEvent and the onKeyRelease property is set to true if the event is of type KEY_RELEASED and false otherwise.
To register a
KeyStroke/ActionListener combination with any JComponent we can use its registerKeyBoardAction(ActionListener action, KeyStroke stroke, int condition) method. The ActionListener parameter is expected to be defined such that its actionPerformed() method performs the necessary operations when keyboard input corresponding to the KeyStroke parameter is intercepted. The int parameter specifies under what conditions the given KeyStroke is considered to be valid:JComponent.WHEN_FOCUSED
: the corresponding ActionListener will only be invoked if the component this KeyStroke is registered with has the current focus.JComponent.WHEN_ANCESTOR_OF_FOCUSED_COMPONENT
: the corresponding ActionListener will only be invoked if the component this KeyStroke is registered with is the ancestor of (i.e. it contains) the component with the current focus.JComponent.WHEN_IN_FOCUSED_WINDOW
: the corresponding ActionListener will be invoked if the component this KeyStroke is registered with is anywhere within the peer-level window (i.e. JFrame, JDialog, JWindow, JApplet, or any other heavyweight component) that has the current focus. Note that keyboard actions registered with this condition are handled in an instance of the private KeyBoardManager service class (see 2.13.4) rather than the component itself.
For example, to associate the invocation of an
ActionListener corresponding to ALT-H no matter what component has the focus in a given JFrame, we can do the following:
  KeyStroke myKeyStroke =
    KeyStroke.getKeyStroke(KeyEvent.VK_H,
      InputEvent.ALT_MASK, false);

  myJFrame.getRootPane().registerKeyBoardAction(
    myActionListener, myKeyStroke,
    JComponent.WHEN_ANCESTOR_OF_FOCUSED_COMPONENT);
Each
JComponent maintains a Hashtable client property containing all bound KeyStrokes. Whenever a KeyStroke is registered using the registerKeyboardAction() method, it is added to this structure. Only one ActionListener can be registered corresponding to each KeyStroke, and if there is already an ActionListener mapped to a particular KeyStroke, the new one will effectively overwrite the previous one. We can retrieve an array of KeyStrokes corresponding to the current bindings stored in this Hashtable using JComponent’s getRegisteredKeyStrokes() method, and we can wipe out all bindings by with the resetKeyboardActions() method. Given a KeyStroke object we can retrieve the corresponding ActionListener with JComponent’s getActionForKeyStroke() method, and we can retrive the corresponding condition property with the getConditionForKeyStroke() method.2.13.3 Actions
An
Action instance is basically a convenient ActionListener implementation that encapsulates a Hashtable of bound properties similar JComponent’s client properties (see chapter 12 for details about working with Action implementations and their properties). We often use Action instances when registering keyboard actions.
Note: Text components are special in that they use hierarchically resolving
KeyMaps. A KeyMap is a list of Action/KeyStroke bindings and JTextComponent supports multiple levels of such mappings. See chapters 11 and 19.
2.13.4 The flow of keyboard input
Each
KeyEvent is first dispatched to the focused component. The FocusManager gets first crack at processing it. If the FocusManager doesn’t want it, then the focused JComponent it is sent to calls super.processKeyEvent() which allows any KeyListeners a chance to process the event. If the listeners don’t consume it and the focused component is a JTextComponent, the KeyMap hierarchy is traversed (see chapters 11 and 19 for more about KeyMaps). If the event is not consumed by this time the key bindings registered with the focused component get a shot. First, KeyStrokes defined with the WHEN_FOCUSED condition get a chance. If none of these handle the event, then the component walks though it’s parent containers (up until a JRootPane is reached) looking for KeyStrokes defined with the WHEN_ANCESTOR_OF_FOCUSED_COMPONENT condition. If the event hasn’t been handled after the top-most container is reached, it is sent to KeyboardManager, a package private service class (note that unlike most service classes in Swing, KeyboardManager does not register its shared instance with AppContext -- see section 2.5). KeyboardManager looks for components with registered KeyStrokes with the WHEN_IN_FOCUSED_WINDOW condition and sends the event to them. If none of these are found then KeyboardManager passes the event to any JMenuBars in the current window and lets their accelerators have a crack at it. If the event is still not handled, we check if the current focus resides in a JInternalFrame (because it is the only RootPaneContainer that can be contained inside another Swing component). If this is the case, we move up to the JInternalFrame’s parent. This process continues until either the event is consumed or the top-level window is reached.2.14 SwingUtilities
class javax.swing.SwingUtilities
In section 2.3 we discussed two methods in the
SwingUtilities class used for executing code in the event-dispatching thread. These are just 2 of the 36 generic utility methods defined SwingUtilities, which break down logically into seven groups: computational methods, conversion methods, accessibility methods, retrieval methods, multithreading/event-related methods, mouse button methods, and layout/rendering/UI methods. Each of these methods is static, and they are described very briefly in this section (for a more thorough understanding see the SwingUtilities.java source code).2.14.1 Computational methods
Rectangle[] computeDifference(Rectangle rectA, Rectangle rectB)
: returns those rectangular regions representing the portion of rectA that do not intersect with rectB.Rectangle computeIntersection(int x, int y, int width, int height, Rectangle dest)
: returns the intersection of two rectangular areas. The first region is defined by the int parameters and the second by the Rectangle parameter. The Rectangle parameter is altered and returned as the result of the computation so that a new Rectangle does not have to be instantiated.Rectangle computeUnion(int x, inty, int width, int height, Rectangle dest)
: returns the union of two rectangular areas. The first region is defined by the int parameters and the second by the Rectangle parameter. The Rectangle parameter is altered and returned as the result of the computation so that a new Rectangle does not have to be instantiated.isRectangleContainingRectangle(Rectangle a, Rectangle b)
: returns true if Rectangle b is completely contained in Rectangle a.computeStringWidth(FontMetrics fm, String str)
: returns the width of the given String according to the given FontMetrics object (see 2.8.3).2.14.2 Conversion methods
MouseEvent convertMouseEvent(Component source, MouseEvent sourceEvent, Component destination)
: returns a new MouseEvent with destination as its source and x,y-coordinates converted to the corrdinate system of destination (both assuming destination is not null). If destination is null the coordinates are converted to the coordinate system of source, and source is set as the source of the event. If both are null the MouseEvent returned is identical to the event passed in.Point convertPoint(Component source, Point aPoint, Component destination)
: returns a Point representing aPoint converted to coordinate system of the destination component as if it were originating in the source component. If either component is null the coordinate system of the other is used, and if both are null the Point returned is identical to the Point passed in.Point convertPoint(Component source, int x, int y, Component destination)
: this method acts identically to the above convertPoint() method except that it takes int parameters representing the Point to convert rather than a Point instance.Rectangle convertRectangle(Component source, Rectangle aRectangle, Component destination)
: returns a Rectangle converted from then source component’s coordinate system to the destination component’s coordinate system. This method behaves similarly to convertPoint().void convertPointFromScreen(Point p, Component c)
: converts a given Point in screen coordinates to the coordinate system of the given Component.void convertPointToScreen(Point p, Component c)
: converts a given Point in the given Component‘s coordinate system to the coordinate system of the screen.2.14.3 Accessibility methods
Accessible getAccessibleAt(Component c, Point p)
: returns the Accessible component at the given Point in the coordinate system of the given Component (null will be returned if none is found). Note that an Accessible component is one that implements the javax.accessibility.Accessible interface.Accessible getAccessibleChild(Component c, int i)
: returns the ith Accessible child of the given Component.int getAccessibleChildrenCount(Component c)
: returns the number of Accessible children contained in the given Component.int getAccessibleIndexInParent(Component c)
: returns the index of the given Component in its parent disregarding all contained components that do not implement the Accessible interface. -1 will be returned if the parent is null or does not implement Accessible, or the given Component does not implement Accessible.AccessibleStateSet getAccessibleStateSet(Component c)
: returns the set of AccessibleStates that are active for the given Component.2.14.4 Retrieval methods
Component findFocusOwner(Component c)
: returns the component contained within the given Component (or the given Component itself) that has the current focus. If there is no such component null is returned.Container getAncestorNamed(String name, Component comp)
: returns the closest ancestor of the given Component with the given name. Otherwise null is returned. (Note that each Component has a name property which can assigned and retrieved using setName() and getName() methods respectively.)Container getAncestorOfClass(Class c, Component comp)
: returns the closest ancestor of the given Component that is an instance of c. Otherwise null is returned.Component getDeepestComponentAt(Component parent, int x, int y)
: returns the most ‘contained’ child of the given Component containing the point (x,y) in terms of the coordinate system of the given Component. If the given Component is not a Container this method simply returns it immediately.Rectangle getLocalBounds(Component c)
: returns a Rectagle representing the bounds of a given Component in terms of its own coordinate system (thus it always starts at 0,0).Component getRoot(Component c)
: returns the first ancestor of c that is a Window. Otherwise this method returns the last ancestor that is an Applet.JRootPane getRootPane(Component c)
: returns the first JRootPane parent of c, or c itself if it is a JRootPane.Window windowForComponent(Component c)
: return the first ancestor of c that is a Window. Otherwise this method returns null.boolean isDescendingFrom(Component allegedDescendent, Component allegedAncestor)
: returns true if allegedDescendent is contained in allegedAncestor.2.14.5 Multithreading/event-related methods
See section 2.3 for more about these methods.
void invokeAndWait(Runnable obj)
: sends the given Runnable to the event-dispatching queue and blocks on the current thread.void invokeLater(Runnable obj)
: sends the given Runnable to the event-dispatching queue and continues.boolean isEventDispatchThread()
: returns true if the current thread is the event-dispatching thread.2.14.6 Mouse button methods
boolean isLeftMouseButton(MouseEvent)
: returns true if the given MouseEvent corresponds to left mouse button activation.boolean isMiddleMouseButton(MouseEvent)
: returns true if the given MouseEvent corresponds to middle mouse button activation.boolean isRightMouseButton(MouseEvent)
: returns true if the given MouseEvent corresponds to right mouse button activation.2.14.7 Layout/rendering/UI methods
String layoutCompoundLabel(FontMetrics fm, String text, icon icon, int verticalAlignment, int horizontalAlignment, int verticalTextPosition, int horizontalTextPosition, Rectangle viewR, Rectangle iconR, Rectangle textR, int textIconGap)
: this method is normally used by JLabel‘s UI delegate to lay out text and/or an icon using the given FontMetrics object, alignment settings and text positions within the viewR Rectangle. If it is determined that the label text will not fit within this Rectangle, an elipsis ("...") is used in place of the text that will not fit. The textR and iconR Rectangles are modified to reflect the new layout, and the String that results from this layout is returned.String layoutCompoundLabel(JComponent c, FontMetrics fm, String text, icon icon, int verticalAlignment, int horizontalAlignment, int verticalTextPosition, int horizontalTextPosition, Rectangle viewR, Rectangle iconR, Rectangle textR, int textIconGap)
: this method is identical to the above method, but takes target component to check whether or not text orientation should play a role (see the "Component Orientation in Swing: How JFC Components support BIDI text" article at the Swing Connection for more about orientation: http://java.sun.com/products/jfc/tsc/tech_topics/bidi/bidi.html).void paintComponent(Graphics g, Component c, Container p, int x, int y, int w, int h)
: paints the given Component in the given graphical context, using the rectangle defined by the four int parameters as the clipping area. The given Container is used to act as the Component’s parent so that any validation and repaint requests that occur on that component do not propogate up the ancestry tree of the component owning the given graphial context. This is the same methodology used by component renderers of JList, JTree, and JTable to properly exhibit "rubber stamp" behavior. This behavior is accomplished through the use of a CellRendererPane (see chapter 17 for more about this class and why it is used to wrap renderers).void paintComponent(Graphics g, Component c, Container p, Rectangle r)
: functions identical to the above method, but takes a Rectangle parameter rather than four ints.void updateComponentTreeUI(Component c)
: notifies all components contained in c, and c itself, to update their UI delegate to match the current UIManager and UIDefaults settings (see chapter 21).