Chapter 7. Scrolling Panes
In this chapter:
7.1 JScrollPane
class javax.swing.JScrollPane
Using
JScrollPane is normally very simple. Any component or container can be placed in a JScrollPane and scrolled. Simply create a JScrollPane by passing its constructor the component youíd like to scroll:JScrollPane jsp = new JScrollPane(myLabel);
Normally, our use of
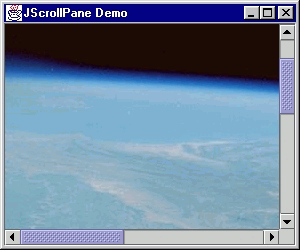
JScrollPane will not be much more extensive than the one line of code shown above. The following is a simple JScrollPane demo appliction. Figure 7.1 illustrates:
Figure 7.1 JScrollPane demo
<<file figure7-1.gif>>
The Code: ScrollPaneDemo.java
see \Chapter7\1
import java.awt.*;
import javax.swing.*;

public class ScrollPaneDemo extends JFrame
{
  public ScrollPaneDemo() {
    super("JScrollPane Demo");
    ImageIcon ii = new ImageIcon("earth.jpg");
    JScrollPane jsp = new JScrollPane(new JLabel(ii));
    getContentPane().add(jsp);
    setSize(300,250);
    setVisible(true);
  }

  public static void main(String[] args) {
    new ScrollPaneDemo();
  }
}
When you run this example try scrolling by pressing or holding down any of the scroll bar buttons. You will find this unacceptably slow because the scrolling occurs one pixel at a time. We will see how to control this shortly.
Many components use a
JScrollPane internally to display their contents, such as JComboBox and JList. We are normally expected to place all multi-line text components inside scroll panes (although this is not default behavior).
UI Guideline : Using Scroll Panes
For many applications it is best to avoid the introduction of a scrollpane and concentrate on puting the required data on a screen such that scrolling is unnecessary. However, this is not always possible. When you do need to introduce scrolling put some thought into the type of data and application. If possible try to introduce scrolling in only 1 direction. For example, with text documents, western culture has been used to scrolling vertically since Egyptian times. Usability studies for World Wide Web pages have shown that readers can find data quickly when vertically scrolling. Scrolling horizontally, however, is labourious and difficult with text. Try to avoid it. With visual information, e.g. tables of information, it may be more appropriate for horizontal scrolling, but try to avoid horizontal and vertical scrolling if possible.
We can access a
JScrollPaneís scroll bars directly with its getXXScrollBar() and setXXScrollBar() methods, where XX is either HORIZONTAL or VERTICAL.
Reference: In chapter 13 weíll talk more about
JScrollBars7.1.1 Scrollbar policies
abstract interface javax.swing.ScrollPaneConstants
We can specify specific policies for when and when not to display a
JScrollPaneís horizontal and vertical scrollbars. We simply use its setVerticalScrollBarPolicy() and setHorizontalScrollBarPolicy() methods, provding one of three constants defined in the ScrollPaneConstants interface:HORIZONTAL_SCROLLBAR_AS_NEEDED
HORIZONTAL_SCROLLBAR_NEVER
HORIZONTAL_SCROLLBAR_ALWAYS
VERTICAL_SCROLLBAR_AS_NEEDED
VERTICAL_SCROLLBAR_NEVER
VERTICAL_SCROLLBAR_ALWAYS
For example, to enforce the display of the vertical scrollbar at all times and always keep the horizontal scrollbar hidden, we could do the following:
jsp.setHorizontalScrollBarPolicy(
ScrollPaneConstants.HORIZONTAL_SCROLLBAR_NEVER);
jsp.setVerticalScrollBarPolicy(
ScrollPaneConstants.VERTICAL_SCROLLBAR_ALWAYS);
7.1.2 JViewport
class javax.swing.JViewport
The
JViewport class is the container that is really responsible for displaying a specific visible region of the component in JScrollPane. We can set/get a viewportís view (the component it contains) using its setView() and getView() methods. We can control how much of this component JViewport displays by setting its extent size to a specified Dimension using its setExtentSize() method. We can also specify wh! ere the origin (upper left corner) of a JViewport should begin displaying its contained component by providing specific coordinates (as a Point) of the contained component to the setViewPosition() method. In fact, when we scroll a component in a JScrollPane this view position is constantly being changed by the scrollbars.
Note:
JViewport enforces a view position that lies within the view component only. We cannot set negative or extremely large view positions (as of JDK1.2.2 we can set negative view positions). However, since the view position is the upper right hand corner of the viewport, we are still allowed to set the view position such that only part of the viewport is filled. We will show how to watch for this, and stop it from happening, in some of the examples below.Whenever a change is made to the position or size of the visible portion of the view,
JViewport fires ChangeEvents. We can register ChangeListeners to capture these events using JViewportís addChangeListener() method. These are the only events that are associated with JScrollPane by default. For instance, whenever we scroll using JScrollPaneís scroll bars, its main viewport, as well as its row and column header viewports (see below), will each fire ChangeEvents.The visible region of
JViewportĎs view can be retrieved as a Rectangle or Dimension instance using the getViewRect() and getViewSize() methods respectively. This will give us the current view position as well as the extent width and hieght. The view position alone can be retrieved with getViewPosition(), which returns a Point instance. To remove a component from JViewport we use its remove() method.We can translate specific
JViewport coordinates to the coordinates of its contained component by passing a Point instance to its toViewCoordinates() method. We can do the same for a region by passing toViewCoordinates() a Dimension instance. We can also manually specify the visible region of the view component by passing a Dimension instance to JViewportís scrollRectToVisible() method! .We can retreive
JScrollPaneís main JViewport by calling its getViewport() method, or assign it a new one using setViewport(). We can replace the component in this viewport through JScrollPaneís setViewportView() method, but there is no getViewportView() counterpart. Instead we must first access its JScrollPaneís JViewport by calling getViewport(), and then call getView() on that (as discussed above). Typically, to access a JScrollPaneís main child component we would do the following:Component myComponent = jsp.getViewport().getView();
7.1.3 ScrollPaneLayout
class javax.swing.ScrollPaneLayout
By default
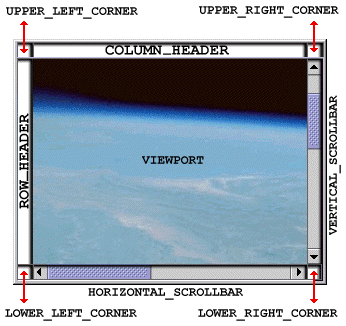
JScrollPaneís layout is managed by an instance of ScrollPaneLayout. JScrollPane can contain up to nine components and it is ScrollPaneLayoutís job to make sure that they are positioned correctly. These components are:
A
A
JViewport used as the row header. This viewportís view position changes vertically in sync with the main viewport.A
JViewport used as the column header. This viewportís view position changes horizontally in sync with the main viewport.Four components for placement in each corner of the scroll pane.
Two
JScrollBars for vertical and horizontal scrolling.The corner components will only be visible if the scrollbars and headers surrounding them are also visible. To assign a component to a corner position we can call
JScrollPaneís setCorner() method. This method takes both a String and a component as parameters. The String is used to identify which corner this component is to be placed in, and is recognized by ScrollPaneLayout. In fact ScrollPaneLayout identifies each JScrollPane component with a unique
Figure 7.2 JScrollPane components as identified by ScrollPaneLayout
<<file figure7-2.gif>>
To assign
JViewports as the row and column headers we use JScrollPaneís setRowHeader() and setColumnHeader() methods respectively. We can also avoid the creation of a JViewport ourselves by passing the component to be placed in the row or column viewport to JScrollPaneís setRowHeaderView() or setColumnHeaderView() methods.Because
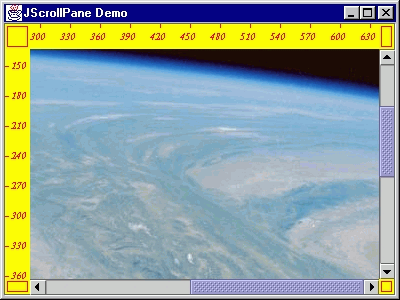
JScrollPane is most often used to scroll images, the most obvious use for the row and column headers is to function as some sort of ruler. Here we present a basic example showing how to populate each corner with a label and create some simple rulers for the row and column headers that display ticks every 30 pixels, and render themselves based on their current viewport position. Figure 7.3 illustrates:
Figure 7.3 JScrollPane demo with 4 corners, row header, and column header.
<<file figure7-3.gif>>
The Code: HeaderDemo.java
see \Chapter7\2
import java.awt.*;
import javax.swing.*;

public class HeaderDemo extends JFrame
{
  private JLabel label;

  public HeaderDemo() {
    super("JScrollPane Demo");
    ImageIcon ii = new ImageIcon("earth.jpg");
    label = new JLabel(ii);
    JScrollPane jsp = new JScrollPane(label);

    JLabel[] corners = new JLabel[4];
    for(int i = 0; i < 4 ;i++) {
      corners[i] = new JLabel();
      corners[i].setBackground(Color.yellow);
      corners[i].setOpaque(true);
      corners[i].setBorder(BorderFactory.createCompoundBorder(
        BorderFactory.createEmptyBorder(2,2,2,2),
        BorderFactory.createLineBorder(Color.red, 1)));

    }

    JLabel rowheader = new JLabel() {
      Font f = new Font("Serif",Font.ITALIC | Font.BOLD,10);
      public void paintComponent(Graphics g) {
        super.paintComponent(g);
        Rectangle r = g.getClipBounds();
        g.setFont(f);
        g.setColor(Color.red);
        for (int i = 30-(r.y % 30); i < r.height; i+=30) {
          g.drawLine(0, r.y + i, 3, r.y + i);
          g.drawString("" + (r.y + i), 6, r.y + i + 3);
        }
      }

      public Dimension getPreferredSize() {
        return new Dimension(25,(int)label.getPreferredSize().getHeight());
      }
    };
    rowheader.setBackground(Color.yellow);
    rowheader.setOpaque(true);


    JLabel columnheader = new JLabel() {
      Font f = new Font("Serif",Font.ITALIC | Font.BOLD,10);
      public void paintComponent(Graphics g) {
        super.paintComponent(g);
        Rectangle r = g.getClipBounds();
        g.setFont(f);
        g.setColor(Color.red);
        for (int i = 30-(r.x % 30); i < r.width; i+=30) {
          g.drawLine(r.x + i, 0, r.x + i, 3);
          g.drawString("" + (r.x + i), r.x + i - 10, 16);
        }
      }

      public Dimension getPreferredSize() {
        return new Dimension((int)label.getPreferredSize().getWidth(),25);
      }
    };
    columnheader.setBackground(Color.yellow);
    columnheader.setOpaque(true);

    jsp.setRowHeaderView(rowheader);
    jsp.setColumnHeaderView(columnheader);
    jsp.setCorner(JScrollPane.LOWER_LEFT_CORNER, corners[0]);
    jsp.setCorner(JScrollPane.LOWER_RIGHT_CORNER, corners[1]);
    jsp.setCorner(JScrollPane.UPPER_LEFT_CORNER, corners[2]);
    jsp.setCorner(JScrollPane.UPPER_RIGHT_CORNER, corners[3]);

    getContentPane().add(jsp);
    setSize(400,300);
    setVisible(true);
  }

  public static void main(String[] args) {
    new HeaderDemo();
  }
}
Notice that the row and column headers use the graphics clipping area in their
paintComponent() routine for optimal efficiency. We also override the getPreferredSize() method so that the proper width (for the row header) and height (for the column header) will be used by ScrollPaneLayout. The other dimensions are obtained by simply grabbing the labelís preferred size, as they are completely controlled by ScrollPaneLayout.We are certainly not limited to labels for corners and row headers or within the main viewport itself. As we mentioned in the beginning of this chapter, any comoponent can be placed in a
JViewport and scrolled in a JScrollPane.7.1.4. The Scrollable interface
The
Scrollable interface describes five methods that allow us to customize how JScrollPane scrolls its contents. Specifically, by implementing this interface we can specify how many pixels are scrolled when a scroll bar button or scroll bar paging area (the empty region between the scroll bar thumb and the buttons) is pressed. There are two methods that control this functionality: getScrollableBlockIncrement() and getScrollableUnitIncrement(). The former is used to return the amount to scroll when a scroll bar paging area is pressed, the latter is used when the button is pressed.
Reference: In text components, these two methods are implemented so that scrolling will move one line of text at a time. (
JTextComponent implements the Scrollable interface.)The other three methods of this interface involve
JScrollPaneís communication with the main viewport. The getScrollableTracksViewportWidth() and getScrollableTracksHeight() methods can return true to disable scrolling in the horizontal or vertical direction respecively. Normally these just return false. The getPreferredSize() method is supposed to return the preferred size of the viewport that will contain this component (the component implementing the Scrollable interface). Normally we just return the preferred size of the componen! t for this.The following code shows how to implement the
Scrollable interface to create a custom JLabel whose unit and block increments will be 10 pixels. As we saw in the example in the beginning of this chapter, scrolling one pixel at a time is tedious at best. Increasing this to a 10 pixel increment provides a more natural feel.The Code: ScrollableDemo.java
see \Chapter7\3
import java.awt.*;
import javax.swing.*;

public class ScrollableDemo extends JFrame
{
  public ScrollableDemo() {
    super("JScrollPane Demo");
    ImageIcon ii = new ImageIcon("earth.jpg");
    JScrollPane jsp = new JScrollPane(new MyScrollableLabel(ii));
    getContentPane().add(jsp);
    setSize(300,250);
    setVisible(true);
  }

  public static void main(String[] args) {
    new ScrollableDemo();
  }
}

class MyScrollableLabel extends JLabel implements Scrollable
{
  public MyScrollableLabel(ImageIcon i){
    super(i);
  }

  public Dimension getPreferredScrollableViewportSize() {
    return getPreferredSize();
  }

  public int getScrollableBlockIncrement(Rectangle r,
    int orietation, int direction) {
      return 10;
  }

  public boolean getScrollableTracksViewportHeight() {
    return false;
  }

  public boolean getScrollableTracksViewportWidth() {
    return false;
  }

  public int getScrollableUnitIncrement(Rectangle r,
    int orientation, int direction) {
      return 10;
  }
}
7.2 Grab-and-drag scrolling
Many paint programs and document readers (such as Adobe Acrobat) support grab-and-drag scrolling. This is the ability to click on an image and drag it in any direction with the mouse. It is fairly simple to implement, however, we must take care to make the operation smooth without allowing the view to be scrolled past its extremities.
JViewport takes care of the negative direction for us, as it does not allow the view position coordinates to be less than 0. But it will allow us to change the view position to very large values, which can result in the viewport displaying a portion of the view smaller than the viewport itself.
Note: As of JDK1.2.2 we are allowed to specify negative view position coordinates.
Weíve modified the simple example from the beginning of this chapter to support grab-and-drag scrolling.
The Code: GrabAndDragDemo.java
see \Chapter7\4
import java.awt.*;
import java.awt.event.*;
import javax.swing.*;
import javax.swing.event.*;

public class GrabAndDragDemo extends JFrame
{
  public GrabAndDragDemo() {
    super("Grab-and-drag Demo");
    ImageIcon ii = new ImageIcon("earth.jpg");
    JScrollPane jsp = new JScrollPane(new GrabAndScrollLabel(ii));
    getContentPane().add(jsp);
    setSize(300,250);
    setVisible(true);

    WindowListener l = new WindowAdapter() {
      public void windowClosing(WindowEvent e) {
        System.exit(0);
      }
    };
    addWindowListener(l);
  }

  public static void main(String[] args) {
    new GrabAndDragDemo();
  }
}

class GrabAndScrollLabel extends JLabel
{
  public GrabAndScrollLabel(ImageIcon i){
    super(i);

    MouseInputAdapter mia = new MouseInputAdapter() {
      int m_XDifference, m_YDifference;
      boolean m_dragging;
      Container c;

      public void mouseDragged(MouseEvent e) {
        c = GrabAndScrollLabel.this.getParent();
        if (c instanceof JViewport)
        {
          JViewport jv = (JViewport) c;
          Point p = jv.getViewPosition();
          int newX = p.x - (e.getX() - m_XDifference);
          int newY = p.y - (e.getY() - m_YDifference);

          int maxX = GrabAndScrollLabel.this.getWidth() - jv.getWidth();
          int maxY = GrabAndScrollLabel.this.getHeight() - jv.getHeight();
          if (newX < 0)
            newX = 0;
          if (newX > maxX)
            newX = maxX;
          if (newY < 0)
            newY = 0;
          if (newY > maxY)
            newY = maxY;

          jv.setViewPosition(new Point(newX, newY));
        }
      }

      public void mousePressed(MouseEvent e) {
        setCursor(Cursor.getPredefinedCursor(
          Cursor.MOVE_CURSOR));
        m_XDifference = e.getX();
        m_YDifference = e.getY();
      }

      public void mouseReleased(MouseEvent e) {
        setCursor(Cursor.getPredefinedCursor(
          Cursor.DEFAULT_CURSOR));
      }
    };
    addMouseMotionListener(mia);
    addMouseListener(mia);
  }
}
Understanding the Code:
Class GrabAndScrollLabel
This class extends
JLabel and overrides the JLabel(Imageicon ii) constructor. The GrabAndScrollLabel constructor starts by calling the super class version and then proceeds to set up a MouseInputAdapter. This adapter is the heart of the GrabAndScrollLabel class.The adapter uses three variables:
int m_XDifference
: x coordinate saved on a mouse press event and used for dragging horizontallyint m_YDifference
: y coordinate saved on a mouse press event and used for dragging verticallyContainer c
: used to hold a local reference to the parent container in the mouseDragged() method.The
mousePressed() method changes the cursor to MOVE_CURSOR, and stores the event coordinates in variables m_XDifference and m_YDifference to be use in mouseDragged().The
mouseDragged() method first grabs a reference to the parent and checks if it is a JViewport. If it isnít we do nothing. If it is we store the current view position and calculate the new view position the drag will bring us into:
        Point p = jv.getViewPosition();
        int newX = p.x - (e.getX()-m_XDifference);
        int newY = p.y - (e.getY()-m_YDifference);
When dragging components, normally this would be enough (as we will see in future chapters), however we must make sure that we do not move this label in such a way that the viewport is not filled by it. So we calculate the maximum allowable x and y coordinates by subtracting the viewport dimensions from the size of this label (since the view position coordinates are upper-left hand corner):
      int maxX = GrabAndScrollLabel.this.getWidth() - jv.getWidth();
      int maxY = GrabAndScrollLabel.this.getHeight() - jv.getHeight();
The remainder of this method compares the
newX and newY values with the maxX and maxY values, and adjusts the view position accordingly. If newX or newY is ever greater than the maxX or maxY values respectively, we use the max values instead. If newX or newY is ever less than 0 (which can happen only with JDK1.2.2), we use 0 instead. This is necessary to allow smooth scrolling in all situations.7.3 Scrolling programmatically
We are certainly not required to use a
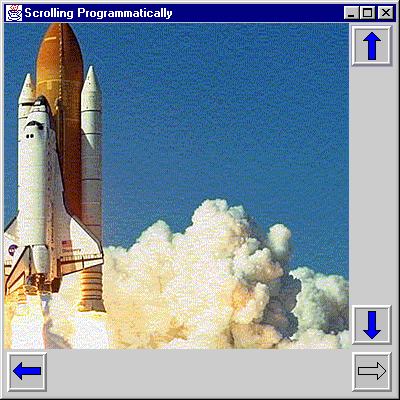
JScrollPane for scrolling. We can place a component in a JViewport and control the scrolling ourselves if we like. This is what JViewport was designed for, it just happens to be used by JScrollPane as well. Weíve constructed this example to show how to implement our own scrolling in a JViewport. Four buttons are used for scrolling. We enable and disable these buttons based on whether the view component is at any of its extremities. These buttons are assigned keyboard mnemonics which we can use as an alternative to clicking.This example also shows how to use a
ChangeListener to capture ChangeEvents that are fired when the JViewport changes state. The reason we need to capture these events is that when our viewport is resized bigger than its view component child, the scrolling buttons should become disabled. If these buttons are disabled and the viewport is then resized so that it is no longer bigger than its child view component, the buttons should then become enabled. It is quite simple to capture and process these events as you will see below. (As with all of the examples we have presented, it may help if you run this example before stepping through the code.)
Figure 7.4 Programmatic scrolling with JViewport.
<<file figure7-4.gif>>
The Code: ButtonScroll.java
see \Chapter7\5
import java.awt.*;
import java.awt.event.*;

import javax.swing.*;
import javax.swing.event.*;

public class ButtonScroll extends JFrame
{
        protected JViewport m_viewport;
	protected JButton m_up;
	protected JButton m_down;
	protected JButton m_left;
	protected JButton m_right;

	protected int m_pgVert;
	protected int m_pgHorz;

	public ButtonScroll()
	{
		super("Scrolling Programmatically");
		setSize(400, 400);
		getContentPane().setLayout(new BorderLayout());

		ImageIcon shuttle = new ImageIcon("shuttle.gif");
		m_pgVert = shuttle.getIconHeight()/5;
		m_pgHorz = shuttle.getIconWidth()/5;
		JLabel lbl = new JLabel(shuttle);

                m_viewport = new JViewport();
                m_viewport.setView(lbl);
                m_viewport.addChangeListener(new ChangeListener() {
                  public void stateChanged(ChangeEvent e) {
		    enableButtons(ButtonScroll.this.m_viewport.getViewPosition());
                  }
                });
       		getContentPane().add(m_viewport, BorderLayout.CENTER);

		JPanel pv = new JPanel(new BorderLayout());
		m_up = createButton("up", 'u');
		ActionListener lst = new ActionListener() {
			public void actionPerformed(ActionEvent e) {
				movePanel(0, -1);
			}
		};
		m_up.addActionListener(lst);
		pv.add(m_up, BorderLayout.NORTH);

		m_down = createButton("down", 'd');
		lst = new ActionListener() {
			public void actionPerformed(ActionEvent e) {
				movePanel(0, 1);
			}
		};
		m_down.addActionListener(lst);
		pv.add(m_down, BorderLayout.SOUTH);
		getContentPane().add(pv, BorderLayout.EAST);

		JPanel ph = new JPanel(new BorderLayout());
		m_left = createButton("left", 'l');
		lst = new ActionListener() {
			public void actionPerformed(ActionEvent e) {
				movePanel(-1, 0);
			}
		};
		m_left.addActionListener(lst);
		ph.add(m_left, BorderLayout.WEST);

		m_right = createButton("right", 'r');
		lst = new ActionListener() {
			public void actionPerformed(ActionEvent e) {
				movePanel(1, 0);
			}
		};
		m_right.addActionListener(lst);
		ph.add(m_right, BorderLayout.EAST);
		getContentPane().add(ph, BorderLayout.SOUTH);

		WindowListener wndCloser = new WindowAdapter() {
			public void windowClosing(WindowEvent e) {
				System.exit(0);
			}
		};
		addWindowListener(wndCloser);

		setVisible(true);
		movePanel(0, 0);
	}

	protected JButton createButton(String name, char mnemonics) {
		JButton btn = new JButton(new ImageIcon(name+"1.gif"));
		btn.setPressedIcon(new ImageIcon(name+"2.gif"));
		btn.setDisabledIcon(new ImageIcon(name+"3.gif"));
		btn.setToolTipText("Move "+name);
		btn.setBorderPainted(false);
		btn.setMargin(new Insets(0, 0, 0, 0));
		btn.setContentAreaFilled(false);
		btn.setMnemonic(mnemonics);
		return btn;
	}

	protected void movePanel(int xmove, int ymove) {
		Point pt = m_viewport.getViewPosition();
		pt.x += m_pgHorz*xmove;
		pt.y += m_pgVert*ymove;

		pt.x = Math.max(0, pt.x);
		pt.x = Math.min(getMaxXExtent(), pt.x);
		pt.y = Math.max(0, pt.y);
		pt.y = Math.min(getMaxYExtent(), pt.y);

		m_viewport.setViewPosition(pt);
		enableButtons(pt);
	}

	protected void enableButtons(Point pt) {
		if (pt.x == 0)
                  enableComponent(m_left, false);
                else enableComponent(m_left, true);

		if (pt.x >= getMaxXExtent())
		  enableComponent(m_right, false);
		else enableComponent(m_right, true);

		if (pt.y == 0)
		  enableComponent(m_up, false);
		else enableComponent(m_up, true);

		if (pt.y >= getMaxYExtent())
		  enableComponent(m_down, false);
		else enableComponent(m_down, true);
	}

	protected void enableComponent(JComponent c, boolean b) {
		if (c.isEnabled() != b)
			c.setEnabled(b);
	}

	protected int getMaxXExtent() {
                return m_viewport.getView().getWidth()-m_viewport.getWidth();
	}

	protected int getMaxYExtent() {
                return m_viewport.getView().getHeight()-m_viewport.getHeight();
	}

	public static void main(String argv[])  {
		new ButtonScroll();
	}
}
Understanding the Code
Class ButtonScroll
Several instance variables are declared:
JViewport m_viewport
: viewport to display a large image.JButton m_up
: push button to scroll up programmatically.JButton m_down
: push button to scroll down programmatically.JButton m_left
: push button to scroll left programmatically.JButton m_right
: push button to scroll right programmatically.int m_pgVert
: number of pixels for a vertical scroll.int m_pgHorz
: number of pixels for a horizontal scroll.The constructor of the
ButtonScroll class creates and initializes the GUI components for this example. A BorderLayout is used to manage the components in this frame's content pane. JLabel lbl holding a large image is placed in the viewport, m_viewport, to provide programmatic viewing capabilities. This JViewport is added to the center of our frame.As we mentioned above, we need to capture the
ChangeEvents that are fired when our JViewport changes size so that we can enable and disable our buttons accordingly. We do this by simply attaching a ChangeListener to our viewport and call our enableButtons() method (see below) from stateChanged():
    m_viewport.addChangeListener(new ChangeListener() {
      public void stateChanged(ChangeEvent e) {
        enableButtons( ButtonScroll.this.m_viewport.getViewPosition());
      }
    });
Two buttons
m_up and m_down are created for scrolling in the vertical direction. Method createButton() is used to create a new JButton component and set a group of properties for it (see below). Each of the new buttons receives an ActionListener which calls the movePanel() method in response to a mouse click. These two buttons are added to the intermediate container, JPanel pv, which is added to the EAST side of our frameís content pane. Similarly, two buttons, m_left and m_right, are created for scrolling in the horizontal direction and added to the SOUTH region of the content pane.Method
createButton() creates a new JButton component and sets a group of properties for it. This method takes two parameters: the name of the scrolling direction as a String and the button's mnemonic as a char. This method assumes that three image files are prepared:name1.gif: the default icon.
name2.gif: the pressed icon.
name3.gif: the disabled icon.
These images are loaded as
ImageIcons and attached to the button with the associated setXX() method:
        JButton btn = new JButton(new ImageIcon(name+"1.gif"));
        btn.setPressedIcon(new ImageIcon(name+"2.gif"));
        btn.setDisabledIcon(new ImageIcon(name+"3.gif"));
        btn.setToolTipText("Moves "+name);
        btn.setBorderPainted(false);
        btn.setMargin(new Insets(0, 0, 0, 0));
        btn.setContentAreaFilled(false);
        btn.setMnemonic(mnemonic);
        return btn;
Then we remove any border or content area painting, so the presentation of our button is completely determined by our icons. Finally we set the tool tip text and mnemonic and return that component instance.
Method
movePanel() programmatically scrolls the image in the viewport in the direction determined by two parameters: xmove and ymove. These parameters can have values -1, 0, or 1. To determine the actual amount of scrolling we multiply these parameters by m_pgHorz (m_pgVert). Local variable Point pt determines a new viewport position. It is limited so the resulting view will not display any empty space (not belonging to the displaying image), similar to how we enforce the viewport view position in the grab-and-drag scrolling example! above. Finally, method setViewPosition() is called to scroll to the new position and enableButtons() enables/disables buttons according to the new position:
    Point pt = m_viewport.getViewPosition();
    pt.x += m_pgHorz*xmove;
    pt.y += m_pgVert*ymove;

    pt.x = Math.max(0, pt.x);
    pt.x = Math.min(getMaxXExtent(), pt.x);
    pt.y = Math.max(0, pt.y);
    pt.y = Math.min(getMaxYExtent(), pt.y);

    m_viewport.setViewPosition(pt);
    enableButtons(pt);
Method
enableButtons() disables a button if scrolling in the corresponding direction is not possible and enables it otherwise. For example, if the viewport positionís x coordinate is 0 we can disable the scroll left button (remember that the view position will never be negative, as enforced by JViewport):
    if (pt.x <= 0)
      enableComponent(m_left, false);
    else
      enableComponent(m_left, true);
...Similarly, if the viewport positionís x coordinate is greater than or equal to our maximum allowable x position (determined by
getMaxXExtent()) we disable the scroll right button:
    if (pt.x >= getMaxXExtent())
      enableComponent(m_right, false);
    else
      enableComponent(m_right, true);
Methods
getMaxXExtent() and getMaxYExtent() return the maximum coordinates available for scrolling in the horizontal (vertical direction) by subtracting the appropriate viewport dimension from the appropriate dimension of the child component.Running the Code
Note: The shuttle image for this example was found at http://shuttle.nasa.gov/sts-95/images/esc/
Note how different images completely determine the presentation of our buttons. Press the buttons and note how the image is scrolled programmatically. Use the keyboard mnemonic as an alternative way to press the buttons, and note how this mnemonic is displayed in the tool tip text. Note how a button is disabled when scrolling in the corresponding direction is no longer available, and are enabled otherwise. Now try resizing the frame and note how the buttons will change state depending on whether the viewport is bigger or smaller than its child component.