Introducing SQL Anywhere Studio
Tutorial: Designing Databases with PowerDesigner
Lesson 1: Getting Started
In this section, you generate a Physical Data Model (PDM) of the sample database by reverse engineering it.
To reverse engineer the database
Click the diagram window (the large central pane of PowerDesigner).
From the Database menu in the toolbar, choose Reverse Engineering Database.
The Reverse Engineering a Database dialog appears:
Ensure that Using an ODBC Data Source is selected, and that the data source is ASA 9.0 Sample.
If ASA 9.0 Sample does not appear, click the icon to the right of the data source. The Connect to an ODBC Data Source dialog appears. Select Machine Data Source and select ASA 9.0 Sample from the dropdown list. Enter user ID DBA and password SQL. Click Connect to return to the Reverse Engineering a Database dialog.
In the Reverse Engineering a Database dialog, click OK.
The ODBC Reverse Engineering dialog appears:
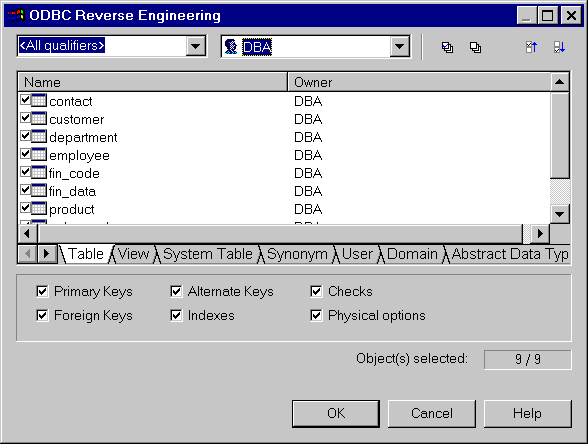
In the lower half of the dialog, there are six checkboxes for selecting keys, indexes, and so on. These are the reverse engineering options. Ensure all are selected (the default). You should also ensure that all tables are selected (also the default).
Click OK to reverse engineer the database.
A graphic representation of the sample database appears in the diagram window, and the model objects appear in the browser:
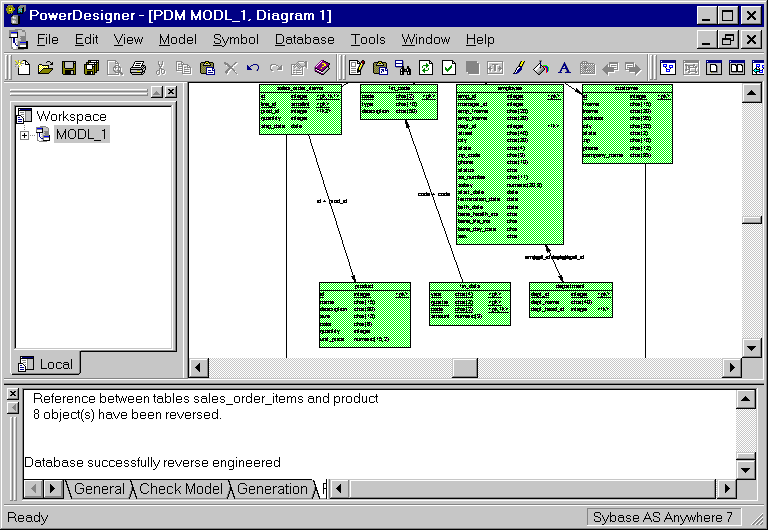
Examine the diagram. You can use F6 to zoom in and F7 to zoom out to make the tables more readable.
Experiment with these toolbar buttons:

Choose Tools
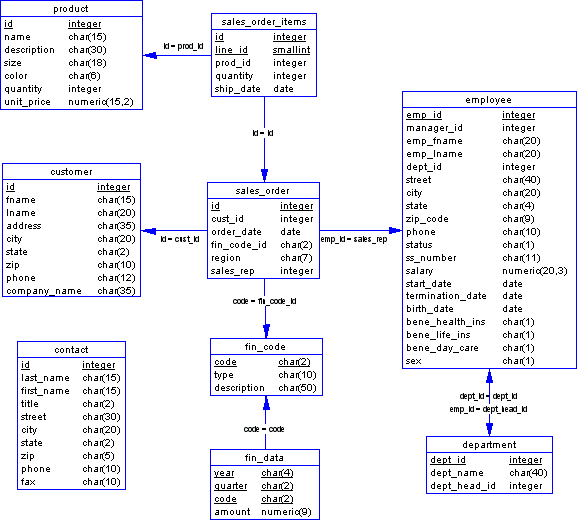
Each table in the database is represented by a box. The name of the table appears at the top of the box. Below is a list of the columns. Column names that are underlined are part of the primary key for that table. The data type of each column appears on the right. Some of the tables may overlap after reverse engineering, but you can use the Auto-layout tool in the Symbol menu to reorganize them.
References between tables are represented with arrows. The arrows point toward the parent table, which is the table that contains the primary key. An equation appears next to each arrow that identifies the reference.
Rearrange the tables so that the diagram is easier to read. To do this, drag them with your mouse. The reference arrows follow automatically. You can select multiple objects by holding down the Shift key.
One possible arrangement appears below: