- Table of Contents
- How to use Graphs
- Examples
- References
This document provides an experimental analysis of the JGraph component, based on working examples. Source code from the JGraphpad application will be used, together with two additional examples. One example is a diagram editor, the other is a GXL to SVG file converter for batch processing an automatic layout.
This document is not a specification of the API, and it does not provide an in-depth study of the component's architecture. The target readers are developers who need a well-documented collection of working examples that demonstrate how to use the JGraph component in a custom application.
How to use Graphs
With the JGraph class, you can display objects and their relations. A JGraph object doesn't actually contain your data; it simply provides a view of the data. Like any non-trivial Swing component, the graph gets data by querying its data model. Here's a picture of a graph:
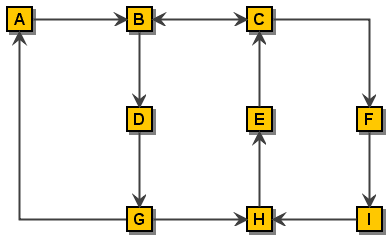
As the preceding figure shows, JGraph displays its data by drawing individual elements. Each element displayed by the graph contains exactly one item of data, which is called a cell. A cell may either be a vertex, an edge or a port. Vertices have zero or more neighbours, and edges have one or no source and target vertex. Each cell has zero or more children, and one or no parent. (Instances of ports are always children of vertices.)
The rest of this tutorial discusses the following topics:
Creating a Graph
Customizing a Graph
Responding to Interaction
Customizing a Graph's Display
Dynamically changing a Graph
Two working examples are provided:
Client-side Example
Implements a simple diagram editor with a custom graph model, marquee handler, tooltips, command history and a popup menu.
Server-side Example
Uses the JGraph component for converting a GXL file into an SVG file, and applying a simple circle-layout.
Creating a Graph
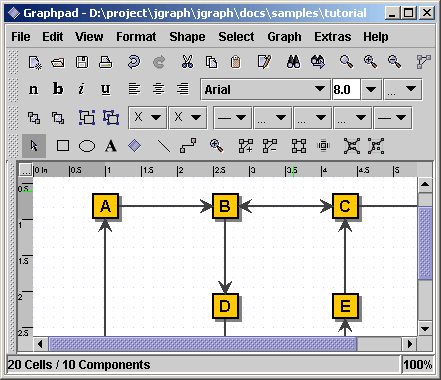
Here is a picture of an application that uses a graph in a scroll pane:
The following code creates a JGraph object:
    JGraph graph = new JGraph();
    ...
    JScrollPane scrollPane = new JScrollPane(graph)
|
The code creates an instance of JGraph and puts it in a scroll pane. JGraph's constructor is called with no arguments in this example. Therefore, JGraph will use an instance of DefaultGraphModel, create an instance of GraphView for it, and add a sample graph to the model.
JGraph's default implementations define the following set of keyboard bindings:
Alt-Click forces marquee selection if over a cell
Shift- or Ctrl-Select extends or toggles the selection
Shift-Drag constrains the offset to one direction
Ctrl-Drag clones the selection
Doubleclick or F2 starts editing
To summarize, you can create a graph by invoking the JGraph constructor. You should probably put the graph inside a scroll pane, so that the graph won't take up too much space. You don't have to do anything to support cell editing, selection, marquee selection, vertex and edge resizing and moving.
Customizing a Graph
JGraph offers the following forms of interactions:
In-place editing
Moving
Cloning
Sizing
Bending (Adding/Removing/Moving edge points)
Establishing Connections
Removing Connections
All interactions can be disabled using setEnabled(false). In-place editing is available for both, vertices and edges, and may be disabled using setEditable(false). The number of clicks that triggers editing may be changed using setEditClickCount.
Moving, cloning, sizing, and bending, establishing connections and disconnecting edges may be disabled using the respective methods, namely setMoveable, setCloneable, setSizeable, setBendable, setConnectable and setDisconnectable on the graph instance.
The model offers finer control of connection establishment and disconnection based on the acceptsSource and acceptsTarget methods. By overriding these methods, you can decide for each edge, port pair if it is valid with respect to the edge's source or target. (Before an edge is disconnected from a port, the respective method is called with the port set to null to check if disconnection is allowed.)
CellViews offer yet another level of control in that they allow/disallow being edited, moved, cloned, resized, and shaped, or connected/disconnected to or from other cells. (Note: In the context of multiple views, a cell may be connectable in one view, and not connectable in another.)
There are a number of additional methods to customize JGraph, for example, setMinimumMove to set the minimum amount of pixels before a move operation is initiated, and setSnapSize to define the maximum distance from a cell to be selected.
With setDisconnectOnMove you can indicate if the selection should be disconnected from the unselected graph when a move operation is initiated, setDragEnabled enables/disables the use of Drag-and-Drop, and setDropEnabled sets if the graph accepts Drops from external sources. (The latter also affects the clipboard, in that it allows/disallows to paste data from exernal sources.)
Responding to Interaction
You can either respond to mouse events, or to events generated by JGraph. JGraph offers the following notifications:
Changes to the model
Changes to the view
Changes to the selection
Undoable edit happened
What's "Undoable edit happened"?
JGraph is compatible to Swing's Undo-Support. Each time the user performs an action, the model dispatches an edit that describes the change. The edit provides an undo method to undo the change.
If undo is called on an edit, the model fires a GraphModelEvent, but it does not fire an UndoableEditEvent. The latter only fires if JGraph wants to indicate that an edit was added to the command history, which is not the case for an undo. (In the context of multiple views, you must use an instance of GraphUndoManager to ensure correctness.)
Responding to Mouse Events
For detection of double-clicks or when a user clicks on a cell, regardless of whether or not it was selected, a MouseListener should be used in conjunction with getFirstCellForLocation. The following code prints the label of the topmost cell under the mouse pointer on a doubleclick. (The getFirstCellForLocation method scales its arguments.)
  // MouseListener that Prints the Cell on Doubleclick
  graph.addMouseListener(new MouseAdapter() {
    public void mousePressed(MouseEvent e) {
      if (e.getClickCount() == 2) {
        // Get Cell under Mousepointer
        int x = e.getX(), y = e.getY();
        Object cell = graph.getFirstCellForLocation(x, y);
        // Print Cell Label
        if (cell != null) {
          String lab = graph.convertValueToString(cell);
          System.out.println(lab);
        }
      }
    }
  });
|
Responding to Model Events
If you are interested in handling model notifications, implement the GraphModelListener interface and add the instance using the method addGraphModelListener. The listeners are notified when cells are inserted, removed, or when the label, source, target, parent or children of an object have changed. (Make sure to also add an Observer to GraphView in order to be notified of all possible changes to a graph!)
The following code defines a listener that prints out information about the changes to the model, and adds the listener to the graph's model:
  // Define a Model Listener
  public class ModelListener implements GraphModelListener {
    public void graphCellsChanged(GraphModelEvent e) {
      System.out.println("Change: "+e.getChange());
    }
  }
  // Add an Instance to the Model
  graph.getModel().addGraphModelListener(new ModelListener());
|
Responding to View Events
Visual modifications are typically handled by the GraphView, which extends the Observable class. To respond to view-changes, implement the Observer interface and add it to the view using the method addObserver. Observers are notified when the size, position, color etc. of a cell view has changed. (Note: If the model's isAttributeStore returns true, then the view is bypassed, and all attributes are stored in the model.)
  // Define an Observer
  public class ViewObserver implements Observer {
    public void update(Observable o, Object arg) {
      System.out.println("View changed: "+o);
    }
  }
  // Add an Instance to the View
  graph.getView().addObserver(new ViewObserver());
|
Responding to Selection Changes
The following code prints out selection events:
  // Define a Selection Listener
  public class MyListener implements GraphSelectionListener {
    public void valueChanged(GraphSelectionEvent e) {
      System.out.println("Selection changed: "+e);
    }
  }
  // Add an Instance to the Graph
  graph.addGraphSelectionListener(new MyListener());
|
The preceding code creates an instance of MyListener, which implements the GraphSelectionListener interface, and registers it on the graph.
Responding to Undoable Edits
To enable Undo-Support, a GraphUndoManager must be added using addUndoableEditListener. The GraphUndoManager is an extension of Swing's UndoManager that maintains a command history in the context of multiple views. You can safely use an instance of UndoManager if your graph has only one view. Otherwise, a GraphUndoManager must be used for correct behaviour.
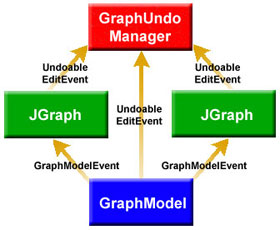
The figure above shows a graph model in the context of multiple views. From a logical point of view, both, JGraph and the GraphModel fire UndoablEditEvents. However, in reality only the model supports these events and the view uses this support to dispatch its own UndoableEdits. The view is updated based on GraphModelEvents.
Extending the Default Handlers
JGraph provides two high-level listeners that are used to control mouse and datatransfer functionality. By overriding these, you can gain full control of marquee selection and datatransfer, that is, how cells are imported and exported via Drag-and-Drop and the clipboard. The client-side example at the end of this Tutorial provides such a custom handler. The custom marquee handler in this example is used to establish connections between cells by dragging ports.
Customizing a Graphs Display
JGraph performs some look-and-feel specific painting. You can customize this painting in a limited way. For example, you can modify the grid using setGridColor and setGridSize, and you can change the handle colors using setHandleColor and setLockedHandleColor. The background color may be changed using setBackground.
Subclassing Renderers
If you want finer control over the rendering, you can subclass one of the default renderers, and override its paint-method. A renderer is a Component-extension that paints a cell based on its attributes. Thus, neither JGraph nor its look-and-feel-specific implementation actually contain the code that paints a cell. Instead, JGraph uses the cell renderer's painting code. A new renderer may be associated with a cell by overriding the getRendererComponent method of the corresponding CellView, or the getRenderer method for extensions of the AbstractCellView class.
Adding new Cell Types to a Graph
The following code was taken from JGraphpad (http://jgraph.sourceforge.net/pad/jgraphpad.jnlp) to illustrate how to add new cell types and renderers. The code adds an oval vertex to the graph. The easiest way to do this is by extending JGraph. Since JGraph implements the CellViewFactory interface, it is in charge of creating views.
When creating a view, JGraph assumes a cell is a vertex if it is not an instance of Edge or Port, and calls the createVertexView method. Thus, we only need to override this method to identify an oval vertex (based on a typetest) and return the corresponding view.
  // Overrides JGraph.createVertexView
  protected VertexView createVertexView(Object v,
                                        GraphModel model,
                                        CellMapper cm) {
    // Return an EllipseView for EllipseCells
    if (v instanceof EllipseCell)
      return new EllipseView(v, model, cm);
    // Else Call Superclass
    return super.createVertexView(v, model, cm);
  }
|
The oval vertex is represented by the EllipseCell class, which is an extension of the DefaultGraphCell class, and offers no additional methods. It is only used to distinguish oval vertices from normal vertices.
  // Define EllipseCell
  public class EllipseCell extends DefaultGraphCell {
    // Empty Constructor
    public EllipseCell() {
      this(null);
    }
    // Construct Cell for Userobject
    public EllipseCell(Object userObject) {
      super(userObject);
    }
  }
|
The EllipseView is needed to define the special visual aspects of an ellipse. It contains an inner class which serves as a renderer that provides the painting code. The view and renderer are extensions of the VertexView and VertexRenderer classes, respectively. The methods that need to be overridden are getPerimeterPoint to return the perimeter point for ellipses, getRenderer to return the correct renderer, and the renderer's paint method.
  // Define the View for an EllipseCell
  public class EllipseView extends VertexView {
    static EllipseRenderer renderer = new EllipseRenderer();
    // Constructor for Superclass
    public EllipseView(Object cell, GraphModel model,
              CellMapper cm) {
      super(cell, model, cm);
    }
    // Returns Perimeter Point for Ellipses
    public Point getPerimeterPoint(Point source, Point p) { ...
    }
    // Returns the Renderer for this View
    protected CellViewRenderer getRenderer() {
      return renderer;
    }
    // Define the Renderer for an EllipseView
    static class EllipseRenderer extends VertexRenderer {
      public void paint(Graphics g) { ... }
    }
  }
|
The reason for overriding getRenderer instead of getRendererComponent is that the AbstractCellView class, from which we inherit, already provides a default implementation of this method that returns a configured CellViewRenderer, which in turn is retrieved through the method that was overridden.
Adding Tooltips to a Graph
Tooltips can be implemented by overriding JGraph's getToolTipText method, which is inherited from the JComponent class. The following displays the label of the cell under the mouse pointer as a tooltip.
  // Return Cell Label as a Tooltip
  public String getToolTipText(MouseEvent e) {
    if(e != null) {
      // Fetch Cell under Mousepointer
      Object c = getFirstCellForLocation(e.getX(), e.getY());
      if (c != null)
        // Convert Cell to String and Return
        return convertValueToString(c);
    }
    return null;
  }
|
The graph must be registered with Swing's TooltipManager to correctly display tooltips. This is done with the following code on startup:
ToolTipManager.sharedInstance().registerComponent(graph)
|
Customizing In-Place Editing
In graphs that display complex structures, it is quite common to offer a property dialog instead of the simple in-place editing. To do this, the BasicGraphUI's startEditing and completeEditing methods must be overridden. Then, in order to use this UI in a graph, the graph's updateUI method must be overridden, too:
  // Define a Graph with a Custom UI
  public class DialogGraph extends JGraph {
    // Sets the Custom UI for this graph object
    public void updateUI(){
      // Install a new UI
      setUI(new DialogUI());
      invalidate();
    }
  }
|
The DialogUI class takes the view's editor, and puts it in a dialog, which blocks the frame until the dialog is closed. The code for the DialogUI class is not printed here. It is included in the Tutorial.java file, which is available for download (see references at the end of this Tutorial).
Dynamically changing a Graph
In JGraph, either the model or the view is modified, or they are modified in parallel with a single transaction. When working on the model, objects that implement the GraphCell interface are used, whereas objects that implement the CellView interface are used in the context of a GraphView. GraphViews allow to edit CellViews, whereas GraphModels allow to insert, remove, and edit GraphCells.
In this chapter, a DefaultGraphModel is used along with a graph that provides a view to the model. This way, we can clarify which methods belong to the model, and which belong to the view.
    DefaultGraphModel model = new DefaultGraphModel();
    JGraph graph = new JGraph(model);
|
Attributes
JGraph separates the model and the view. The model is defined by the GraphModel interface, and contains objects that implement the GraphCell interface, whereas the view is represented by the GraphView class, and contains objects that implement the CellView interface. The mapping between cells and views is defined by the CellMapper interface:

A model has zero or more views, and for each cell in the model, there exists exactly one CellView in each GraphView. The state of these objects is repesented by a map of key, value pairs. Each CellView combines the attirbutes from the corresponding GraphCell with its own attributes.
When combining the attributes from a GraphCell with the attributes from the CellView, the graph cell's attributes have precedence over the view's attributes. The special value attribute is in sync with the cell's user object.
Dynamically Changing Attributes
The state of a cell, and likewise of a view is represented by its attributes. In either case, the GraphConstants class is used to change the state in two steps:
Construct the object that constitutes the change
Execute the change on the model, or the graph view
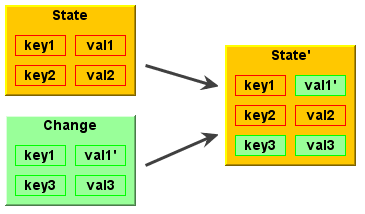
To construct the object that constitutes the change, a new map is created using the createMap method of the GraphConstants class. When a map is applied to a view's or cell's state, it does not replace the existing map. The entries of the new map are added or changed in-place. As a consequence, the GraphConstants class offers the setRemoveAttributes and setRemoveAll methods, which are used to remove individual or all keys from the existing state. (Note: The notion of states using maps closely resembles the structure of XML-documents.)
Automatically Changing Attributes
The update method of the CellView interface is used to message the CellView when one of its attributes was changed programmatically, or one of its neighbours has changed attributes. Thus, the update method is a good place to automatically set attributes, like for example the points of an edge. To reflect changes to the view's corresponding cell, for example to point to the current source and target port, the refresh method is used.
Working with the GraphModel
You can think of the model as an access point to two independent structures: the graph structure and the group structure. The graph structure is based on the mathematical definition of a graph, ie. vertices and edges. The group structure is used to enable composition of cells, ie. parents and childs.
The graph structure is defined by the getSource and getTarget methods, which return the source and target port of an object. The port in turn is a child of a vertex, which is used as an indirection to allow multiple connection points.
The group structure is defined by the getChild, getChildCount, getIndexOfChild, and getParent methods. The objects that have no parents are called roots, and may be retrieved using the getRootAt and getRootCount methods.
Inserting a Vertex into the Model
Here is a method that creates a new DefaultGraphCell and adds it to the model. The method adds two ports to the cell, and creates a map which maps the cells to their attributes. The attributes are in turn maps of key, value pairs, which may be accessed in a type-safe way by use of the GraphConstants class:
  void insertVertex(Object obj, Rectangle bounds) {
    // Map that Contains Attribute Maps
    Map attributeMap = new Hashtable();
    // Create Vertex
    DefaultGraphCell cell = new DefaultGraphCell(userObject);
    // Create Attribute Map for Cell
    Map map = GraphConstants.createMap();
    GraphConstants.setBounds(map, bounds);
    // Associate Attribute Map with Cell
    attributeMap.put(cell, map);
    // Create Default Floating Port
    DefaultPort port = new DefaultPort("Floating");
    cell.add(port);
    // Additional Port Bottom Right
    int u = GraphConstants.PERCENT;
    port = new DefaultPort("Bottomright");
    // Create Attribute Map for Port
    map = GraphConstants.createMap();
    GraphConstants.setOffset(map, new Point(u, u));
    // Associate Attribute Map with Port
    attributeMap.put(port, map);
    cell.add(port)
    // Add Cell (and Children) to the Model
    Object[] insert = new Object[]{cell};
    model.insert(insert, null, null, attributeMap);
  }
|
The first argument to the insertVertex method is the user object - an object that contains or points to the data associated with the cell. The user object can be a string, or it can be a custom object. If you implement a custom object, you should implement its toString method, so that it returns the string to be displayed for that cell. The second argument represents the bounds of the vertex, which are stored as an attribute.
Note: The vertex is passed to the insert method without its children. The fact that parent-child relations are stored in the cells is used here to insert the children implicitly, without providing a ParentMap. (Future implementations should provide an additional argument to allow separate storage.)
The attributeMap argument is not used by the model. It is passed to the views to provide the attributes for the cell views to be created. The third parameter of the insert call can be used to provide properties, that is, attributes that are stored in the model.
Finding the Port of a Vertex
Since ports are treated as normal children in the model (using the model's group structure), the GraphModel interface may be used to find the "default port" of a vertex:
  Port getDefaultPort(Object vertex, GraphModel model) {
    // Iterate over all Children
    for (int i = 0; i < model.getChildCount(vertex); i++) {
      // Fetch the Child of Vertex at Index i
      Object child = model.getChild(vertex, i);
      // Check if Child is a Portif (child instanceof Port)
      // Return the Child as a Port
      return (Port) child;
    }
    // No Ports Found
    return null;
  }
|
The code is not provided by the core API because it introduces the notion of a "default port", which is typically application dependent. (The code above uses the first port as the default port.)
Inserting an Edge into the Model
The following method creates a new DefaultEdge, and adds it to the model, along with the connections to the specified source and target port.
  void insertEdge(Object obj, Port source, Port target) {
    // Create Edge
    DefaultEdge edge = new DefaultEdge(userObject);
    // Create ConnectionSet for Insertion
    ConnectionSet cs = new ConnectionSet(edge, source, target);
    // Add Edge and Connections to the Model
    Object[] insert = new Object[]{edge};
    model.insert(insert, cs, null, null);
  }
|
Again, the first argument represents the user object of the cell, and the second and third argument specify the source and target port of the new edge. To insert connections into a graph model, an instance of ConnectionSet is required. The instance is used to collect the new ports and targets of edges, and execute the change as a single transaction.
Removing Cells from the Model
If a cell is removed from the model, the model checks if the cell has children, and if so, updates the group structure accordingly, that is, for all parents and children that are not to be removed. As a consequence, if a cell is removed with children, it can be reinserted using insert, that is, without providing the children or a ParentMap. If a cell is removed without children, the resulting operation is an "ungroup".
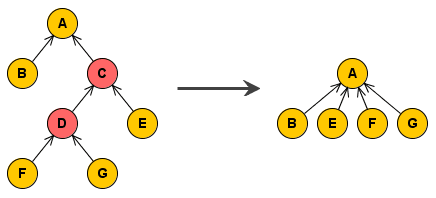
The figure above shows a group A, which contains the cell B, and a group C, which in turn contains E, a group D, which in turn contains F, and G. The second figure shows the group structure after the removal of cells C and D.
The following removes all selected cells, including all descendants:
    // Get Selected Cells
    Object[] cells = graph.getSelectionCells();
    if (cells != null) {
      // Remove Cells (incl.  Descendants) from the Model
      graph.getModel().remove(graph.getDescendants(cells));
    }
|
Changing the Model
The ConnectionSet and ParentMap classes are used to change the model. The attributes may be changed using a map that contains cell, attributes pairs. The attributes are in turn represented by maps of key, value pairs, which may be accessed in a type-safe way by using the GraphConstants class.
Let edge, port and vertex be instances of the DefaultEdge, DefaultPort and DefaultGraphCell classes, respectively; all contained in the model. This code changes the source of edge to port, the parent of port to vertex, and the user object of vertex to the String Hello World.
    // Create Connection Set
    ConnectionSet connectionSet = new ConnectionSet();
    connectionSet.connect(edge, port, true);
    // Create Parent Map
    ParentMap parentMap = new ParentMap();
    parentMap.addEntry(port, vertex);
    // Create Properties for VertexMap
    properties = GraphConstants.createMap();
    GraphConstants.setValue(properties, "Hello World");
    // Create Property Map
    Map propertyMap = new Hashtable();
    propertyMap.put(vertex, properties);
    // Change the Model
    model.edit(connectionSet, propertyMap, parentMap, null);
|
The last argument of the edit call may be used to specify the initial edits that triggered the call. The edits specified are considered to be part of the transaction. (This is used to implement composite transactions, ie. transactions that change the model and the view in parallel.)
Changing the View
Each GraphCell has one or more associated CellViews, which in turn contain the attributes. The attributes of a CellView may be changed using editCells on the parent GraphView. In contrast to the propertyMap argument used before, and the attributeMap argument used to insert cells into the model, the attributeMap argument used here contains instances of the CellView class as keys. The attributes, again, are maps of key, value pairs.
The following changes the border color of vertex to black:
    // Work on the Graph's View
    GraphView v = graph.getView();
    // Create Attributes for Vertex
    Map attributes = GraphConstants.createMap();
    GraphConstants.setBorderColor(attributes, Color.black);
    // Get the CellView to use as Key
    CellView cellView = v.getMapping(vertex, false);
    // Create Attribute Map
    Map attributeMap = new Hashtable();
    attributeMap.put(cellView, properties);
    // Change the View
    v.editCells(attributeMap);
|
Creating a Data Model
Extending the Default Model
The DefaultGraphModel provides three methods for subclassers, namely the acceptsSource and acceptsTarget method to allow or disallow certain connections to be established in a model, and the isAttributeStore method to gain control of the attributes that are changed by the UI. The first two methods are used in the GraphEd example in this tutorial, the latter is explained in detail in the paper. The isOrdered method is used to indicate if the model's order should be used instead of the view's, and the toBack and toFront methods are used to change this order. Note that the graph views methods with the same name are redirected to the model if the isOrdered method returns true.
Providing a Custom Model
If DefaultGraphModel doesn't suit your needs, then you will have to implement a custom data model. Your data model must implement the GraphModel interface. GraphModel accepts any kinds of objects as cells. It doesn't require that cells implement the GraphCell interface. You can devise your own cell representation.