 |
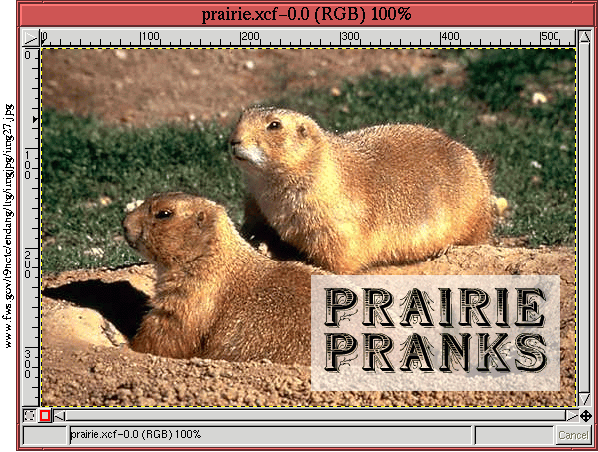
Figure 2.1 will be used to describe some of
Figure 2.2 shows a 3D break-out of how the three-layer stack relates to the 2D image shown in Figure 2.1. The bottom layer is a picture of a gopher couple; this layer is fully opaque. The middle layer has the same dimensions as the bottom layer and is completely transparent except for a small white rectangular region. The white rectangle itself is partially transparent (thus, the bottom layer can be perceived through it). Finally, the top layer's dimensions are smaller than either the bottom or middle layers. The top layer is also transparent except for the text Prairie Pranks. The vertical red dashed lines in Figure 2.2 show that the text in the top layer is positioned directly over the white rectangle in the middle layer. The black frames shown in the figure have been drawn in to show the positions of the text and the white rectangle but are not actually part of the image (refer to Figure 2.1).
The 3D layer stack shown in Figure 2.2 is a useful mental model for understanding how layers work in an image. It also underscores the utility of having image components on layers. Because the text is on a layer, it can be positioned independently of the lowest layer. Because the white rectangle is on a layer, its partial transparency can be adjusted without affecting the text.
It is impossible to work with images without knowing their layer
structure. This information is provided by the Layers dialog, which
is part of the Layers & Channels window. The Layers & Channels window can be found in
the Image:Layers menu, the Image:Dialogs menu, or can be
invoked by simply typing C-l in the image window.
Figure 2.3(a)
The Layers dialog has many components. Let's
take a moment to briefly describe each one.
Figure 2.4 illustrates the dialog's
In addition to showing the layer ordering structure of an image, the Layers Palette provides useful information and tools for working with the image. As shown in Figure 2.4, the area to the far left of the Layer Thumbnail contains the Eye icon. If this icon is visible, the corresponding layer is visible in the image window. The Eye icon can be toggled off by clicking on it. This makes the corresponding layer invisible in the image window. Toggling it again brings the layer back.
The region of the strip just to the left of the thumbnail and to the right of the Eye icon is the position of the Layer Link icon. Clicking in this area makes a four-way arrow appear, as shown in two of Figure 2.4's layer strips. When this icon is activated for several layers at once, they are linked together with respect to the Move tool. These layers will now move together as a single unit (the Move tool is covered in Section 2.6.1).
To the right of the thumbnail is the Layer Title Area, which, for a new image, is named Background by default. The title can be changed by double-clicking in the Layer Title Area. This brings up a dialog box where the new title can be entered.
The middle layer strip in Figure 2.4 is highlighted in blue, indicating that it is the active. layer GIMP tools applied to the image window are applied to this layer. This is very important, so read these last two sentences again! The GIMP tools and filters are applied to the active layer. Not knowing which layer is active is a formula for confusion and frustration. The identity of the active layer can only be reliably determined by having the Layers dialog open. Any layer can be made active by clicking on its thumbnail or Title Area. Only one layer can be active at a time.
Outside of the Layers Palette area are several other important features of the Layers dialog. First, there are two pull-down menus labeled Image and Mode. The Image menu is used to specify the context of the Layers dialog. The GIMP can have many image windows open simultaneously. When there is more than one image window open, this menu is used to select the one whose layers are displayed in the Layers Palette area. If the Auto Context button is toggled on (which it is by default), any keystroke in an image window will change the Layers Palette context auto-magically to that window. I like to use the space bar for this.
The Mode menu selects how the pixels of the active layer are visually blended with those beneath it. Each layer has a blending mode context that is specified using this menu. Blending modes are described in more detail in Chapter 5.
The remaining features of the Layers dialog consist of the Opacity slider, the Keep Trans. toggle button, and, at the bottom of the dialog, a row of function buttons that I call the button bar. These are all discussed in more detail later. However, of these features, the Opacity slider is of immediate interest because it is used in the example shown in Figure 2.3. Figure 2.3(b) shows that the the middle layer strip is highlighted, indicating that this layer, containing the small white rectangle, is active. Careful examination of the Layers dialog shows that the Opacity slider is set to 60.0% for this layer. This means that the layer below can be seen through the white rectangle because the rectangle's layer is only partially opaque. Like for the blending modes, opacity can be independently set for each layer.
In addition to the features described in the previous section, the
Layers dialog has a hidden menu. This menu is displayed by right-clicking
on the highlighted active layer in the Layers
Palette. This is called the Layers menu.
Figure 2.5(a)