 |
Blending modes are fascinating toys that are lots of fun and can stimulate creative play with color. Results of experimenting with the blending modes often produce surprising and very aesthetic results.
Blending modes, however, are a lot more than toys for playing with color; some very useful operations would be impossible without them. Examples of practical uses for blending modes can be found in Sections 7.2, 7.3, and 7.4. This section describes two great applications of blending modes that do not appear elsewhere in this book.
It is often desirable to completely change the color of a
subject--the color of a car, a lip gloss, eyes, a dress. The
problem with changing the color of any real world image is that there
are always lots of variations in the shading of a color. This is due
to natural color gradations, lighting conditions, and textures.
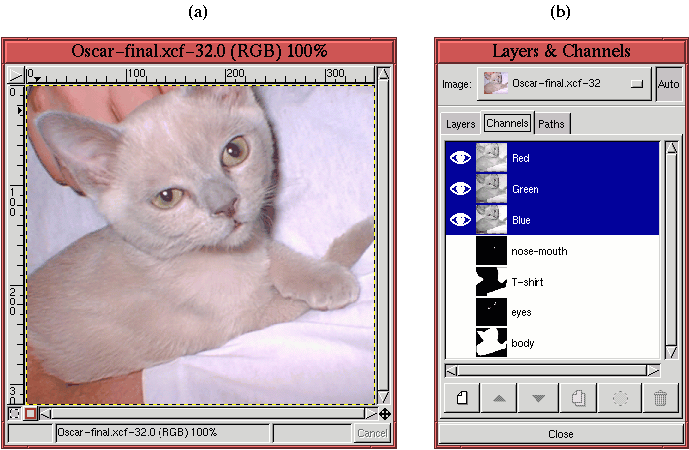
Figure 5.26(a)
The Color blending mode is purr-fect for this type of operation. This mode combines the hue and saturation of the foreground with the lightness of the background. Thus, the natural dark and light areas of the kitten's coat are preserved and only the color changes. The following illustrates how the technique is applied.
The objective is to change the kitten into a tabby colored cat with blue-ish eyes and to make the T-shirt of the person holding her a khaki green. To do this, a separate selection is made of the kitten's body, her eyes, her nose and mouth, and of the T-shirt. Each of these image components are selected using any of the techniques from Chapters 3 or 4 (I used the Bezier Path tool). Each selection is stored as a channel mask, as shown in the Channels dialog displayed in Figure 5.26(b). The four channel masks are labeled Body, Eyes, T-shirt, and Nose+Mouth.
The next step is to create a transparent layer above the kitten image where the new colors can be applied. The new layer is created by clicking on the New Layer button in the Layers dialog. When the New Layer Options dialog appears, the Transparent option is used, and the resulting layer is labeled Colorization Layer. Changing the blending mode of this new layer to Color, the color surgery can begin.
The Body channel mask is used to recover the selection of the kitten's
body by applying the function Channel to Selection from the
Channels menu (see Section 4.1.5). The Marching Ants
for this selection can be seen in
Figure 5.27(a). Now, making sure that
the Colorization layer is active by clicking on its thumbnail in the
Layers dialog, the Color Selection tool, as shown in
Figure 5.27(b), is used to pick the
desired color, and the Bucket Fill tool
is used to apply the color to the selected region.
Figure 5.27(a)
The color of the kitten's eyes are changed using a similar operation.
After applying the selection from the Eyes channel mask and making the
Colorization layer active, you can apply the desired color to the
eyes. Figure 5.28(b)
Before proceeding to the final operation, that of changing the T-shirt color, an important touch is needed to make the kitten's nose, mouth, and inner ear look natural. These parts are not the same color as her fur and require a little pink to make them look correct. The nose and mouth are colored by converting the Nose+Mouth mask to a selection and by using the Bucket Fill tool to apply an appropriately chosen pink color. As for the kitten's inner ear, the color is applied a little differently. The inside of her ear consists of both fur and skin, and, consequently, the Airbrush tool is more suitable than the Bucket Fill tool for locally applying the pink paint.
Making the T-shirt a khaki green is a little different from the
previous colorization efforts. Because the T-shirt's color in the
original image is so light, it is impossible to make it any darker
using the Color blending mode, which uses the lightness of the
lower layer. This problem can be solved by changing blending modes.
Creating a new transparent layer and setting the mode to Multiply allows darker color to
be applied to the T-shirt. The result of this is shown in
Figure 5.29(a).
A strong specular reflector illuminated by a point source creates a strong highlight and well defined shadows. However, more diffuse lighting produces less well-defined effects. Under these circumstances, the Multiply and Screen blending modes can be used to create realistic shadows and highlights in an image. These modes can be used to darken and lighten parts of an image without the risk of blowing out the tonal range, as is the case for specular reflectors and point source illumination. The following example illustrates this application of these blending modes.
Figures 5.30(a) and (b)
Using the Color Picker tool, the measured colors of the image are 221R 191G 37B for the yellow background and 206R 26G 26B for the red circle. Because the colors are not fully saturated, they can be used. However, if either color were fully saturated (that is, a pure red, green, blue, cyan, magenta, yellow, or white), it would be necessary to select a color that is slightly off pure for this technique to work. This is easily done, however, using the Color Selection tool.
To make the highlight shown in Figure 5.31(a), a
large fuzzy brush is chosen from the Brush Selection tool, as
shown in Figure 5.31(b).
The shadow
shown in Figure 5.32(a) is made with the same
brush; however, now the Multiply blending mode is used, as shown in
Figure 5.32(b).