next up previous contents index
Next: 6.4 Sharpening Up: 6. Touchup and Enhancement Previous: 6.2 Removing Color Casts

        
6.3 Repairing Blemishes with the Clone Tool

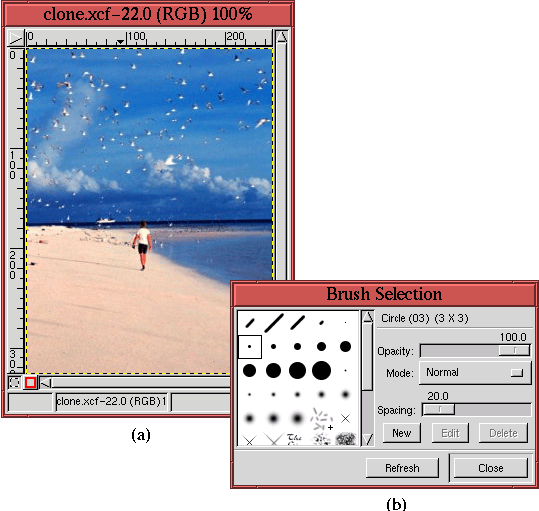
Sometimes an image has elements you'd prefer weren't there. A telephone pole and wires might ruin an otherwise lovely composition of a New England cottage on Cape Cod. Fortunately, these sorts of annoyances can be easily removed using the Clone tool. The Clone tool is found in the GIMP toolbox, and its icon resembles a rubber stamp. The following illustrates how this powerful tool is used.

Figure 6.29(a)

  
Figure 6.29: Image with Unwanted Content
Figure 6.29

illustrates an idyllic scene we've seen already. It shows a long, deserted stretch of beach, blue waters, and a sky dotted with white fluffy clouds on the horizon. Well, the beach is not quite deserted. There is a lone person promenading along the water's edge. This might not be a problem for some uses of this picture. On the other hand, it might be desirable to have an image like this without a single soul on the beach. If that's the case, you can still use this image by simply removing the person from the scene using the Clone tool. To do this, you begin by choosing a brush from the Brush Selection dialog, as shown in Figure 6.29(b). For this example, the second to smallest hard brush has been selected. As usual the choice is dictated by need.

The idea for working with the Clone tool is to cover over the offending part of the image using colors from the background. Where do the background colors come from? From the background itself. The Clone tool covers up one part of an image using another part of the same image. When this is done carefully, it can be used to completely and convincingly remove offending elements.

Figure 6.30(a) shows a zoom of the image from

  
Figure 6.30: Zoom of Image Showing (a) Clone Reference Point and (b) Application of Clone Tool to Unwanted Image Area
Figure 6.30

Figure 6.29(a). Notice the small + cursor on it. The cursor shows the center of the image source reference patch that will be used to cover other, undesirable parts of the image. The size and character of the patch around this point is controlled by the brush size and type. Selecting the Clone tool from the Toolbox, the image source reference point is specified by Control-clicking on it.

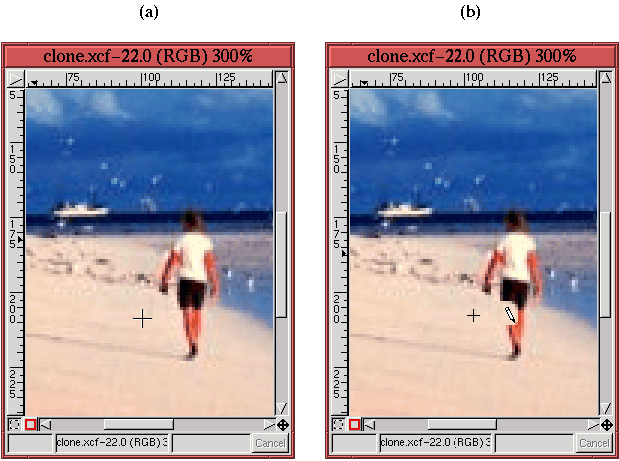
Now, when (simple) clicking and dragging on another part of the image, the neighborhood around the reference point is copied to the new mouse location. If the choice of reference point is made carefully, it can be made to look as if the foreground is being removed to reveal the natural background. The effect is shown in Figure 6.30(b), which shows part of the person's leg being removed. (Don't worry, the process is completely painless, and no one was harmed to present this example.)

The pencil icon is over the region being covered, and the size of the region being affected is equal in size to the area of the brush chosen from the Brush Selection dialog. Note that a smaller + sign cursor is visible in Figure 6.30(b). While painting with the Clone tool, the location of the reference patch is indicated by this cursor. The + sign moves in tandem with the mouse cursor, always remaining exactly the same distance away, as long as the mouse button is held down. This feature aids in producing a more natural looking result because different parts of the image are being used in the cover-up.

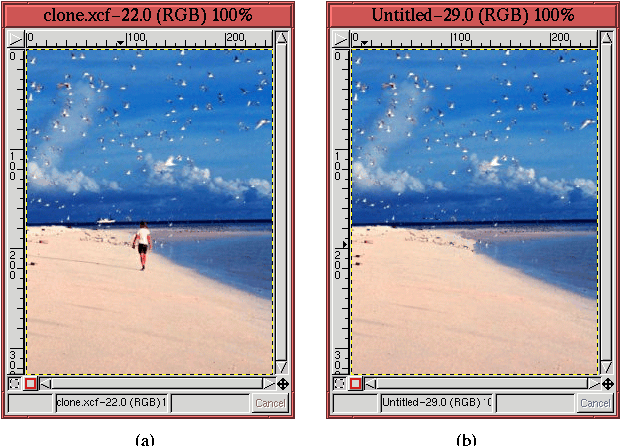
Figure 6.31 shows the final result of using the Clone tool for this example.

  
Figure 6.31: Original Image and Final Image with Unwanted Image Content Removed
Figure 6.31

Figure 6.31(a) shows the original image, and Figure 6.31(b) shows that the person has been completely removed, including his shadow! The boat seen on the horizon in the original image has also been removed. Good examples of practical uses for the Clone tool are presented in Sections 7.4 and  7.5.


next up previous contents index
Next: 6.4 Sharpening Up: 6. Touchup and Enhancement Previous: 6.2 Removing Color Casts

©2000 Gimp-Savvy.com