YUI Library Examples: Uploader Control (experimental): Simple Uploader Example
Uploader Control (experimental): Simple Uploader Example
This example is a demonstration of the YUI Uploader Control's features.
Note: The YUI Uploader Control requires Flash Player 9.0.45 or higher. The latest version of Flash Player is available at the Adobe Flash Player Download Center.
Note: The YUI Uploader Control requires the uploader.swf Flash file that is distributed as part of the YUI package, in the uploader/assets folder. Copy the uploader.swf to your server and set the YAHOO.Uploader.SWFURL variable to its full path.
Note: This example requires a backend component to receive uploaded files. Download the source for this example below to use on your own PHP server.
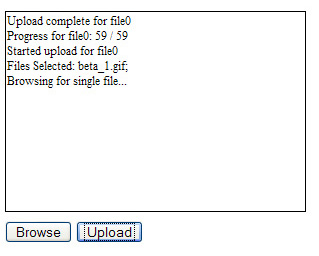
When you have the example running on your own server, it should look like the screenshot below:
A Simple Use Case for the Uploader Control
Start by including all the necessary files for the Uploader and Logger controls:
Next, we set a placeholder for the Uploader Control. The Control has a built-in logging console, so if you set the size of the div to 400x210, you'll see the internal logs of the Uploader.
Next, we'll add two buttons, a "Browse" button, and the "Upload" button. Note that the buttons call the browse() and upload() functions, respectively.
We will now initialize the Logger and the Uploader controls. Note that we are also specifying the SWFURL property for the uploader that's different from the default (./assets/Uploader.swf):
Next, we'll add the event listeners to the Uploader control, and initialize a fileList variable to hold the list of fileIDs and file information.
Next, we'll define the browse() and upload() functions that are called when the respective buttons are pressed. In the browse() function, we call the uploader.clearFileList(), to make sure that no files are left over from the previous upload (if this is the first time the page loads, then there wont be any files there to start with; but the upload queue is not automatically cleared between file selections, so unless we want it to preserve, we want to clear it). We then call the uploader.browse function. The first argument to that function specifies whether we want the user to be able to select multiple files. To keep this example simple, we'll restrict the user to just one file. The second argument is an array of extension filters -- in this case, we have just one, limiting the file extensions to ".jpg". We also post a message to the Logger control.
In the upload() function, we go through the fileList (that's populated by the onFileSelect function below) and call the upload method on all of the file ids contained in it (since we are only allowing the user to select one file, there will be only one file id in the list):
Next, we'll define the functions that are called in response to the events. These are the functions we specified when we added the event listeners above:
The onFileSelect receives the list of files and populates the fileList variable with it.
The rest of the functions simply log the events they receive in the Logger. By examining the event object dump in the Logger, you will be able to see what variables are passed for each specific event (see the Getting Started for the detailed description):
Uploader Control (experimental) Examples:
More Uploader Control (experimental) Resources:
- User's Guide (external)
- API Documentation
- Cheat Sheet PDF (external)
- Yahoo! UI Library
- Home (external)
- YUIBlog (external)
- YUI Discussion Forum (external)
- YUI on Sourceforge (external)
- API Documentation
- Functional Examples
- YUI Theater (external)
- YUI License (external)
- YUI Functional Examples
- Animation
- AutoComplete
- Browser History Manager
- Button
- Calendar
- Charts (experimental)
- Color Picker
- Cookie (beta)
- Connection Manager
- Container
- DataTable (beta)
- Dom
- Drag & Drop
- Event
- Get
- ImageCropper (beta)
- ImageLoader
- JSON
- Layout Manager (beta)
- Logger
- Menu
- Profiler (beta)
- ProfilerViewer (beta)
- Resize (beta)
- Rich Text Editor (beta)
- Selector (beta)
- Slider
- TabView
- TreeView
- Uploader (experimental)
- YAHOO Global Object
- YUI Loader (beta)
- YUI Test
- Reset CSS
- Base CSS
- Fonts CSS
- Grids CSS
- YUI Articles on the YUI Website
- YUI FAQ (external)
- Graded Browser Support (external)
- Bug Reports/Feature Requests (external)
- Serving YUI Files from Yahoo! (external)
- Security Best Practices (external)
Copyright © 2008 Yahoo! Inc. All rights reserved.
Privacy Policy - Terms of Service - Copyright Policy - Job Openings