:: Readme
:: Release Notes
:: License
:: Whitepaper
:: Visual Builders
:: References
:: Tips & Tricks
:: FAQ
Tutorial
:: Introduction
:: Quick Start
:: Basics
:: Building
:: Factories
Reference
:: Alignments
:: Constant Sizes
:: Component Sizes
:: Bounded Sizes
:: Cols & Rows
:: Cell Constraints
:: Groups
Web Pages
:: Project Home
:: Downloads
:: Announcements
:: Mailing Lists
:: Issue Tracker
:: More Examples
:: Tutorial :: Quick Start ::This page quickly aquaints you with the major features of the Forms framework. Find more information on the other tutorial pages and details in the Reference.Working with the FormLayout is basically a six step process:
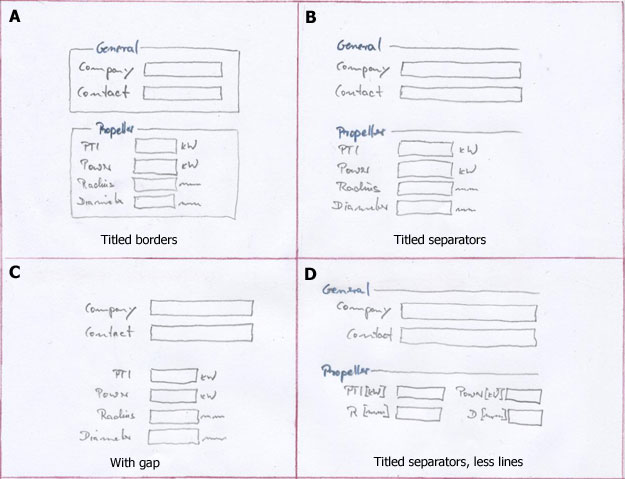
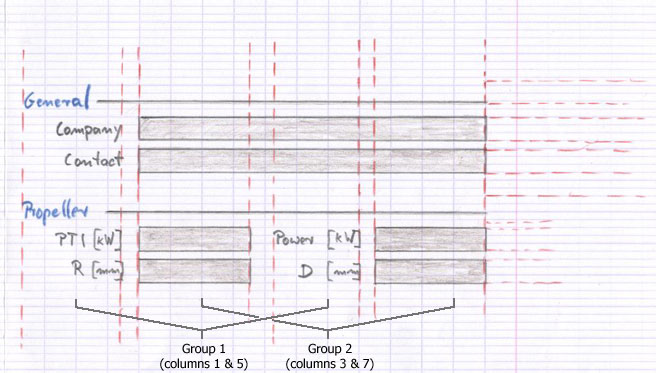
A Sample LayoutWe want to implement an editor for six fields that are separated into two groups. General: company name and contact person; propeller: PTI, power, radius, diameter.Step 1: Find the LayoutBefore you construct and implement a design with the Forms, find the layout. Play around with different layouts and evaluate how they meet your requirements.
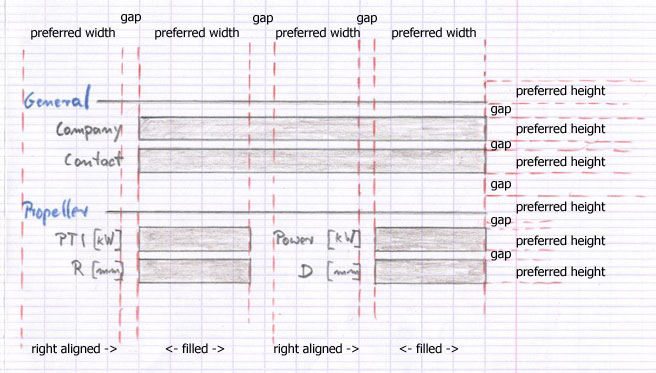
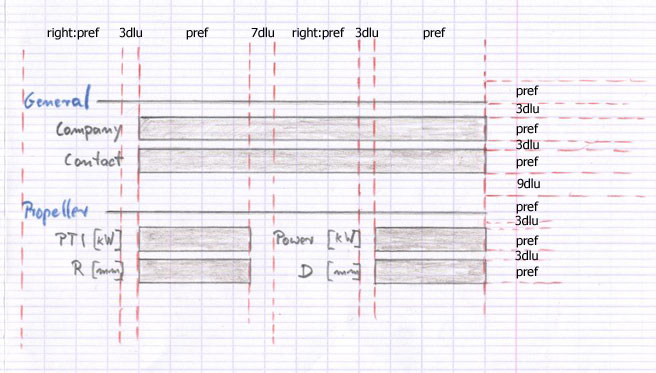
Step 5: Create and Configure a BuilderIn Forms you typically add components using a builder that in turn adds them to the layout container. Builders helps you create frequently used components, keep track of the location for the next component and assist you in style guide compliance.Some builders can be configured (for example the DefaultFormBuilder). The panel-oriented builders can set standardized borders. PanelBuilder builder = new PanelBuilder(layout); builder.setDefaultDialogBorder(); Step 6: Add ComponentsFinally we add the components. We reuse a CellConstraints object for all cells.
// Obtain a reusable constraints object to place components in the grid.
CellConstraints cc = new CellConstraints();

// Fill the grid with components; the builder can create
// frequently used components, e.g. separators and labels.

// Add a titled separator to cell (1, 1) that spans 7 columns.
builder.addSeparator("General",   cc.xyw(1,  1, 7));
builder.addLabel("Company",       cc.xy (1,  3));
builder.add(companyField,         cc.xyw(3,  3, 5));
builder.addLabel("Contact",       cc.xy (1,  5));
builder.add(contactField,         cc.xyw(3,  5, 5));

builder.addSeparator("Propeller", cc.xyw(1,  7, 7));
builder.addLabel("PTI [kW]",      cc.xy (1,  9));
builder.add(ptiField,             cc.xy (3,  9));
builder.addLabel("Power [kW]",    cc.xy (5,  9));
builder.add(powerField,           cc.xy (7,  9));
builder.addLabel("R [mm]",        cc.xy (1, 11));
builder.add(radiusField,          cc.xy (3, 11));
builder.addLabel("D [mm]",        cc.xy (5, 11));
builder.add(diameterField,        cc.xy (7, 11));

// The builder holds the layout container that we now return.
return builder.getPanel();
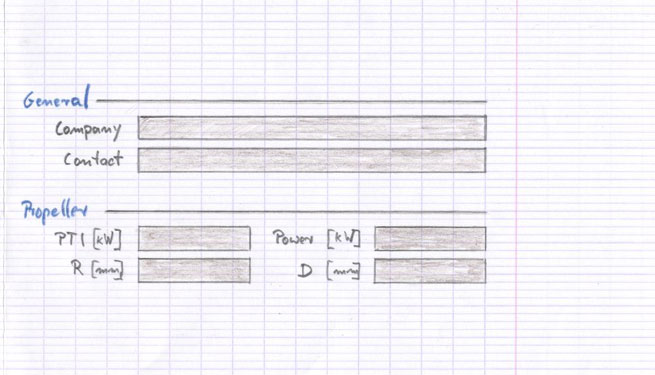
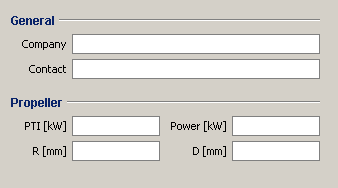 The Finished Panel |
|||||||||||||||||||||||||||||||||||||||