TableLayout TableLayout

Java Technology Home Page
Downloads, APIs, Documentation
Java Developer Connection
Docs, Tutorials, Tech Articles, Training
Online Support
Community Discussion
News & Events from Everywhere
Products from Everywhere
How Java Technology is Used Worldwide


TSC Contents
Front Page
Article Index

Related Links
JFC Home
Download J2SE
J2SE 1.4 Release
Notes for Swing
Java Tutorial
Java Web Start
Swing Sightings

Sign up for email
notification


 Article Table of Contents 
    
 Introduction 
  What is TableLayout? 
  Creating a TableLayout 
    
 Column and Row Sizes 
  Absolute and Scalable Space 
  Order of Allocation 
  Rounding Considerations 
    
 Cells 
  Adding Components 
  Justification 
  Multiple Cells 
    
 Final Theory 
  Dynamic Rows and Columns 
  Preferred Layout Size 
  Onward 
    
 Examples 
  Simple 
  GridLayout Comparison 
 GridBagLayout Comparison 
  A Typical GUI 
  Preferred Rows and Columns 
  TableLayoutConstraints 
  A RAD Tool 
    
 API Reference 
 Download 
Help pagesA-Z Index

The Source for Java Technology


GridBagLayout Versus TableLayout

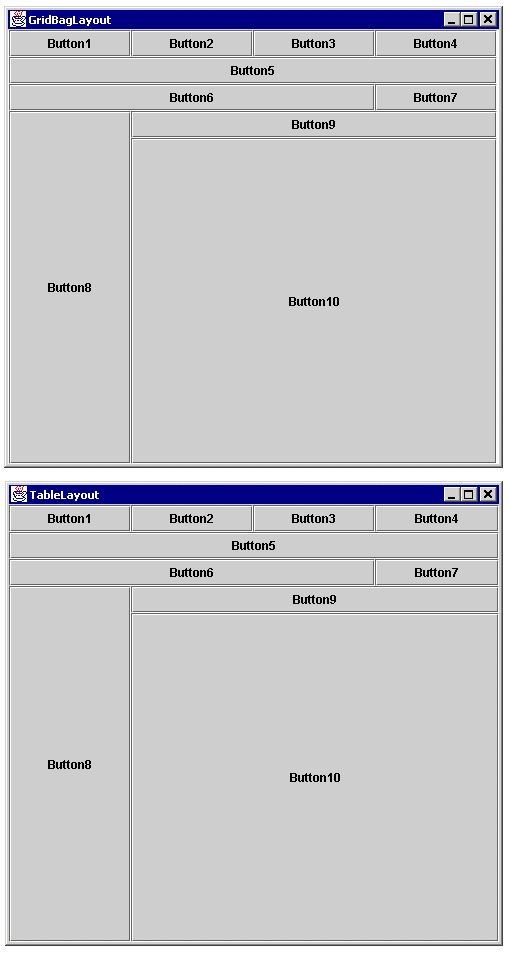
The following example shows that while GridBagLayout and TableLayout offer similar functionality, the TableLayout is easier to use.

package example;


import java.awt.*;
import java.awt.event.*;
import javax.swing.JButton;
import layout.TableLayout;


public class GridBagVersusTable
{


    protected static void makeButton
        (Frame frame, String name, GridBagLayout gridbag, GridBagConstraints c)
    {
        JButton button = new JButton(name);
        gridbag.setConstraints(button, c);
        frame.add(button);
    }


    protected static Frame showGridBagWindow ()
    {
        // Create layout and contraints object
        GridBagLayout gridbag = new GridBagLayout();
        GridBagConstraints c = new GridBagConstraints();
 
        // Create frame
        Frame frame = new Frame("GridBagLayout");
        frame.setFont (new Font("Helvetica", Font.PLAIN, 14));
        frame.setLayout (gridbag);
   
        // Create buttons, add buttons, and apply constraints
        c.fill = GridBagConstraints.BOTH;
        c.weightx = 1.0;
        makeButton (frame, "Button1", gridbag, c);
        makeButton (frame, "Button2", gridbag, c);
        makeButton (frame, "Button3", gridbag, c);

        c.gridwidth = GridBagConstraints.REMAINDER;  //end of row
        makeButton (frame, "Button4", gridbag, c);

        c.weightx = 0.0;                             //reset to the default
        makeButton (frame, "Button5", gridbag, c);   //another row

        c.gridwidth = GridBagConstraints.RELATIVE;   //next-to-last in row
        makeButton (frame, "Button6", gridbag, c);

        c.gridwidth = GridBagConstraints.REMAINDER;  //end of row
        makeButton (frame, "Button7", gridbag, c);

        c.gridwidth = 1;                            //reset to the default
        c.gridheight = 2;
        c.weighty = 1.0;
        makeButton (frame, "Button8", gridbag, c);

        c.weighty = 0.0;                            //reset to the default
        c.gridwidth = GridBagConstraints.REMAINDER; //end of row
        c.gridheight = 1;                           //reset to the default
        makeButton (frame, "Button9", gridbag, c);
        makeButton (frame, "Button10", gridbag, c);

        // Show frame
        frame.pack();
        frame.setLocation (0, 10);
        frame.show();

        return frame;
    }


    protected static Frame showTableWindow ()
    {
        // Create frame
        Frame frame = new Frame("TableLayout");
        frame.setFont(new Font("Helvetica", Font.PLAIN, 14));
        
        // Set layout
        double f = TableLayout.FILL;
        double p = TableLayout.PREFERRED;
        double size[][] = {{f, f, f, f}, {p, p, p, p, f}};
             
        TableLayout layout = new TableLayout(size);
        frame.setLayout (layout);
        
        // Create buttons labeled Button1 to Button10
        int numButton = 10;
        JButton button[] = new JButton[numButton + 1];
        
        for (int i = 1; i <= numButton; i++)
            button[i] = new JButton("Button" + i);
        
        // Add buttons
        frame.add (button[1], "0, 0");
        frame.add (button[2], "1, 0");
        frame.add (button[3], "2, 0");
        frame.add (button[4], "3, 0");
        frame.add (button[5], "0, 1, 3, 1");
        frame.add (button[6], "0, 2, 2, 2");
        frame.add (button[7], "3, 2, 3, 2");
        frame.add (button[8], "0, 3, 0, 4");
        frame.add (button[9], "1, 3, 3, 3");
        frame.add (button[10], "1, 4, 3, 4");

        // Show frame
        frame.pack();
        frame.setLocation (400, 10);
        frame.show();

        return frame;
    }


    public static void main (String args[])
    {
        WindowListener listener =
            (new WindowAdapter()
                {
                    public void windowClosing (WindowEvent e)
                    {
                        System.exit (0);
                    }
                }
            );

        Frame frame = showGridBagWindow();
        frame.addWindowListener (listener);
        
        frame = showTableWindow();
        frame.addWindowListener (listener);
    }
}
                

The first illustration shows the two frames immediately after they are created. The frames are identical except for their titles. The two frames behave nearly identically, though two exceptions are noted below. The code that creates the TableLayout is smaller and conceptually simpler. This is because the constraints used with GridBagLayout affect what the other constraints mean. The code for the GridBagLayout, taken from a well-known Sun example, requires constructing different kinds of restraints depending on which cell is being used. The rightmost cell of each row uses REMAINDER and the others use RELATIVE. This requires the user to think about one component in terms of the other components. The components are not constrained independently. Furthermore, GridBagLayout requires that the user thinks of the y-axis as being different from the x-axis. Axis symmetry is broken, and broken symmetry increases complexity.

The second illustration shows the two frames after being enlarged. The frames are nearly identical. There is one subtle difference. The GridBag frame has a two-pixel wide column of unused space. It might appear to be three pixels wide because the buttons use a white line as their right border, but it's exactly two pixels. This is because of a rounding error. If the TableLayout code were to use 0.25 as the widths of each of the four columns, its frame would suffer the same problem. Since the desire behavior is most likely to constructively use this slack, the TableLayout code uses fill columns. The use of fill columns and rows is a second advantage of TableLayout.

To be fair to GridBagLayout, it is possible to distribute the slack (i.e., extra pixels) among the columns that GridBagLayout implicitly makes by using the weightx and weighty properties of the GridBagConstraints object. It is also possible to justify components within a cell using the anchor property of GridBagConstraint. In fact, everything that can be done with GridBagLayout can be done with TableLayout and vice versa. The advantage of TableLayout is that it is much easier to understand and use.


The second difference between GridBagLayout and TableLayout is illustrated when the frames are made significantly smaller than their preferred sizes (i.e., the size they were made by calling pack). Every layout manager runs into the problem of how to lay out content when there simply isn't enough room to display all of it. Each layout manager handles it differently. FlowLayout lets the last components fall outside the visible area of the container. GridLayout shrinks the components down to 1x1 or even 0x0 pixels. GridBagLayout is a bit more complicated. In our example, it first loses the bottom components and then the top components, favoring the center ones. TableLayout always looses the scalable components first, followed by the bottom-most and right-most absolute components. It's arguable whether or not this difference matters. In either case, it's just the best a layout manager can do with a bad situation.

Both TableLayout and GridBagLayout can be used to layout components in just about any way. The chief difference between the two is the conceptional and code simplicity that TableLayout allows. This simplicity is the result of five factors.

First, the x-axis and y-axis are symmetical. Everything that applies to the horizontal also applies to the vertical and vice versa. With GridBagLayout, rows are terminated when a component with a constraint of GridBagConstaint.REMAINDER is found. So the person adding components is already thinking of the grid as an array of rows rather than a two dimensional array of cells. In TableLayout, the rows and columns are independent and conceptuality separate.

Second, the contraints placed on one component do not affect what constraints need to be placed on another component. With GridbagLayout, the last component in a row needs to be constrained with GridBagConstaint.REMAINDER. If you decide to remove that component, the constraints on the one before it needs to be changed from RELATIVE to REMAINDER. With TableLayout changing one component's constraints never required changing another component's constraints.

Third, it is conceptuality easier to think of a container being partitioned by rows and columns than by a stream of components. Users are familiar with spreadsheets and the TableLayout is similar, although not identical, to the way that spreadsheets work. Rows and columns are first class citizens in TableLayout which makes it easier to get a bird's eye view of the container's partitions.

Fourth, TableLayout uses four justifications that are analogous to paragraph justifications in word processors. These justifications handle both scaling and aligning components whose perferred size is less than that of their cells. So there is no need for two separate concepts like fill and anchor as in GridbagLayout.

Fifth, with TableLayout there is no need to pad each component since padding and borders can be done with empty rows and columns. Since rows and columns can be created explicitly, components can easily be equally padded along both the x and y axis.

Previous | Next