![]()
![]()
![]()
![]()
![]()
![]()
![]()
![]()
![]()
![]() TSC
Contents
TSC
Contents
![]() Front
Page
Front
Page
![]() Article
Index
Article
Index
![]() Related
Links
Related
Links
![]() JFC
Home
JFC
Home
![]() Download
J2SE
Download
J2SE
![]() J2SE
1.4 Release
J2SE
1.4 Release
![]() Notes
for Swing
Notes
for Swing
![]() Java
Tutorial
Java
Tutorial
![]() Java
Web Start
Java
Web Start
![]() Swing
Sightings
Swing
Sightings
![]() Sign
up for email
Sign
up for email
![]() notification
notification
|
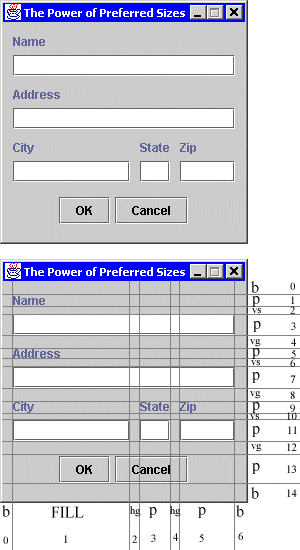
An example of TableLayout using preferred rows and columns.
A simple technique to quickly design a GUI is to use a humble pen and paper. Sketch what you want the GUI to look like, and then use a straight edge to form rows and columns. Make sure to include the gaps between components so that you can easily adjust them. Then number the rows and columns and assign sizes to them based on whether or not you want their components to be resized in the horizontal or vertical direction. Once this is done, the code is easy to construct and will look just like your sketch. |

 This example uses only absolute and preferred columns. If fact the frame itself is not resizable. The
purpose of using TableLayout is several fold. First, no sizes or absolute positions of controls need to
be hard-coded. This makes the code more flexible and allows different fonts and control to be used.
Second, without a RAD tool, it is easier to construct the GUI using TableLayout than by putting in
absolute positions by hand. Third, it is easier to see what is being done in the code than with
hard-coded component bounds. Fourth, the spacing and borders can be adjusted easily. Another reason
is a philosophical issue. Using a layout manager is a more elegant way of putting together a GUI. The
final benefit to using TableLayout even for non-resizble containers is that the preferred size of the
container is figured out for you.