![]()
![]()
![]()
![]()
![]()
![]()
![]()
![]()
![]()
![]() TSC
Contents
TSC
Contents
![]() Front
Page
Front
Page
![]() Article
Index
Article
Index
![]() Related
Links
Related
Links
![]() JFC
Home
JFC
Home
![]() Download
J2SE
Download
J2SE
![]() J2SE
1.4 Release
J2SE
1.4 Release
![]() Notes
for Swing
Notes
for Swing
![]() Java
Tutorial
Java
Tutorial
![]() Java
Web Start
Java
Web Start
![]() Swing
Sightings
Swing
Sightings
![]() Sign
up for email
Sign
up for email
![]() notification
notification
|
A Rapid Application Development Tool
The following example illustrates how to dynamically create, resize, and remove rows and columns from a TableLayout, and how to dynamically retrieve and change the constraints of a component. This example is a simple Rapid Application Development tool that will generate code using TableLayout. The complete source code available in RadTool.java, but for simplicity, we will look at the pertinent individual parts. 
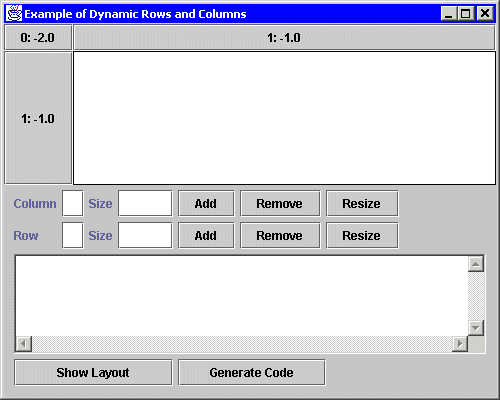
Upon startup, the example looks like this. In the top section of the frame, there is a panel containing
several JButtons labeled "0: -2.0", "1:-1.0", and "1:-1.0". These JButtons mark the columns and rows
that partition the panel. JButtons were used instead of JLabels so that it would be easy to see where
the row and column borders are. The labels of the JButtons refer to the row or column number and the
row or column size. For example, "0: -2.0" means that row 0 has a height of
On startup, there are two rows and two columns. The JButtons in row 0 are the column headers and the JButtons in column 0 are the row headers. As we create, resize, and remove rows and columns, these headers will be adjusted. The panel containing these buttons will simply be referred to as 'the panel'. Below the panel are controls for creating, resizing, and removing rows and columns. The first text field is the row or column number to manipulate. The second text field is a size to use when creating or resizing a row or column. Below those controls is a text area that is used for textual output. Whenever the layout is changed, the current row and column sizes will be shown in this text area. Also, any error messages are also shown in the text area. The "Show Layout" button below the text area is used to show the current layout sizes in the text area. The "Generate Code" button will put fully functional code in the text area for creating a frame that mimics the current state of the panel. Clicking on a white spot in the panel will create a component (a Smiley face) that occupies the cell clicked. Clicking on the Smiley will pop up a dialog box that can be used to adjust the constraints of the Smiley.
Play with the GUI tool to see how it works. As you add rows and columns, you will also see lines separating the rows and columns.
Constructing a GUI
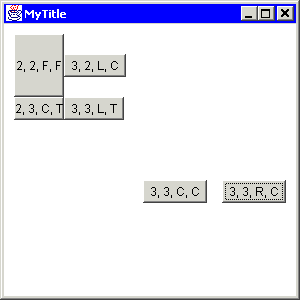
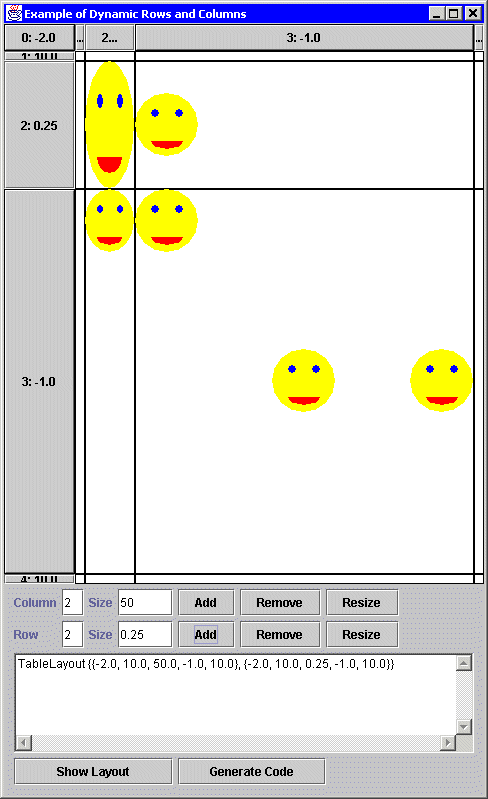
The picture above shows the RAD tool after a couple of rows and columns are inserted and a couple of Smileys are added. The picture below shows the execution of the code generated by the RAD tool. The Smileys are replaced with java.lang.Button objects. Notice that in this example, there are more than one Smiley in cell (3, 3). They don't overlap because of the container size, their preferred sizes, and their justifications. 
The generated code for the above example is given below.
Dynamically Manipulating Rows and Columns
The
The important part of the code is the call to the Final Word
If you want to get more familiar with the nuts and bolts of dynamic layout manipulation, take a look at RadTool.java. If you just want to know how to use the TableLayout APIs, consult the TableLayout documentation. To get more familar with the runtime behavior of TableLayout, play with the RadTool. Adjust the rows and columns, insert some components, and resize the frame to see TableLayout at work. The first layout managers that Java programmers learned were easy to use, but could do very little. Eventually, Java programmers tackle GridBagLayout because they need more functionality and flexibility, but most inevitably go back to using either no layout manager or nested simple layout managers because GridBagLayout is to complicated to use. The next series of layout managers introduced layout managers that were simple and could do more advanced tasks, but they were specialized and designed for specific Swing controls. TableLayout is a general-purpose layout manager that is as easy to use as GridLayout and even more powerful than GridBagLayout with the ability to dynamically add, remove, and resize rows and columns. Best of all, TableLayout is simple and easy to understand. |

